E.3 Architecture Implementation: Passive Inspection Using Exported Session Keys#
AppViewX for Exported Session Key Governance#
This build uses the AppViewX product to manage access to the TLS session keys. While the AppViewX product provides the API for retrieving TLS session keys, in this example implementation, TLS session keys are delivered to and stored in a Redis dictionary-type database in the FastKey JSON file protocol using the TLS session’s Client Random ID as the dictionary key. Since the TLS session Client Random ID is not guaranteed to be unique, the Redis database allows multiple entries per dictionary key, and decryptors would attempt decryption using any available key for that specific Client Random ID.
Instantiation of the AppViewX Virtual Appliances#
To support this use case, two AppViewX products are deployed as virtual appliance machines. The main appviewX virtual appliance was created in vSphere from the vendor-supplied virtual appliance (OVF) file. It is provisioned with 8 vCPUs, 32 GB of memory, 250 GB of storage, and two network interfaces. This appliance is leveraged by the other use cases discussed later in the document.
The second virtual appliance, the Software Security Module, was created in vSphere from a separate OVF file supplied by the vendor. It is provisioned with 1 vCPU, 2 GB of memory, 40 GB of storage, and a single network interface. This appliance is only used for the generation, storage, distribution, and retrieval of the bounded-lifetime Diffie-Hellman key pairs that are used by the TLS servers.
AppViewX Appliance Network Configuration#
Interface |
Network |
IP Address |
Purpose |
|---|---|---|---|
1 |
MANAGEMENT |
192.168.10.15 |
Access to the web-based management console and connectivity to other products. |
2 |
HSMNET |
N/A |
Provides connectivity to the hardware security module. |
AppViewX Software Security Module Appliance Network Configuration#
Interface |
Network |
IP Address |
Purpose |
|---|---|---|---|
1 |
MANAGEMENT |
192.168.10.109 |
Connectivity to other products. |
Additional Modules#
The primary appliance was provisioned with the following modules:
Plugin Name |
Plugin Link |
|---|---|
AppViewX_2020.3.FP11.tar.gz |
|
scripts_2020.3.FP11_27Jul2023.tar.gz |
|
appviewx_addons_2020.3.FP11.tar.gz |
|
AppViewX_2020.3.0_Latest_Plugins_01Sep2023_114616.tar.gz |
https://release.appviewx.com/downLoadPluginAll?version=AppViewX_2020.3.1 |
N/A |
https://release.appviewx.com/downLoadAddons?version=AppViewX_2020.3.1 |
Redis Server Configuration#
The Redis server build started with a standard Ubuntu 20.04.6 LTS virtual machine created with allocations of 2 vCPUs, 16 GB of memory, 50 GB of storage, and 2 network interface cards.
Network Configuration#
Interface |
Network |
Address |
Purpose |
1 |
MANAGEMENT |
192.168.10.150 |
Management access to the server and transfer of session key material to Key Governance Platform. |
Service Details#
Service |
Version |
Containerized |
|---|---|---|
Redis |
7.2.4 |
No |
Notes#
Redis 7.2.4 was built from source for this build, in order to enable the ability to use TLS when connecting to it. To do this, the following command was used:
make BUILD_TLS=yes
The server was assigned the unique hostname redis.visibility.nccoe.org. An associated “A” record for the server’s hostname and IP address was recorded in the lab DNS service. The Redis software was installed using the native “apt” Ubuntu package installer.
First, a PKI certificate and key were created in PEM format using the DigiCert CertCentral service referencing the server’s hostname. The certificate and key were uploaded to the VM and stored in the /home/administrator/redis-baremetal/redis-7.2.4/certs/ directory. Additionally, the DigiCert CertCentral CA certificate in PEM format was uploaded to the same folder. Second, Redis was configured to only listen on the network interface connected to the MANAGEMENT network.
Configuration Files#
Configuration Files |
|---|
The primary usage of redis.conf was to ensure the ability to use TLSv1.3 and to indicate the certificates needed for the TLSv1.3 connection between it and the various products directly inserting keys into it.
Certificates location: /home/administrator/redis-baremetal/redis-7.2.4/certs/
Startup Instructions#
Finally, the Redis service was enabled through the following commands:
service redis restart
Configuration Procedure#
This section describes the configuration of AppViewX to manage access to the Redis dictionary-type database for key providers, (namely the Mira ETO passive decryptor, and the NFR agent installed on the TLSv1.3 configured servers), and key consumers (the decryptors). Authorized via application tokens, the decryptors make calls to the AppViewX RESTAPI, which are forwarded to the Redis database, and the keys matching the requested Client Random ID are returned for decryption.
The figure below shows how to access the workflow library.
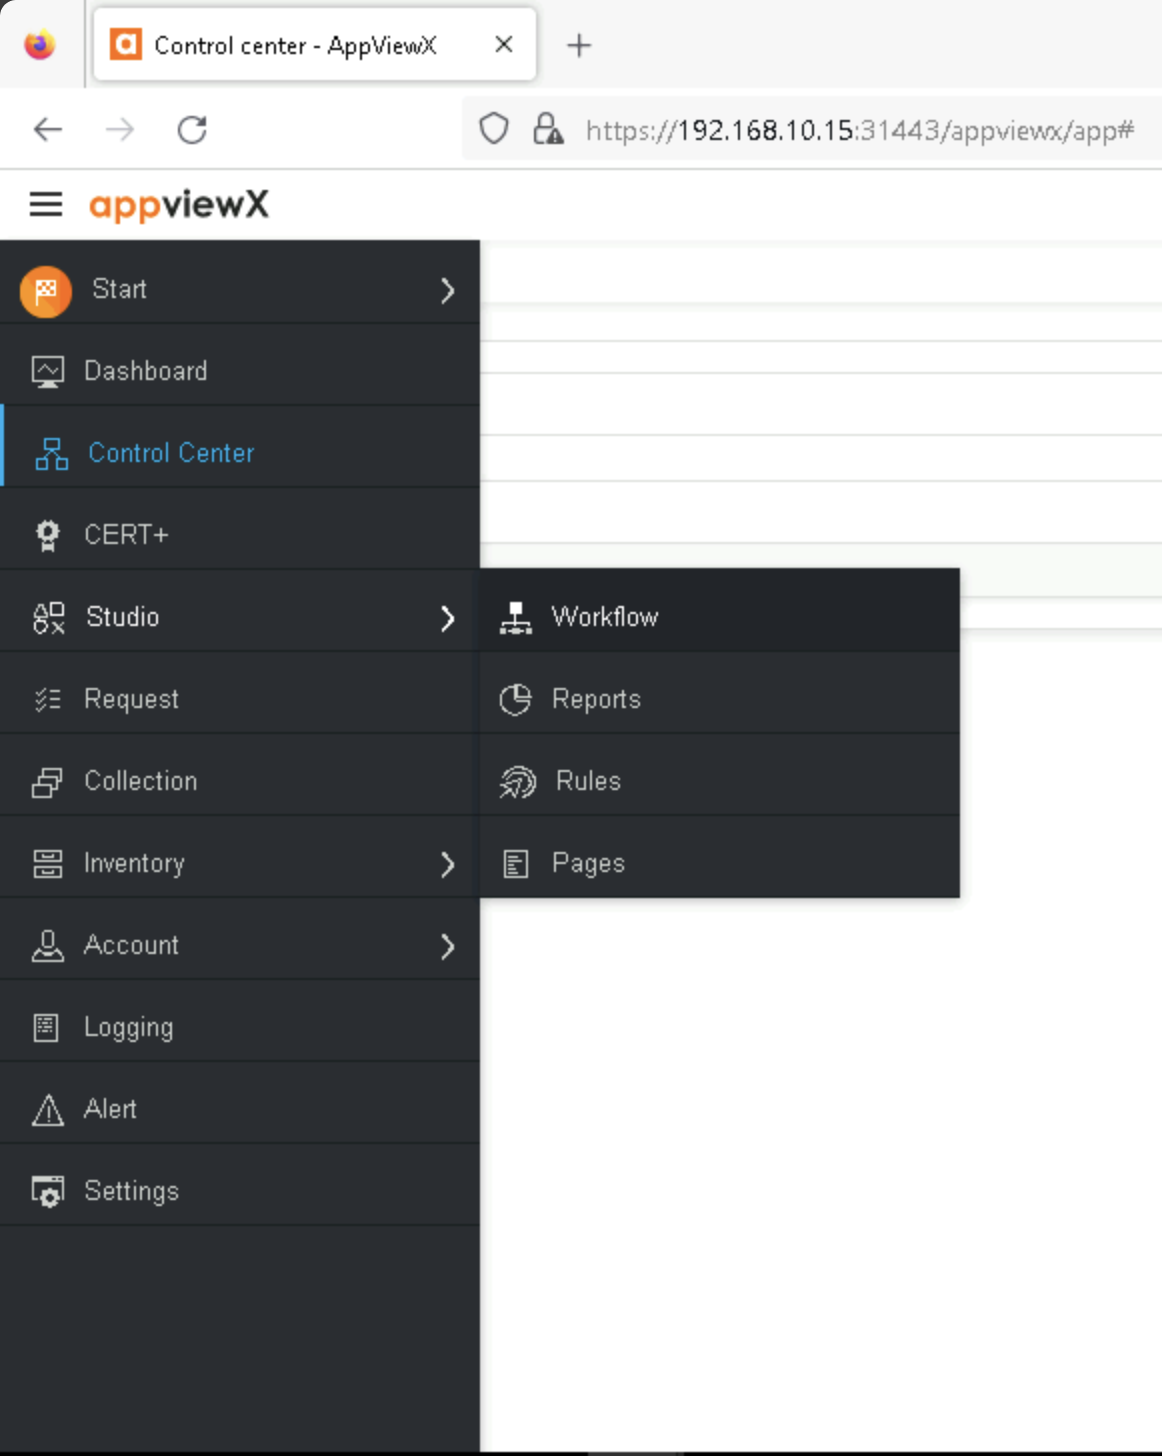
Access to AppViewX Workflows#
The figure below shows shows the contents of the workflow for the Exported Key workflow.
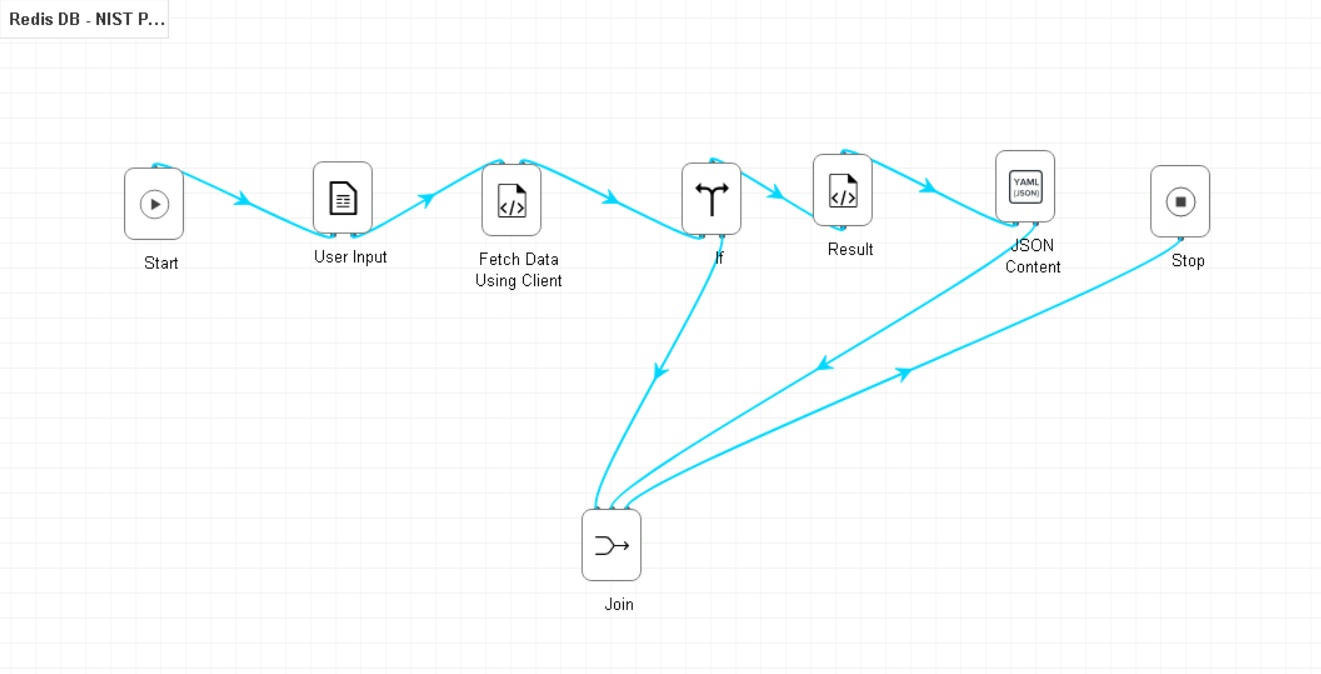
Exported Key Workflow#
Additional Configuration Files#
Relevant Configuration Files |
|---|
workflows/Redis DB - NIST POC/Fetch Data Using Client Random.py |
These files were created as part of the creation of the workflow for this build in AppViewX. This workflow serves the purpose of managing access to the Redis database containing keys indexed by their Client Random ID.
MIRA ETO for Real-time Decryption using Exported Session Keys#
This build uses the MIRA ETO product to passively decrypt TLSv1.3 network traffic leveraging exported TLS session keys. The MIRA ETO product is shared with the EDH keys build, and so the initial configuration and network setup is the same. However, the configuration is slightly different.
Instantiation of the MIRA ETO Virtual Appliance#
The MIRA ETO virtual machine was created in vSphere from the vendor supplied appliance (OVF) file with three network interfaces.
MIRA ETO Passive Decryptor Network Configuration#
Interface |
Network |
IP Address |
Purpose |
|---|---|---|---|
1 |
MANAGEMENT |
192.168.10.8 |
Access to the web-based management console and connectivity to other products. |
2 |
ENCRYPTED |
N/A Layer 2 connection |
Access to the encrypted network data provided by the network tap |
3 |
DECRYPTED |
N/A Layer 2 connection |
Access to the network where decryptors output the decrypted traffic. |
The VM was created with a resource allocation including 8 vCPUs, 16 GB of memory, and 75 GB of storage.
The first interface is configured to connect to the lab MANAGEMENT network and provides access to the MIRA ETO web-based management console. The second and third interfaces are configured to connect to the ENCRYPTED and DECRYPTED networks and act as the source of encrypted traffic and destination for the resulting decrypted traffic streams. The assignment of the ENCRYPTED and DECRYPTED network connections to NICs on the virtual appliance is sensitive to the configuration of the appliance.
Configuration Procedure#
This section describes the configuration of the MIRA ETO passive device to receive Exported Session Keys from the NFR EVA agents on the individual TLSv1.3 servers. In this build, this was configured using a separate server segment, and so this section will simply explain how to enable that segment. In practice it would be possible to perform both of these types of decryptions on the same segment.
To switch between segments, navigate to Policies > Segments, and select the segment relevant to the build, then click Activate. In some scenarios, both segments may not be present, and were only present in this build to enable the ability to demonstrate both Diffie Hellman and Exported Session Key capabilities.
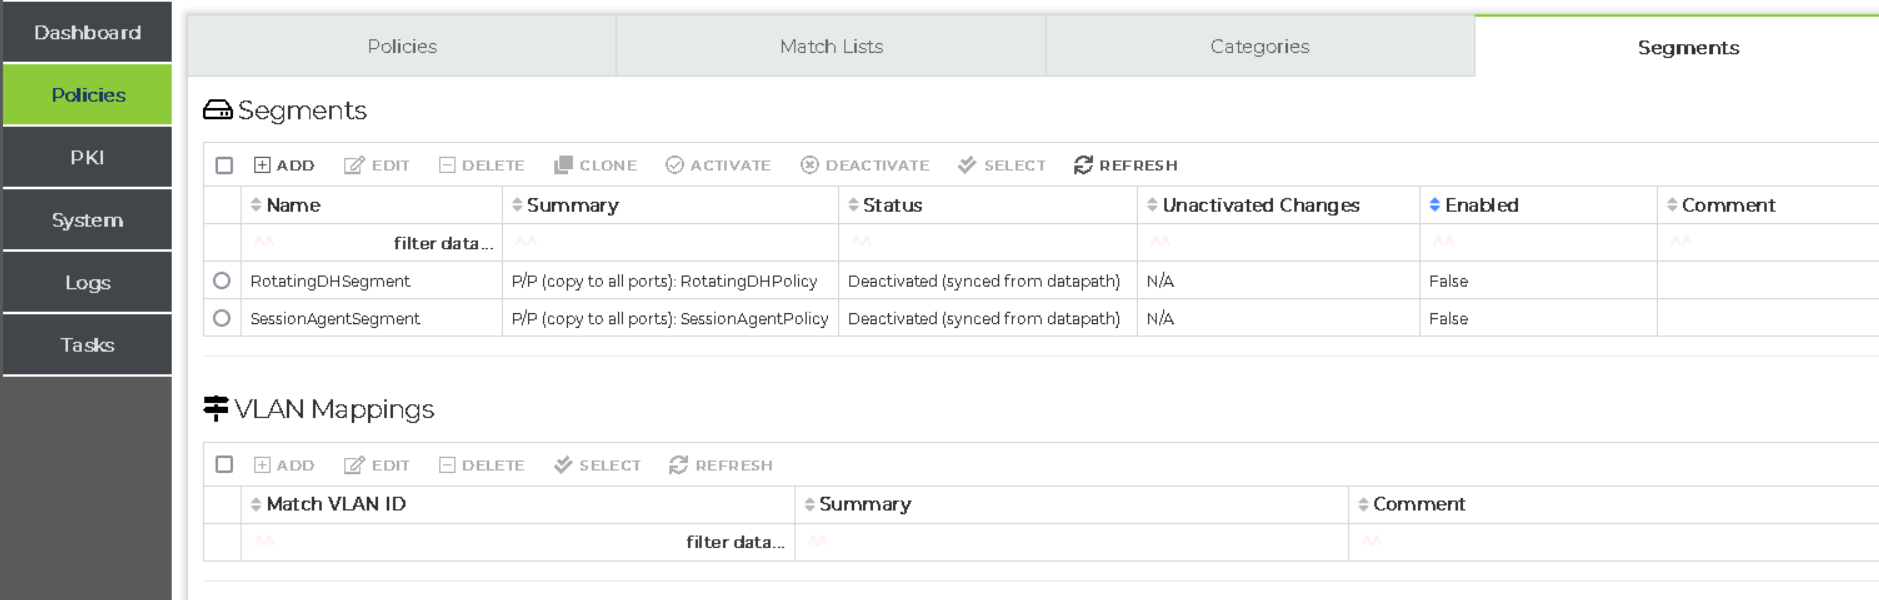
Switching segments between Diffie Hellman and Exported Session Keys.#
Note that the integration for transferring exported session keys both to Mira and to the Redis server is enabled in the key_reporting section of eva.conf on each server.
Additional Configuration Files#
No additional files needed for this build.
Configuring TLS Servers with Not For Radio Using Exported Session Keys#
This build uses the Not For Radio EVA product as the Key Management Agent on each TLS server. The build includes two HTTPS servers, a TLSv1.3-enabled instance of the MariaDB database server, and TLSv1.3-enabled instances of Postfix and Dovecot, for SMTP and IMAP connectivity, respectively. The following sections will provide the details of each of these servers, as well as the EVA agent configurations on each.
Proxy Server Configuration#
The Proxy server build started with a standard Ubuntu 20.04.6 LTS virtual machine created with allocations of 2 vCPUs, 16 GB of memory, 50 GB of storage, and 2 network interface cards.
Network Configuration#
Interface |
Network |
Address |
Purpose |
1 |
MANAGEMENT |
192.168.30.99 |
Management access to the server and transfer of session key material to Key Governance Platform. |
2 |
SERVER |
192.168.10.99 |
Connectivity from TLS clients. |
Service Details#
Service |
Version |
Containerized |
|---|---|---|
Nginx |
1.18.0 |
Yes |
OpenSSL |
1.1.1f |
Yes |
Notes#
The Proxy application server runs within a Docker container, with an Nginx HTTP server acting as a reverse proxy. Docker Community Edition was installed, and the default non-root user was added to the docker OS group.
The server was assigned the unique hostname ek-proxy.visibility.nccoe.org. An associated “A” record for the server’s hostname and IP address was recorded in the lab DNS service. The Proxy software was installed using the native “apt” Ubuntu package installer.
First, a PKI certificate and key were created in PEM format using the DigiCert CertCentral service referencing the server’s hostname. The certificate and key were uploaded to the VM and stored in the /home/administrator/certs directory. Additionally, the DigiCert CertCentral CA certificate in PEM format was uploaded to the same folder. Second, Proxy was configured to only listen on the network interface connected to the SERVER network.
Configuration Files#
Nginx is configured to listen for incoming TLSv1.3 connections on the SERVER network. The Nginx reverse proxy is secured with an SSL certificate issued through DigiCert. The docker files are primarily for ensuring that the service is running and using the correct certificates.
eva-openssl.cnfcontains config lines which are included inopenssl.cnf. It details which services should use the EVA agent to retrieve keys from AppViewX and use them in the workflow.eva.confcontains details on how to retrieve these keys.override.confcontains instructions for the system to ensure that the EVA agent is running prior to the affected service.
Certificates location: /home/administrator/certs
Startup Instructions#
Finally, the Proxy service was enabled through the following commands:
service nginx start
TestApp Server Configuration#
The TestApp server build started with a standard Ubuntu 20.04.6 LTS virtual machine created with allocations of 2 vCPUs, 16 GB of memory, 50 GB of storage, and 2 network interface cards.
Network Configuration#
Interface |
Network |
Address |
Purpose |
1 |
MANAGEMENT |
192.168.30.21 |
Management access to the server and transfer of session key material to Key Governance Platform. |
2 |
SERVER |
192.168.10.51 |
Connectivity from TLS clients. |
Service Details#
Service |
Version |
Containerized |
|---|---|---|
Nginx |
1.18.0 |
Yes |
TestApp |
N/A |
Yes |
OpenSSL |
1.1.1f |
Yes |
Notes#
The web application server consists of an Nginx reverse proxy in front of a Python Flask application running in a Docker container. Docker Community Edition was installed, and the default non-root user was added to the docker OS group.
The server was assigned the unique hostname ek-testapp.visibility.nccoe.org. An associated “A” record for the server’s hostname and IP address was recorded in the lab DNS service. The TestApp software was installed using the native “apt” Ubuntu package installer.
First, a PKI certificate and key were created in PEM format using the DigiCert CertCentral service referencing the server’s hostname. The certificate and key were uploaded to the VM and stored in the /home/administrator/certs directory. Additionally, the DigiCert CertCentral CA certificate in PEM format was uploaded to the same folder. Second, TestApp was configured to only listen on the network interface connected to the SERVER network.
Configuration Files#
Nginx is configured to listen for incoming TLSv1.3 connections on the SERVER network. The Nginx reverse proxy is secured with an SSL certificate issued through DigiCert. The docker files are primarily for ensuring that the service is running and using the correct certificates.
eva-openssl.cnfcontains config lines which are included inopenssl.cnf. It details which services should use the EVA agent to retrieve keys from AppViewX and use them in the workflow.eva.confcontains details on how to retrieve these keys.override.confcontains instructions for the system to ensure that the EVA agent is running prior to the affected service.
The Nginx container manages access to a small python application which acts as a web server. The docker files are primarily for ensuring that the service is running.
Certificates location: /home/administrator/certs
Startup Instructions#
Finally, the TestApp service was enabled through the following commands:
docker compose up -d
Mail Server Configuration#
The Mail server build started with a standard Ubuntu 20.04.6 LTS virtual machine created with allocations of 2 vCPUs, 16 GB of memory, 50 GB of storage, and 2 network interface cards.
Network Configuration#
Interface |
Network |
Address |
Purpose |
1 |
MANAGEMENT |
192.168.30.8 |
Management access to the server and transfer of session key material to Key Governance Platform. |
2 |
SERVER |
192.168.10.21 |
Connectivity from TLS clients. |
Service Details#
Service |
Version |
Containerized |
|---|---|---|
Postfix |
3.4.13 |
Yes |
Dovecot |
1:2.3.7.2 |
Yes |
OpenSSL |
1.1.1f |
Yes |
Notes#
The Mail application server consists of a Postfix service and Dovecot service providing SMTP and IMAP capabilities, running in a Docker container. Docker Community Edition was installed, and the default non-root user was added to the docker OS group.
The server was assigned the unique hostname ek-mail.visibility.nccoe.org. An associated “A” record for the server’s hostname and IP address was recorded in the lab DNS service. The Mail software was installed using the native “apt” Ubuntu package installer.
First, a PKI certificate and key were created in PEM format using the DigiCert CertCentral service referencing the server’s hostname. The certificate and key were uploaded to the VM and stored in the /home/tlsadmin/certs directory. Additionally, the DigiCert CertCentral CA certificate in PEM format was uploaded to the same folder. Second, Mail was configured to only listen on the network interface connected to the SERVER network.
Configuration Files#
Configuration Files |
|---|
/home/tlsadmin/build-mail-container-image/nfr/conf/eva-openssl.cnf |
/home/tlsadmin/build-mail-container-image/nfr/syslog-eva.conf |
Postfix is configured to listen for incoming TLSv1.3 connections on the SERVER network. The Postfix server is secured with an SSL certificate issued through DigiCert. The docker files are primarily for ensuring the service is running and using the correct certificates.
eva-openssl.cnfcontains config lines which are included inopenssl.cnf. It details which services should use the EVA agent to retrieve keys from AppViewX and use them in the workflow.eva.confcontains details on how to retrieve these keys.override.confcontains instructions for the system to ensure that the EVA agent is running prior to the affected service.
In addition to the configs listed, it was also necessary to create MX records in the DNS for each mail server present in the build, to ensure that the external mail server could communicate with them. In this case, the following was added to DNS Resolver > General Settings > Custom options ... in the PFSense firewall:
local-data: "ek-mail.visibility.nccoe.org. IN MX 10 ek-mail.visibility.nccoe.org"
Certificates location: /home/tlsadmin/certs
Startup Instructions#
Finally, the Mail service was enabled through the following commands:
docker compose up -d
Keycloak Server Configuration#
The Keycloak server build started with a standard Ubuntu 20.04.6 LTS virtual machine created with allocations of 2 vCPUs, 16 GB of memory, 50 GB of storage, and 2 network interface cards.
Network Configuration#
Interface |
Network |
Address |
Purpose |
1 |
MANAGEMENT |
192.168.30.11 |
Management access to the server and transfer of session key material to Key Governance Platform. |
2 |
SERVER |
192.168.10.11 |
Connectivity from TLS clients. |
Service Details#
Service |
Version |
Containerized |
|---|---|---|
Nginx |
1.18.0 |
Yes |
Keycloak |
20 |
Yes |
OpenSSL |
1.1.1f |
Yes |
Notes#
The Keycloak application server runs within a Docker container, with an Nginx HTTP server acting as a reverse proxy. Docker Community Edition was installed, and the default non-root user was added to the docker OS group.
The server was assigned the unique hostname ek-keycloak.visibility.nccoe.org. An associated “A” record for the server’s hostname and IP address was recorded in the lab DNS service. The Keycloak software was installed using the native “apt” Ubuntu package installer.
First, a PKI certificate and key were created in PEM format using the DigiCert CertCentral service referencing the server’s hostname. The certificate and key were uploaded to the VM and stored in the /home/administrator/certs directory. Additionally, the DigiCert CertCentral CA certificate in PEM format was uploaded to the same folder. Second, Keycloak was configured to only listen on the network interface connected to the SERVER network.
Configuration Files#
Nginx is configured to listen for incoming TLSv1.3 connections on the SERVER network. The Nginx reverse proxy is secured with an SSL certificate issued through DigiCert. The docker files are primarily for ensuring that the service is running and using the correct certificates.
eva-openssl.cnfcontains config lines which are included inopenssl.cnf. It details which services should use the EVA agent to retrieve keys from AppViewX and use them in the workflow.eva.confcontains details on how to retrieve these keys.override.confcontains instructions for the system to ensure that the EVA agent is running prior to the affected service.
Once operational, Keycloak was configured with a new realm named “CORP”. Within this realm, a user named “testuser” was provisioned. Additionally, an OpenID Connect Client entry was created to allow authentication for a simple Python test application, as described in the Web Application Server Configuration. The docker files are primarily for ensuring that the service is running.
Certificates location: /home/administrator/certs
Startup Instructions#
Finally, the Keycloak service was enabled through the following commands:
docker compose up -d
MariaDB Server Configuration#
The MariaDB server build started with a standard Ubuntu 20.04.6 LTS virtual machine created with allocations of 2 vCPUs, 16 GB of memory, 50 GB of storage, and 2 network interface cards.
Network Configuration#
Interface |
Network |
Address |
Purpose |
1 |
MANAGEMENT |
192.168.30.7 |
Management access to the server and transfer of session key material to Key Governance Platform. |
2 |
SERVER |
192.168.10.20 |
Connectivity from TLS clients. |
Service Details#
Service |
Version |
Containerized |
|---|---|---|
MariaDB |
11.0.6 |
No |
OpenSSL |
1.1.1f |
Yes |
Notes#
As none of the currently available MariaDB container images on DockerHub used a version of OpenSSL supported by the Nubeva agent, the MariaDB 11.0.2 software was installed directly on the host VM.
The server was assigned the unique hostname ek-mariadb.visibility.nccoe.org. An associated “A” record for the server’s hostname and IP address was recorded in the lab DNS service. The MariaDB software was installed using the native “apt” Ubuntu package installer.
First, a PKI certificate and key were created in PEM format using the DigiCert CertCentral service referencing the server’s hostname. The certificate and key were uploaded to the VM and stored in the /etc/mysql/certs directory. Additionally, the DigiCert CertCentral CA certificate in PEM format was uploaded to the same folder. Second, MariaDB was configured to only listen on the network interface connected to the SERVER network.
Configuration Files#
Configuration Files |
|---|
Nginx is configured to listen for incoming TLSv1.3 connections on the SERVER network. The Nginx reverse proxy is secured with an SSL certificate issued through DigiCert. The docker files are primarily for ensuring that the service is running and using the correct certificates.
eva-openssl.cnfcontains config lines which are included inopenssl.cnf. It details which services should use the EVA agent to retrieve keys from AppViewX and use them in the workflow.eva.confcontains details on how to retrieve these keys.override.confcontains instructions for the system to ensure that the EVA agent is running prior to the affected service.
Once operational, Keycloak was configured with a new realm named “CORP”. Within this realm, a user named “testuser” was provisioned. Additionally, an OpenID Connect Client entry was created to allow authentication for a simple Python test application, as described in the Web Application Server Configuration. The docker files are primarily for ensuring that the service is running.
Certificates location: /etc/mysql/certs
Startup Instructions#
Finally, the MariaDB service was enabled through the following commands:
systemctl status enable mariadb
Configuration Procedure#
See configuration of individual TLS servers.
Note that the integration for transferring exported session keys both to Mira and to the Redis server is enabled in the key_reporting section of eva.conf on each server.
Additional Configuration Files#
See configuration of individual TLS servers.