Demos#
This page provides instructions for running ARIAC demo scenarios to help you get familiar with the competition environment. The demos can be run either through the ARIAC App or directly from the terminal.
Note
Before running any demos, ensure you have followed the setup instructions on the startup page.
Running with the App#
The ARIAC App provides an interface for configuring and running trials.
Configuration#
The home page of the ARIAC App is where you configure all the settings needed for a competition run. This configuration page allows you to set up trials, team parameters, database storage, and testing options before starting a run:
Setting |
Description |
|---|---|
Trial Config |
Defines the competition scenario and tasks |
Team Config |
Specifies robot configurations and team settings |
Database |
SQLite database for storing results and scoring |
Cheats |
Testing shortcuts to start at different competition stages |
Trial Configuration#
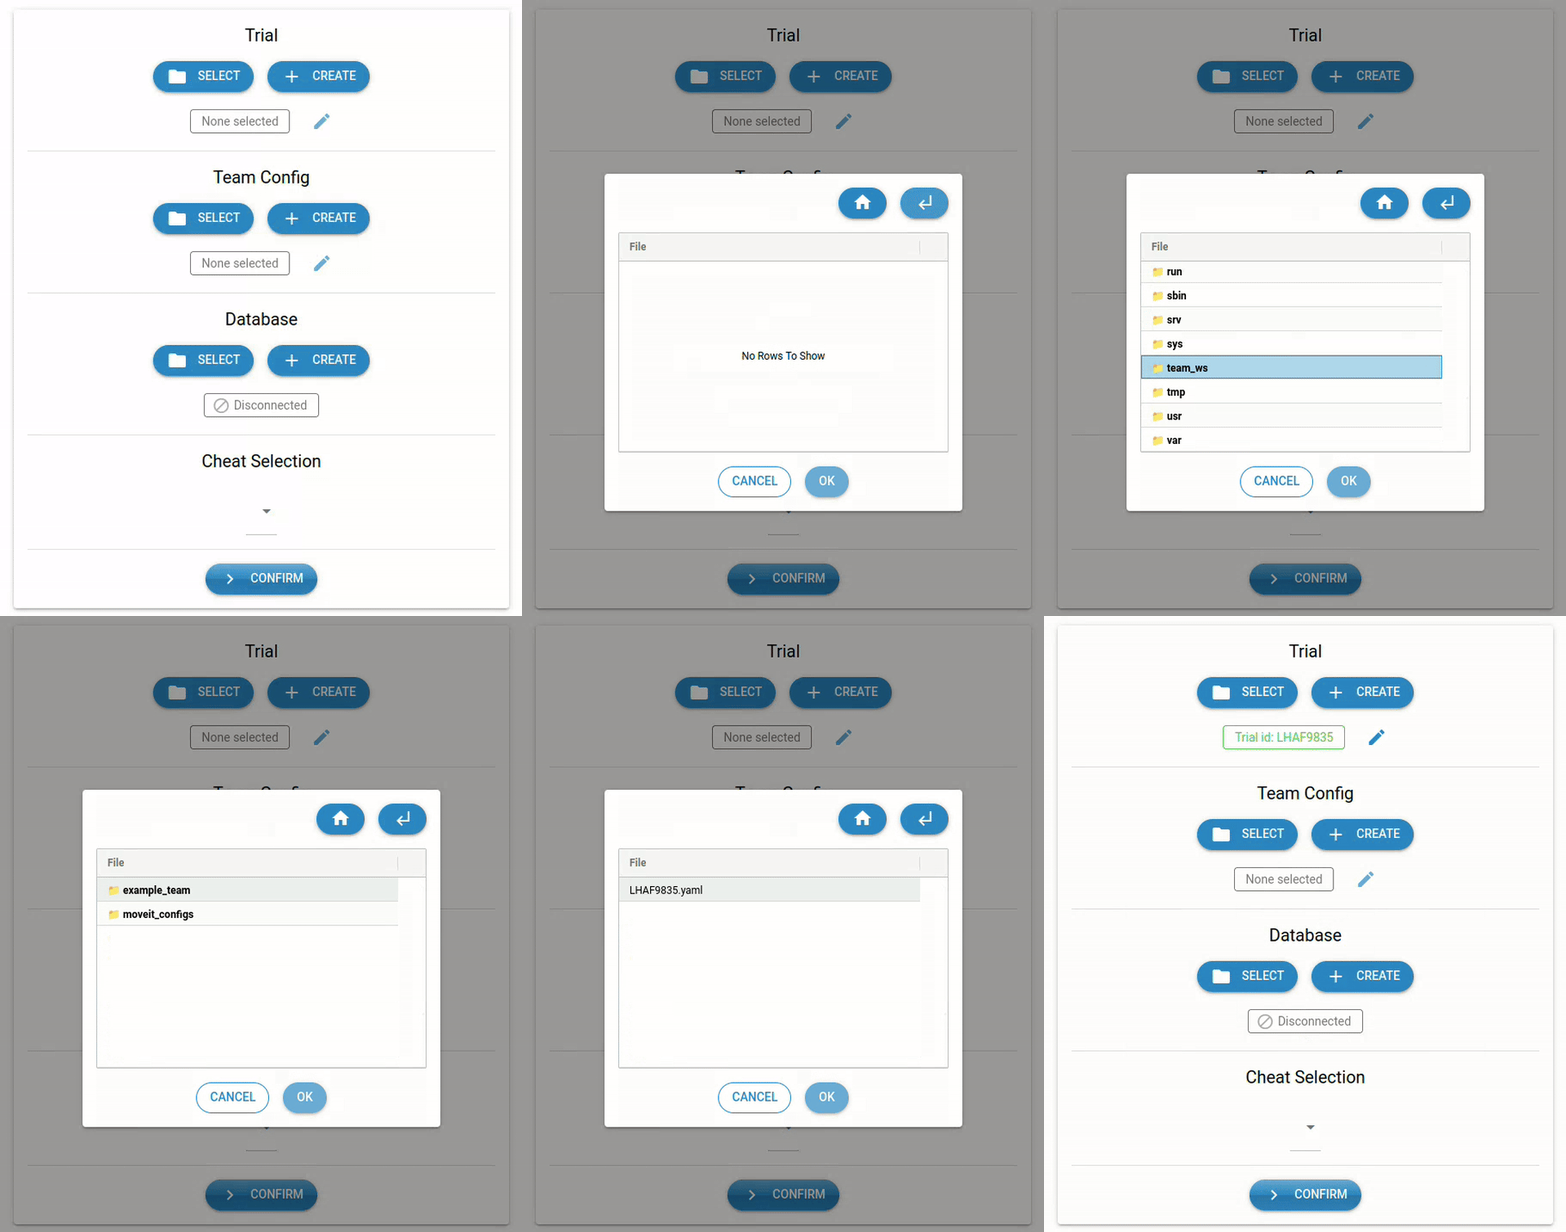
The trial config defines the competition scenario. For demos, use the pregenerated config file:
Steps:
Click the “Select” button in the Trial section
Navigate to the trial config file using the dialog
Use the arrow button (top right) to go up directories if needed
Select the appropriate file based on your setup (see table below)
Setup Type |
File Path |
|---|---|
Docker |
|
Local |
|
Team Configuration#
The team config specifies robot settings and team parameters:

Steps:
Click the “Select” button in the Team Config section
Navigate to the team config file using the dialog
Use the arrow button (top right) to go up directories if needed
Select the appropriate file based on your setup (see table below)
Setup Type |
File Path |
|---|---|
Docker |
|
Local |
|
Database Setup#
The ARIAC database stores scoring information and results. While optional for running the environment, it’s required for viewing demo results.
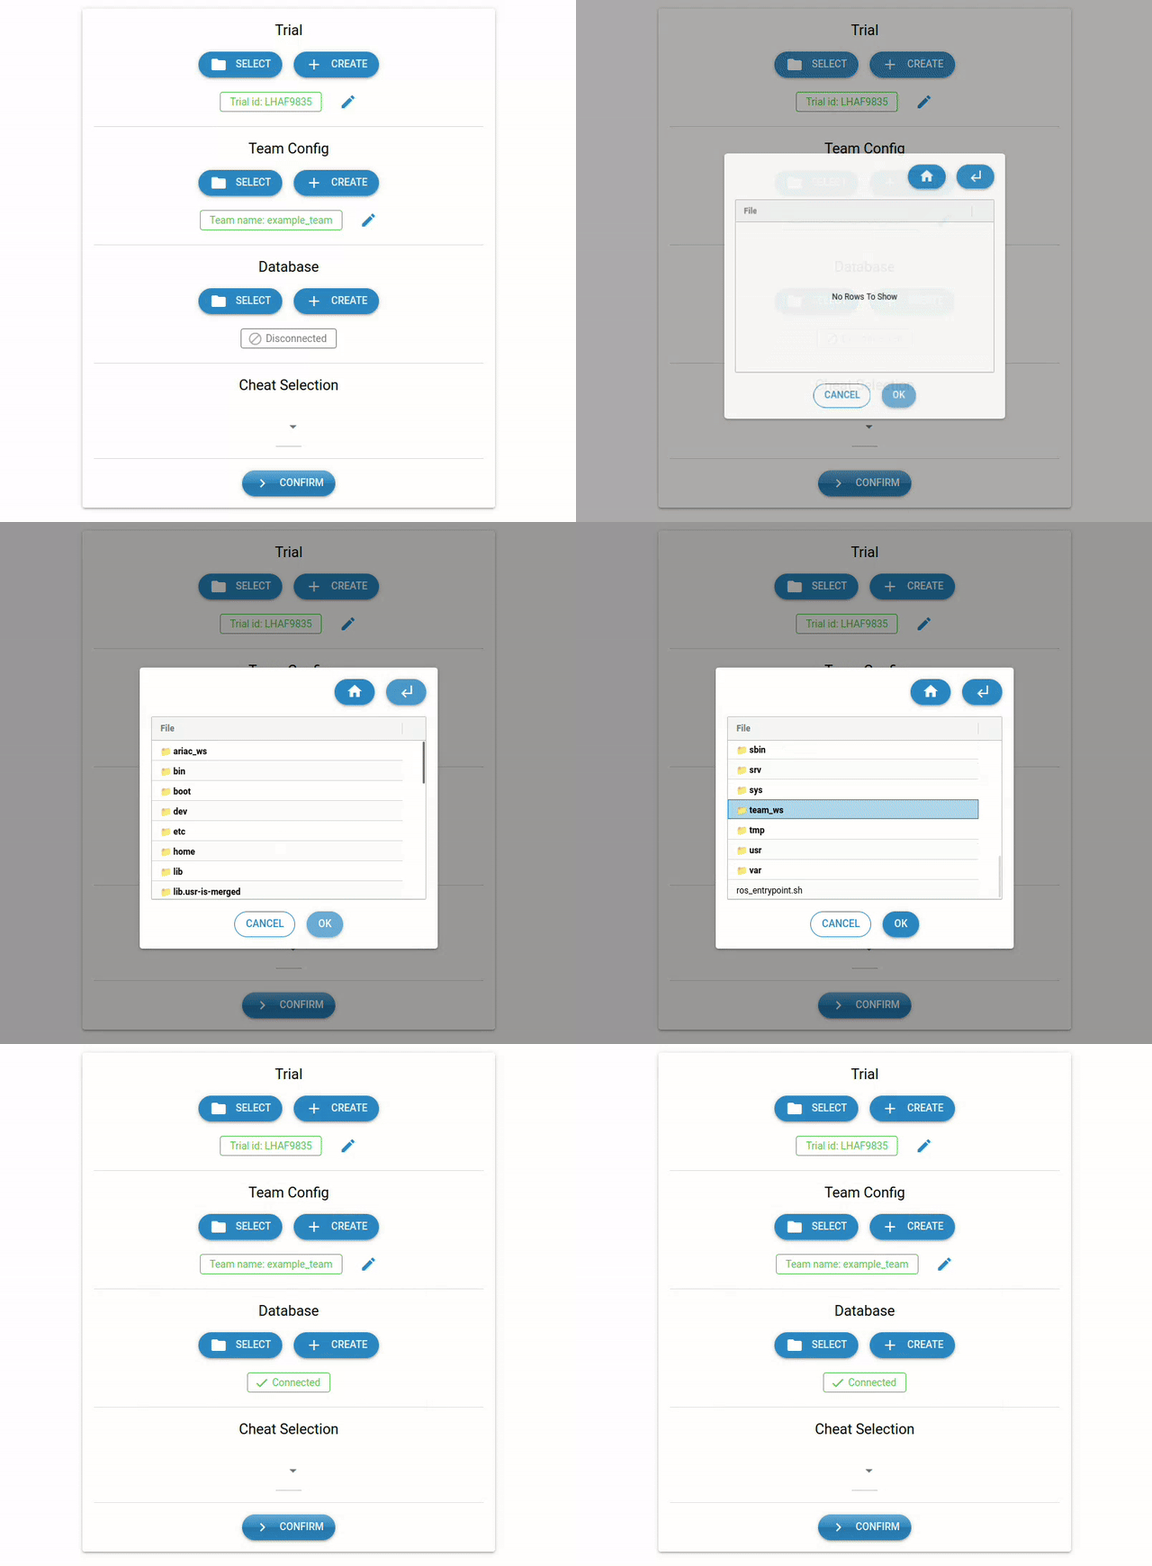
Steps to create a database:
Click the “Create” button in the Database section
Navigate to your desired parent directory using the file dialog
Select the target directory where you want to save the database
Click “OK” to create the database
Note
The database location doesn’t affect functionality - choose any convenient location.
Cheats#
For testing purposes, cheats have been included to start the environment at different stages of the competition:
Number |
Cheat Option |
Description |
|---|---|---|
1 |
Cells in voltage testers |
Pre-places cells in voltage testing stations |
2 |
Kit on AGV |
Places a complete kit on AGV1 |
3 |
Kits on AGVs |
Places kits on multiple AGVs |
4 |
High priority kit |
Creates a high-priority kit scenario |
5 |
Partial module |
Starts with partially assembled modules |
6 |
Module |
Provides complete modules |
7 |
Flipped module |
Creates flipped module scenarios |
8 |
Module with welds |
Includes welded module scenarios |
Running the Demos#
Dummy Inspection Demo#
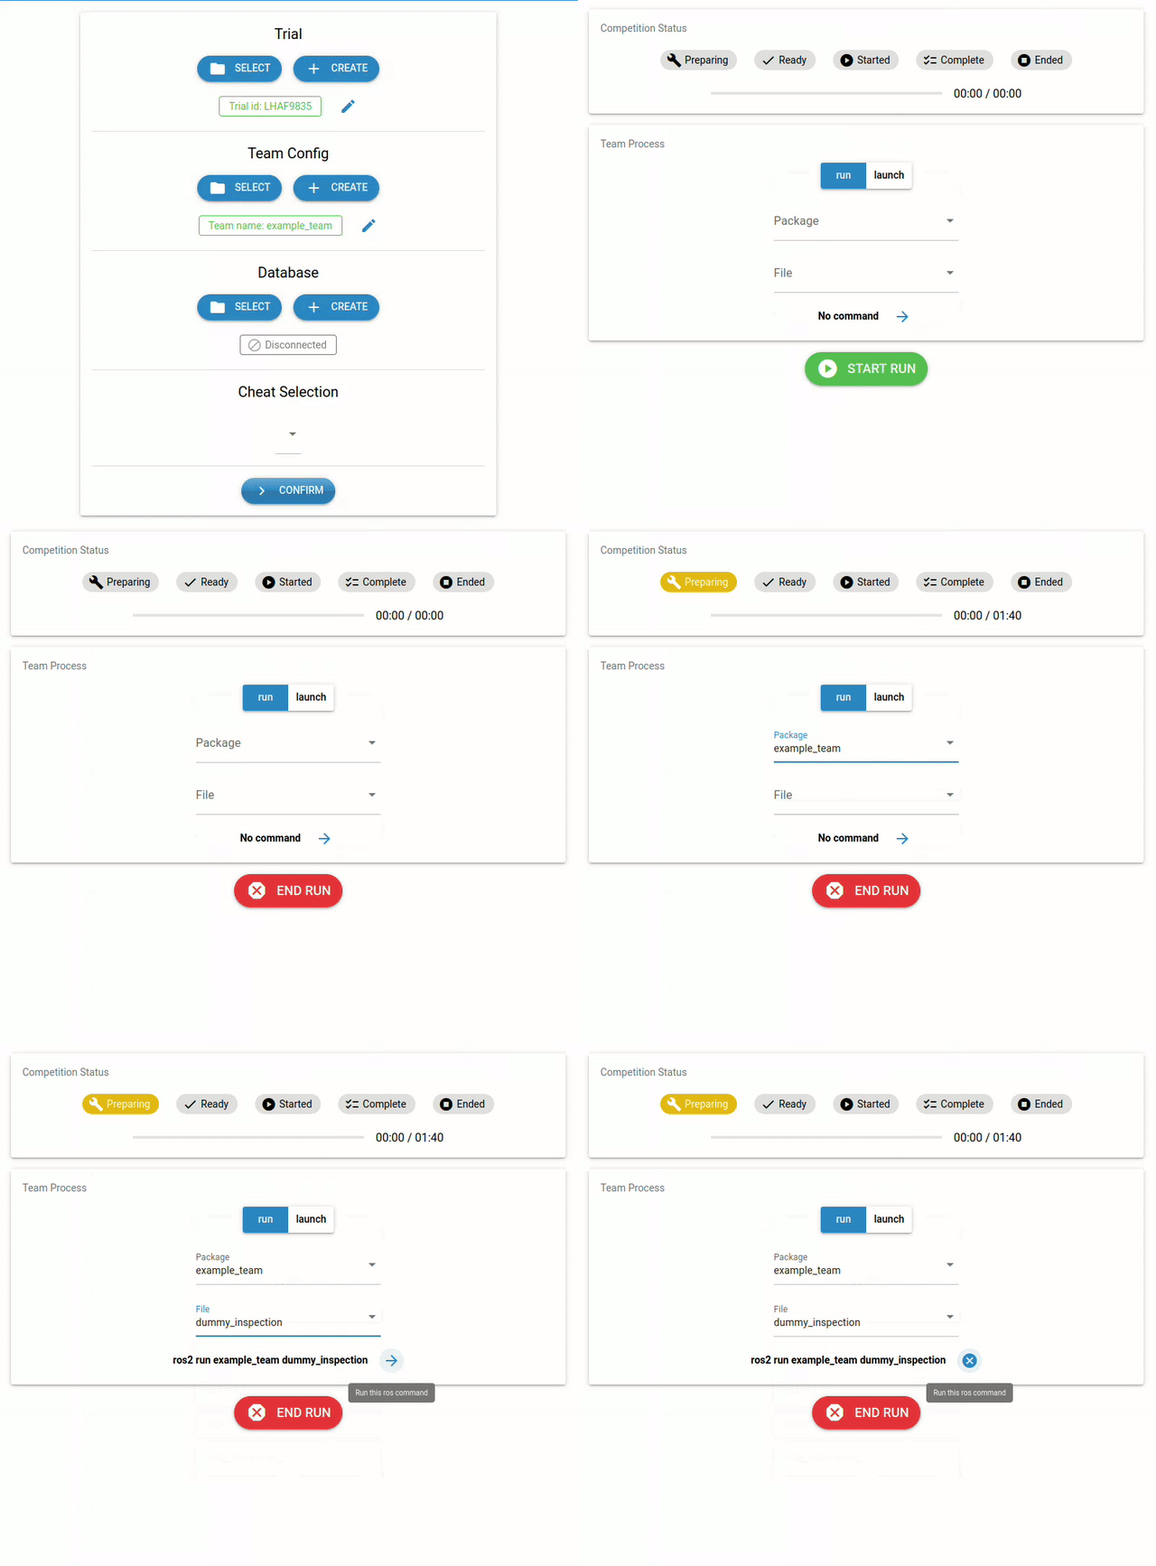
Overview: Demonstrates inspection conveyor control and sensor-based reporting by controlling the cell feed on the inspection conveyor and submitting dummy inspection reports using break-beam sensor data.
Steps to run:
Configure trial and team configs (see sections above)
No cheat selection required
Click “Confirm” to open the run page
Press the green “START RUN” button
In the “Team Process” section:
Package dropdown: Select “example_team”
File dropdown: Select “dummy_inspection”
Press the arrow button next to the generated command
Move Robots Demo#
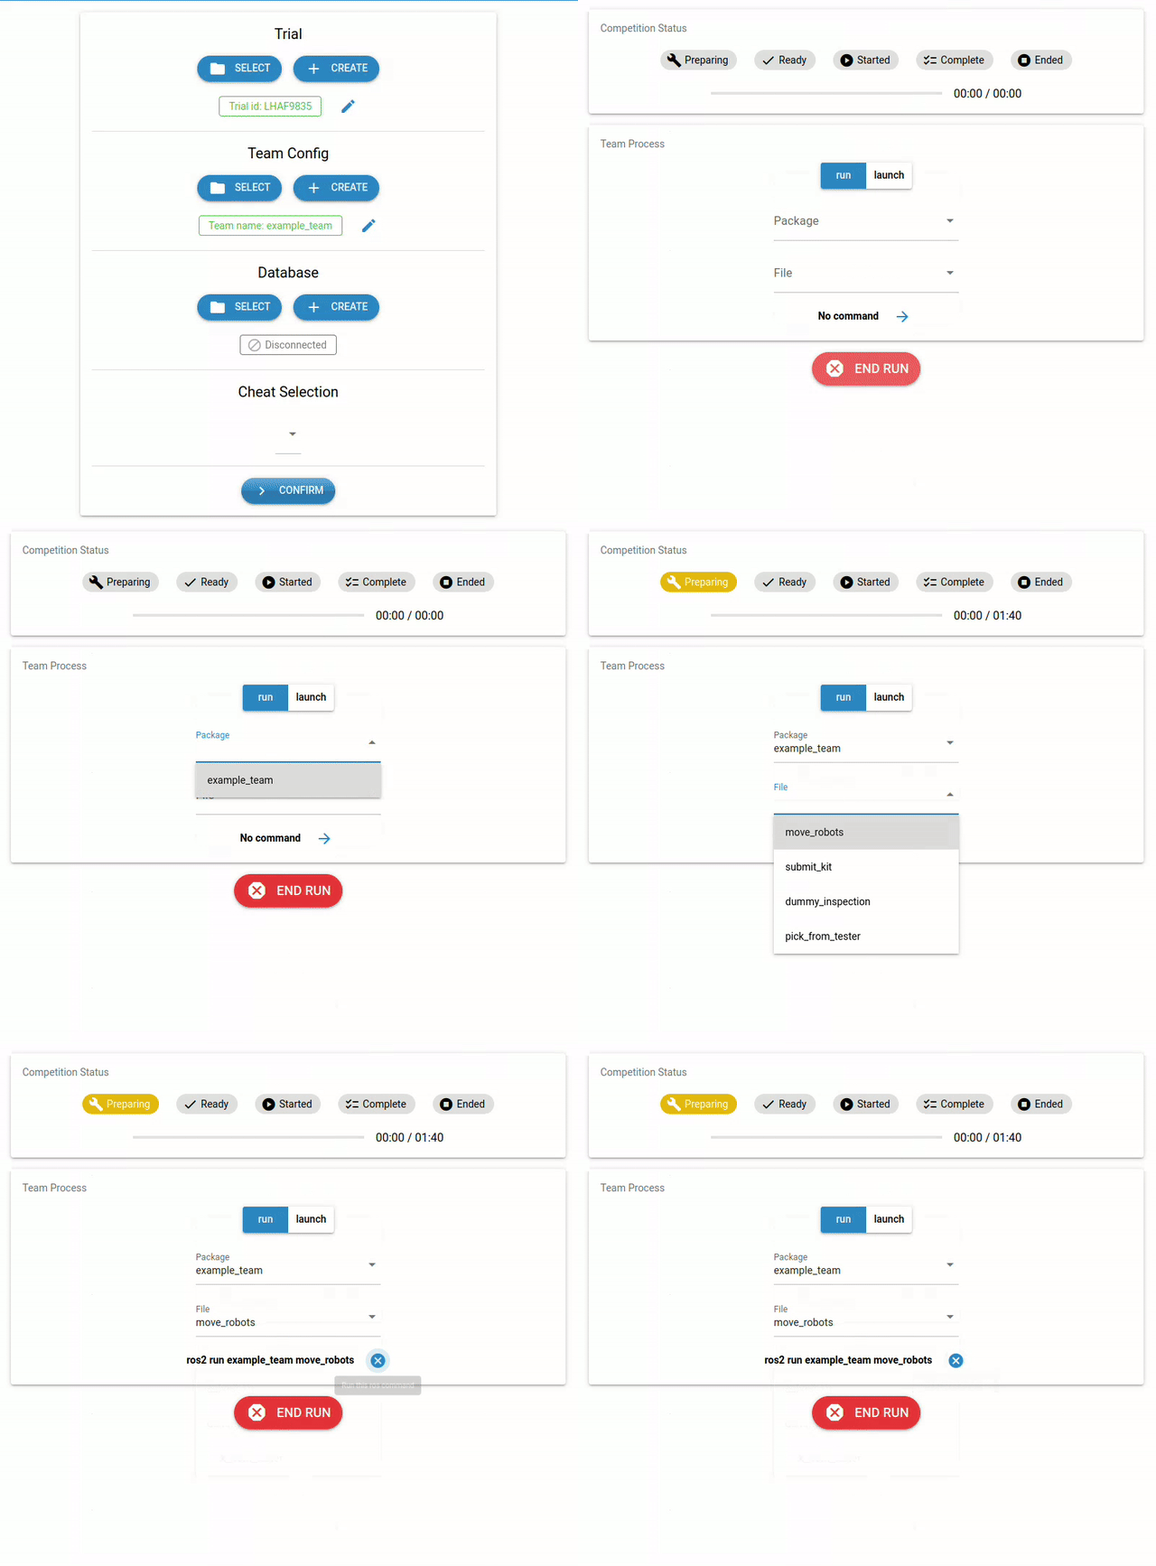
Overview: Demonstrates basic robot motion control across multiple robots by creating MoveIt nodes for all five robots and executing simultaneous linear motions.
Steps to run:
Configure trial and team configs
No cheat selection required
Click “Confirm” to open the run page
Press the green “START RUN” button
In the “Team Process” section:
Package dropdown: Select “example_team”
File dropdown: Select “move_robots”
Press the arrow button next to the generated command
Pick from Voltage Tester Demo#
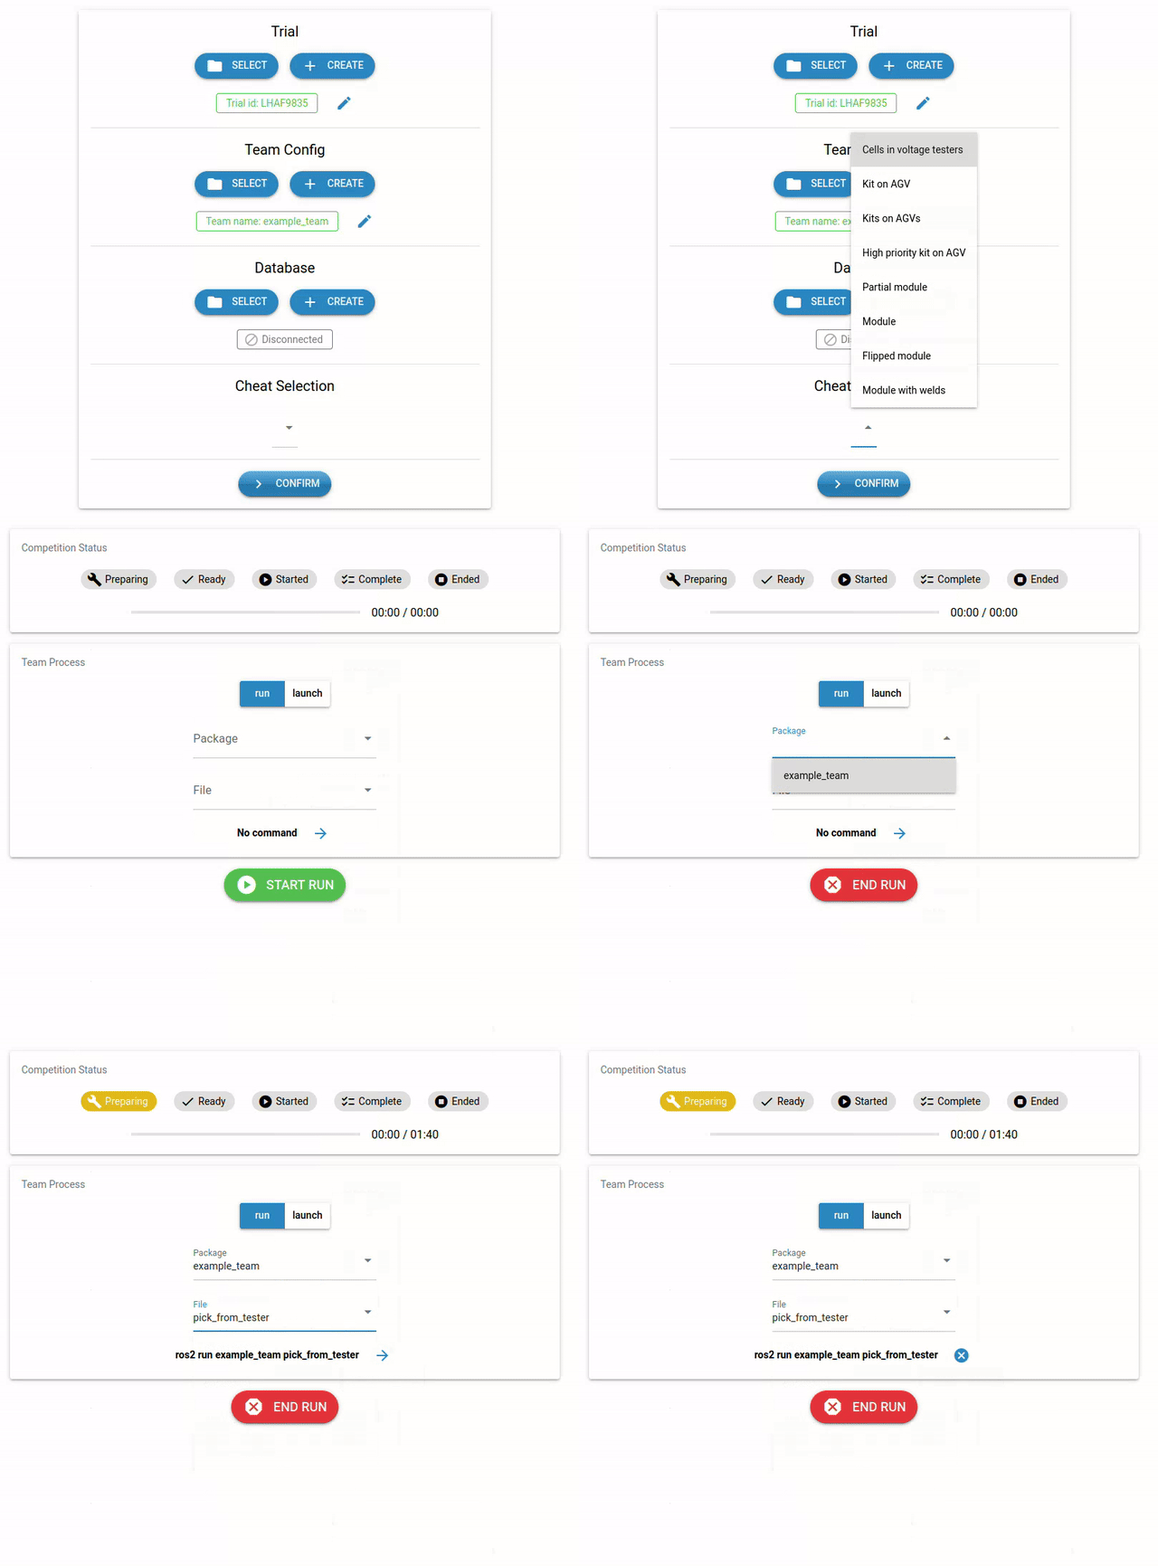
Overview: Demonstrates cell manipulation and recycling operations by using inspection robot 2 to pick a cell from the voltage tester and drop it in the recycling bin.
Steps to run:
Configure trial and team configs
Cheat Selection: Select “Cells in voltage testers” from the dropdown
Click “Confirm” to open the run page
Press the green “START RUN” button
In the “Team Process” section:
Package dropdown: Select “example_team”
File dropdown: Select “pick_from_tester”
Press the arrow button next to the generated command
Submit Kit Demo#
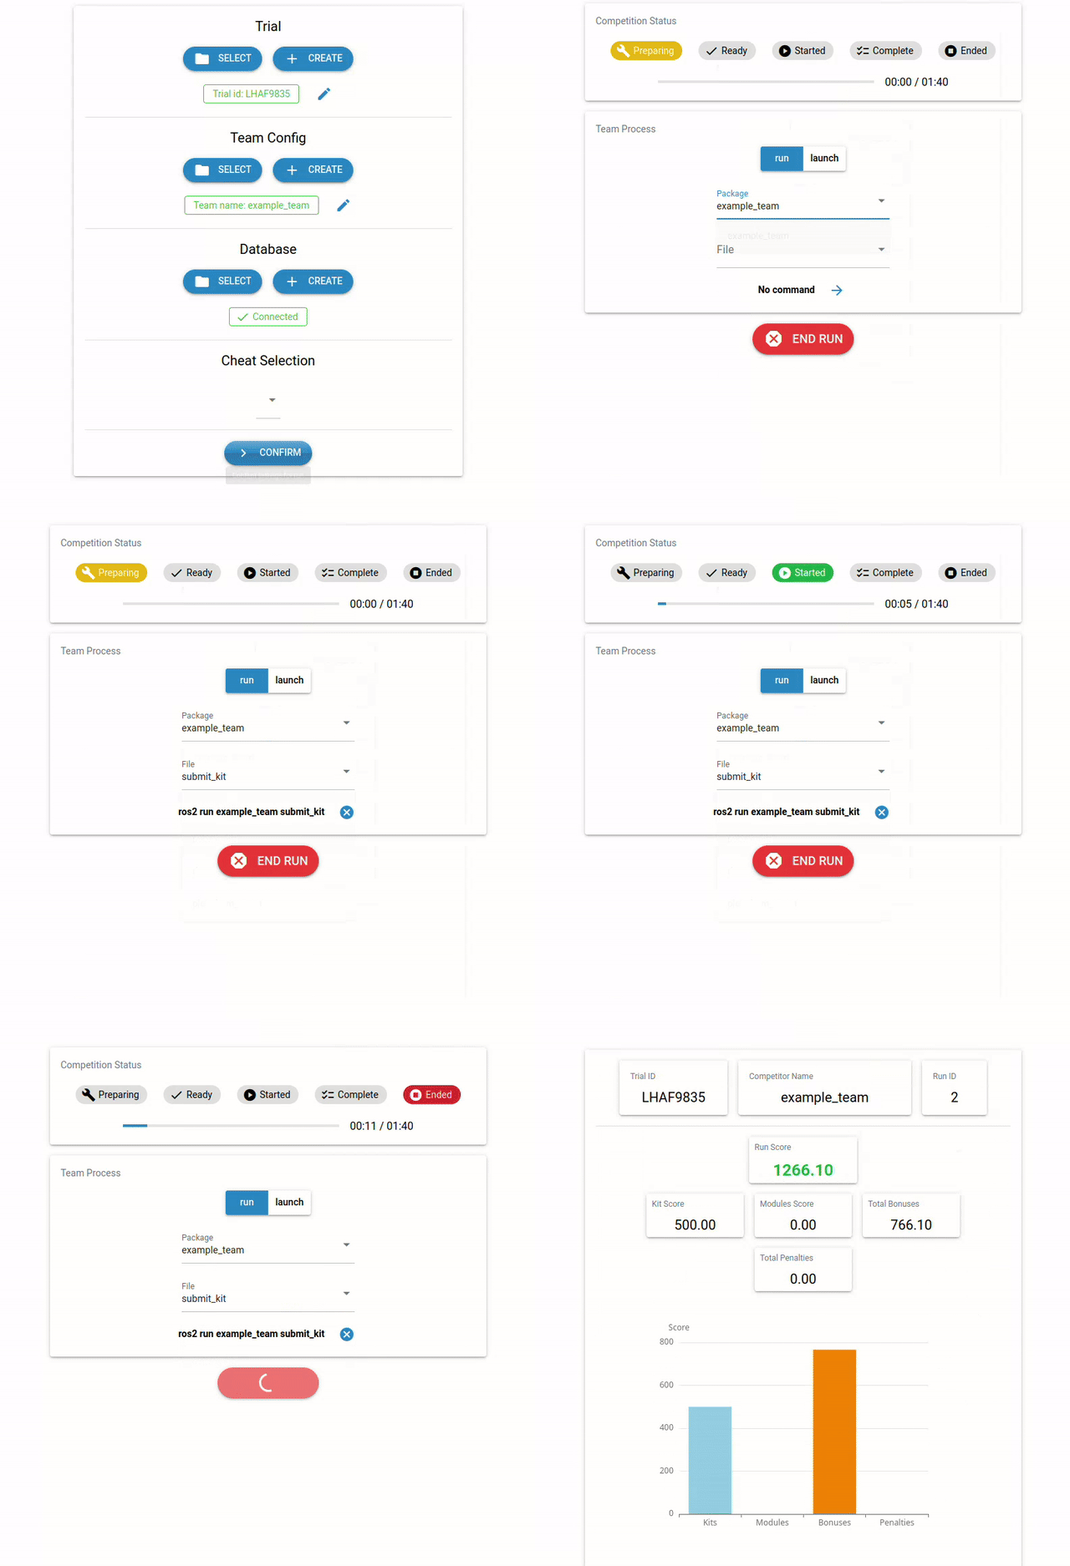
Overview: Demonstrates AGV movement and kit submission workflow by moving AGV1 to the shipping station and submitting a complete kit.
Steps to run:
Configure trial and team configs
Cheat Selection: Select “Kit on AGV” from the dropdown
Click “Confirm” to open the run page
Press the green “START RUN” button
In the “Team Process” section:
Package dropdown: Select “example_team”
File dropdown: Select “submit_kit”
Press the arrow button next to the generated command
Running with the Terminal#
For advanced users or automation purposes, demos can be run directly from the terminal. This approach requires two separate terminal sessions.
Important
Local Installation Setup
If running locally (not Docker), source the setup files in both terminals:
source /opt/ros/jazzy/setup.bash
source ~/ariac_ws/install/setup.bash
Dummy Inspection#
Overview: Demonstrates inspection conveyor control and sensor-based reporting by controlling the cell feed on the inspection conveyor and submitting dummy inspection reports using break-beam sensor data.
Terminal 1 - Start Environment:
Docker:
ros2 launch ariac_gz ariac.launch.py \
  user_config:=/team_ws/src/example_team/config/example_team_config.yaml \
  trial_config:=/team_ws/src/example_team/config/trials/LHAF9835.yaml
Local:
ros2 launch ariac_gz ariac.launch.py \
  trial_config:=~/ariac_ws/src/ariac_example_team/example_team/config/trials/LHAF9835.yaml \
  user_config:=~/ariac_ws/src/ariac_example_team/example_team/config/example_team_config.yaml
Terminal 2 - Run Demo:
ros2 run example_team dummy_inspection
Move Robots#
Overview: Demonstrates basic robot motion control across multiple robots by creating MoveIt nodes for all five robots and executing simultaneous linear motions.
Terminal 1 - Start Environment:
Docker:
ros2 launch ariac_gz ariac.launch.py \
  user_config:=/team_ws/src/example_team/config/example_team_config.yaml \
  trial_config:=/team_ws/src/example_team/config/trials/LHAF9835.yaml
Local:
ros2 launch ariac_gz ariac.launch.py \
  trial_config:=~/ariac_ws/src/ariac_example_team/example_team/config/trials/LHAF9835.yaml \
  user_config:=~/ariac_ws/src/ariac_example_team/example_team/config/example_team_config.yaml
Terminal 2 - Run Demo:
ros2 run example_team move_robots
Pick from Voltage Tester#
Overview: Demonstrates cell manipulation and recycling operations by using inspection robot 2 to pick a cell from the voltage tester and drop it in the recycling bin.
Terminal 1 - Start Environment:
Docker:
ros2 launch ariac_gz ariac.launch.py \
  user_config:=/team_ws/src/example_team/config/example_team_config.yaml \
  trial_config:=/team_ws/src/example_team/config/trials/LHAF9835.yaml \
  cheat_selection:=1
Local:
ros2 launch ariac_gz ariac.launch.py \
  trial_config:=~/ariac_ws/src/ariac_example_team/example_team/config/trials/LHAF9835.yaml \
  user_config:=~/ariac_ws/src/ariac_example_team/example_team/config/example_team_config.yaml \
  cheat_selection:=1
Terminal 2 - Run Demo:
ros2 run example_team pick_from_tester
Submit Kit#
Overview: Demonstrates AGV movement and kit submission workflow by moving AGV1 to the shipping station and submitting a complete kit.
Terminal 1 - Start Environment:
Docker:
ros2 launch ariac_gz ariac.launch.py \
  user_config:=/team_ws/src/example_team/config/example_team_config.yaml \
  trial_config:=/team_ws/src/example_team/config/trials/LHAF9835.yaml \
  cheat_selection:=2
Local:
ros2 launch ariac_gz ariac.launch.py \
  trial_config:=~/ariac_ws/src/ariac_example_team/example_team/config/trials/LHAF9835.yaml \
  user_config:=~/ariac_ws/src/ariac_example_team/example_team/config/example_team_config.yaml \
  cheat_selection:=2
Terminal 2 - Run Demo:
ros2 run example_team submit_kit
