Use Case 1 Configuration Guide
DISCLAIMER
Certain commercial entities, equipment, products, or materials may be identified by name or company logo or other insignia in order to acknowledge their participation in this collaboration or to describe an experimental procedure or concept adequately. Such identification is not intended to imply special status or relationship with NIST or recommendation or endorsement by NIST or NCCoE; neither is it intended to imply that the entities, equipment, products, or materials are necessarily the best available for the purpose.
This page is a guide that demonstrates how we configured the products in our NCCoE mDL lab . Security architects, product managers, and other technical staff within your organization may find this information helpful. We cover the essential products deployed in our reference architecture — the IDMS, Verifier, and Relying Party components. We do not re-create the product manufacturers’ documentation, which is presumed to be widely available. Rather, this webpage shows how we configured and integrated the products in our lab environment. A video demonstration of this architecture in action can be viewed on this page. Within each section, we describe the steps we executed to satisfy each guideline. We include configuration file snippets, code examples, and links to technology contributor documentation where applicable.
Note
This is not a comprehensive tutorial. There are many possible service and security configurations for these products that are out of scope for this reference design. Further, credential issuance was out of scope for this demonstration. We recommend contacting state issuing authorities directly to determine the best path for test credential issuance.
1. Establish a verifier environment
In the mDL ecosystem, the verifier component is used to request the mDL from a wallet and to cryptographically verify the mDL presented. The verifier is configured to trust the issuer’s signature and public keys and validates the credential’s authenticity of the mDL and integrity of the information it contains, without needing to contact the issuer directly. To support this the NCCoE implemented a dedicated centralized verifier service.
The NCCoE architecture deployed a dedicated centralized verifier application that defines how verification requests from the relying party (RP) are handled. This ensures that requests originating from different applications or lines of business can be routed and processed according to policy. See section 6.2.1 of Special Publication 1800-42.
Complete MATTR verifier application documentation can be viewed on the MATTR documentation website. Note in our implementation, we have set the
resultAvailableInFrontChannelsetting tofalsewhich allows our bank function to retrieve presentation results in the back-channel. We have also enabled Digital Credential API support as indicated by thedcApiConfiguration. Complete DC API configuration documentation can be viewed at this page. See section 6.2.4 of Special Publication 1800-42 for why we feel it’s important to implement the DC API.Click the dropdown below to view our full configuration.
Demonstration Verifier Application Configuration
{
  "id": "xxxxx-xxx-xxxx",
  "name": "Bank of NCCoE",
  "type": "web",
  "domain": "login.vcidentity.dev",
  "additionalDomains": [],
  "openid4vpConfiguration": {
    "display": {
      "bodyText": "Please scan the QR code to the right to provide information required for this interaction.",
      "logoImage": {
        "url": "https://www.nist.gov/sites/default/files/styles/960_x_960_limit/public/images/itl/nccoe_logo_cmyk_1.jpg",
        "altText": "NIST National Cybersecurity Center of Excellence Logo"
      },
      "headerText": "Please verify your mDL to continue",
      "primaryColorHex": "#000000"
    },
    "redirectUris": [
      "https://[IDP-DOMAIN]/[B2C-TENANT]/b2c_1a_fido_enroll_mobile/oauth2/v2.0/authorize"
    ],
    "supportedModes": "all"
  },
  "dcApiConfiguration": {
    "supportedBrowserPlatforms": {
      "mobile": true,
      "desktop": true
    }
  },
  "resultAvailableInFrontChannel": false
}
Define trusted wallet providers including the URI schemes used to invoke wallet apps where appropriate.
Note
This demonstration primarily uses the Digital Credential API to invoke wallet presentation, however, this step ensures a fallback path for the user when the DC API is unavailable or unsupported.
Full documentation to create a wallet configuration can be viewed on the MATTR website. We have used the default
mdoc-openid4vpcustom URI scheme when 18013-7 Annex B fallback is required. Any wallet app registered to handle this scheme can respond to the verification request. Additional guidance regarding custom schemes can be found on the MATTR website.Demonstration Wallet Configuration
{
"id": "xxxxx-xxx-xxxx",
"name": "wallet",
"openid4vpConfiguration": {
  "authorizationEndpoint": "mdoc-openid4vp://"
}
Maintain a list of trusted credential issuers including certificate authorities or signing keys used to validate mobile credentials (mdocs or similar). Issuer lists should be updated as test credentials evolve and should account for regional or national trust frameworks. Optionally, leverage existing trust services that maintain a list of trusted issuers such as AAMVA’s Mobile Driver License Digital Trust Service.
Full documentation to configure trusted credential issuers can be viewed on the MATTR website. Click below to view our issuer configuration composed of test IACA certificates from MATTR and the states of Maryland and California.
Demonstration Issuer Configuration
{
  "data": [
    {
      "id": "a2a001e1-a7b8-4025-8a11-4c3c2badcc1b",
      "certificatePem": "-----BEGIN CERTIFICATE-----[certdata]-----END CERTIFICATE-----",
      "certificateData": {
        "notBefore": "2023-04-14T17:24:47.000Z",
        "notAfter": "2033-02-20T17:24:47.000Z",
        "country": "US",
        "commonName": "California DMV Root CA UAT",
        "stateOrProvinceName": "US-CA",
        "organisationName": "DMV"
      }
    },
    {
      "id": "4298a03d-b348-40d7-b391-6e3534ae8f5b",
      "certificatePem": "-----BEGIN CERTIFICATE-----[certdata]-----END CERTIFICATE-----",
      "certificateData": {
        "notBefore": "2025-02-18T18:40:57.000Z",
        "notAfter": "2035-02-06T18:40:57.000Z",
        "country": "US",
        "commonName": "digitalcredentials.dev",
        "stateOrProvinceName": "California",
        "organisationName": "Digital Credentials"
      }
    },
    {
      "id": "c3cd3adb-2eb4-4917-b4f1-f4c155e20500",
      "certificatePem": "-----BEGIN CERTIFICATE-----[certdata]-----END CERTIFICATE-----",
      "certificateData": {
        "notBefore": "2025-04-08T06:00:00.000Z",
        "notAfter": "2030-04-08T06:00:00.000Z",
        "country": "US",
        "commonName": "MDOT MVA Root",
        "stateOrProvinceName": "US-MD",
        "organisationName": "Maryland MVA"
      }
    }
  ]
2. Integrate verification capabilities into an identity management system
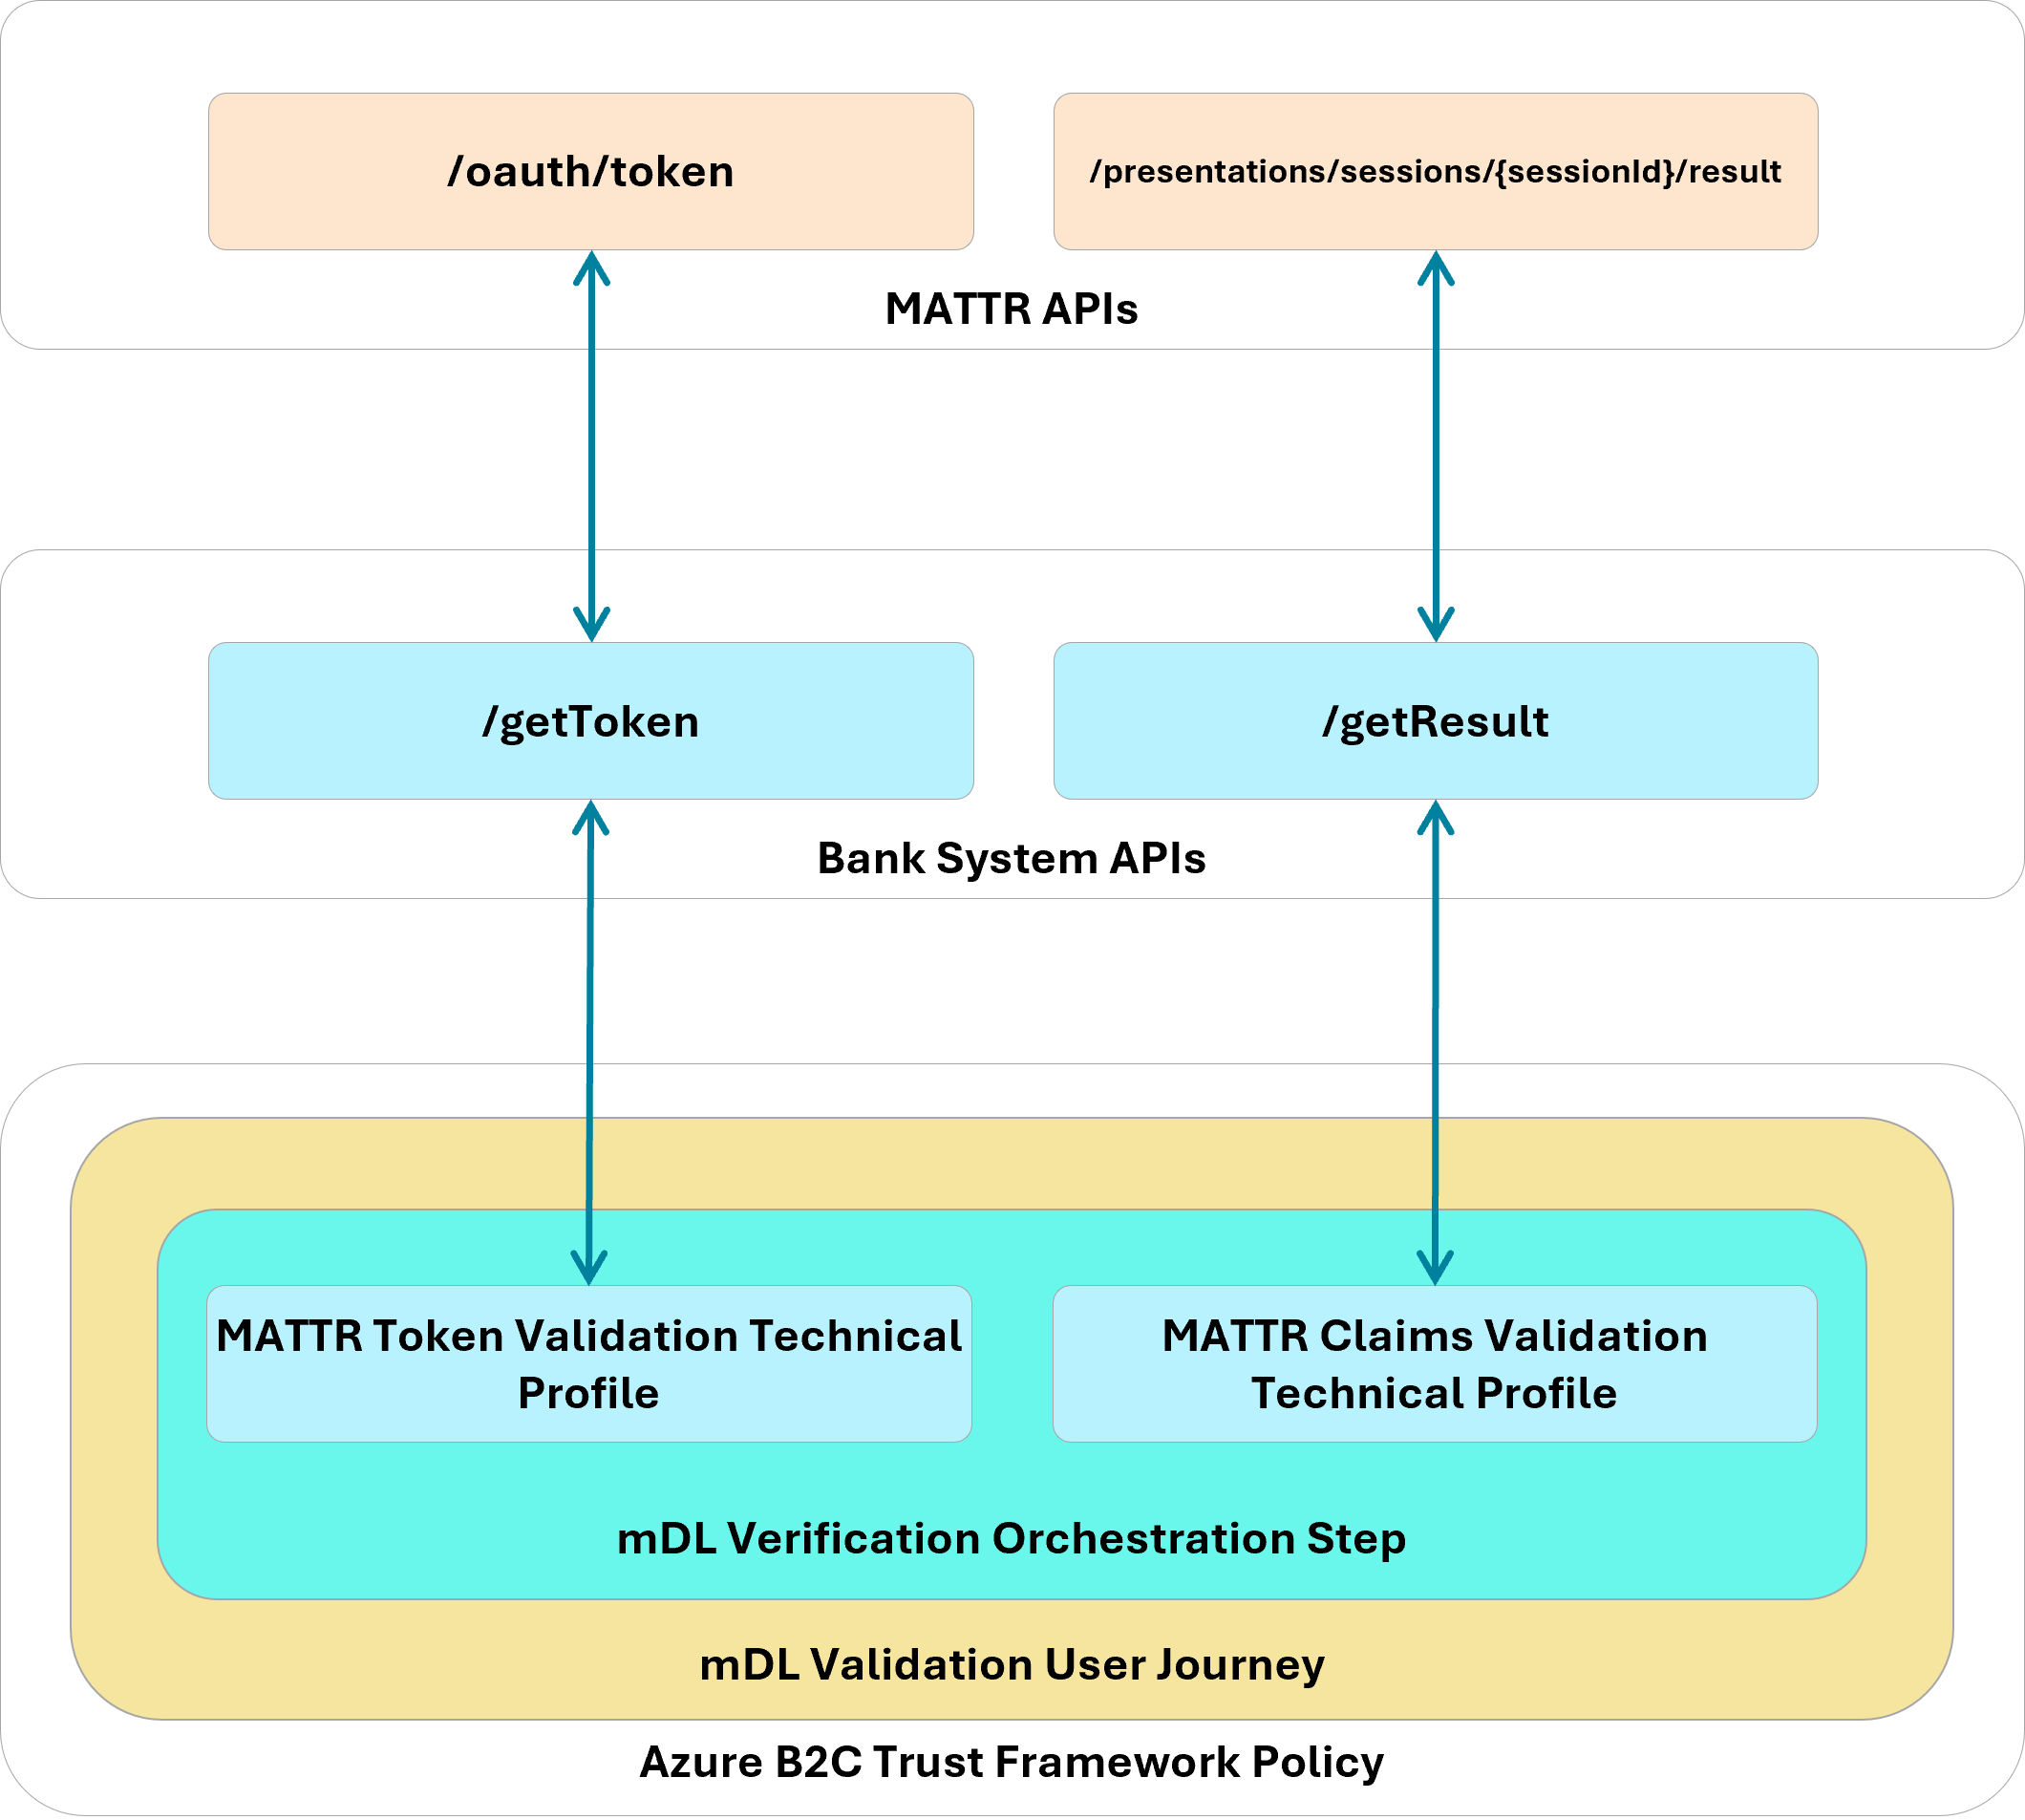
Your integration pattern will be dependent on your specific IDMS and verifier, however, below we have provided a diagram of the interactions between our IDMS (Azure AD B2C), the bank system backend we built for this demonstration, and the verifier. Interactions between the IDMS and the Verifier are mediated by a set of APIs managed by the banking system as described in section 6.3 of our practice guide. We chose to host these functions in the cloud using Azure Function service. The remainder of this section describes how we implemented this pattern.
Note
Current users of Azure AD B2C can continue to use the B2C policies for orchestration, however, new Microsoft customers must use Entra External ID using Native APIs.
To support credential-based verification from web applications:
Integrate a web verification module that supports back-channel retrieval of presented credentials. Back-channel retrieval may offer advantages in environments where server-side validation is preferred. Back-channel is recommended by our technology partner for production environments to protect against replay attacks rather than retrieving mDL attributes through the front-channel (browser).
Implementers should first ensure that Javascript support is enabled in their Azure B2C tenant by following the B2C documentation. Javascript is disabled by default for security reasons. Next, embed the MATTR Web SDK into an HTML template that interacts with the user to initiate mDL verification. Our implmentation embeds a
scripttag to the production SDK within a template that is invoked during the account application, digital enrollment, and re-verification stages.<script src="https://cdn.mattr.global/js/verifier-sdk-web/2.1/verifier-js.production.js" data-preload="true"/>
Initialize the verification module early in the application lifecycle so relevant methods and configuration options are available to policy or orchestration engines.
Refer to the MATTR documentation for complete instructions describing how to initiate the SDK in your application. In our Azure B2C html template which mediates verifcation, we defined a javascript function that is invoked when the user clicks the Verify My Identity button in the browser.
SDK Initialization
function initializeVerifierSDK() {
  if (typeof MATTRVerifierSDK !== "undefined") {
    // SDK is loaded, initialize it
    MATTRVerifierSDK.initialize({
      apiBaseUrl: apiBaseUrl,
      applicationId: "98ff9c28-8231-421d-a833-0900dd3b4d34"
    });
    requestCredentials();
    console.log("MATTR Verifier SDK initialized");
  } else {
    // Retry after a short delay
    setTimeout(initializeVerifierSDK, 50);
  }
}
Define credential queries that clearly state required document types and attributes. Queries should support both primary mechanisms (e.g., DC API) and fallback mechanisms (e.g., protocol-based presentation profiles) to ensure cross-platform operability.
Learn how to create a credential query on the MATTR documentation site. Our credential query is dependent on the applicant/customer journey stage. In the example below, we query for the attributes that satisfy Customer Information Program requirements and allow the bank to create a persistent identifier of the user from applicant to customer.
Demonstration DCQL CIP Query
"dcql": {
  credentials: [
    {
      id: "mdl",
      format: "mso_mdoc",
      meta: {
        doctype_value: "org.iso.18013.5.1.mDL"
      },
      claims: [
        { path: ["org.iso.18013.5.1", "given_name"] },
        { path: ["org.iso.18013.5.1", "family_name"] },
        { path: ["org.iso.18013.5.1", "birth_date"] },
        { path: ["org.iso.18013.5.1", "issue_date"] },
        { path: ["org.iso.18013.5.1", "expiry_date"] },
        { path: ["org.iso.18013.5.1", "issuing_country"] },
        { path: ["org.iso.18013.5.1", "issuing_authority"] },
        { path: ["org.iso.18013.5.1", "document_number"] },
        { path: ["org.iso.18013.5.1", "portrait"] },
        { path: ["org.iso.18013.5.1", "resident_address"] },
        { path: ["org.iso.18013.5.1", "resident_city"] },
        { path: ["org.iso.18013.5.1", "resident_state"] },
        { path: ["org.iso.18013.5.1", "resident_postal_code"] }
      ]
    }]
}
The query below enables the bank to create a persistent identifier of the customer with a minimal attribute set.
Demonstration DCQL Minimal Query
"dcql": {
  credentials: [
    {
      id: "mdl",
      format: "mso_mdoc",
      meta: {
        doctype_value: "org.iso.18013.5.1.mDL"
      },
      claims: [
        { path: ["org.iso.18013.5.1", "issuing_authority"] },
        { path: ["org.iso.18013.5.1", "document_number"] }
      ]
    }]
}
Trigger presentation requests from within the RP workflow, allowing users to present credentials in a same-device or cross-device flow. Implementers should evaluate which approach best aligns with the user experience and security goals.
Refer to step 3 in the Create credential request section on the MATTR documentation website for general guidance when triggering a presentation request. In our implementation, we rendered an HTML button which triggers the request as shown below.
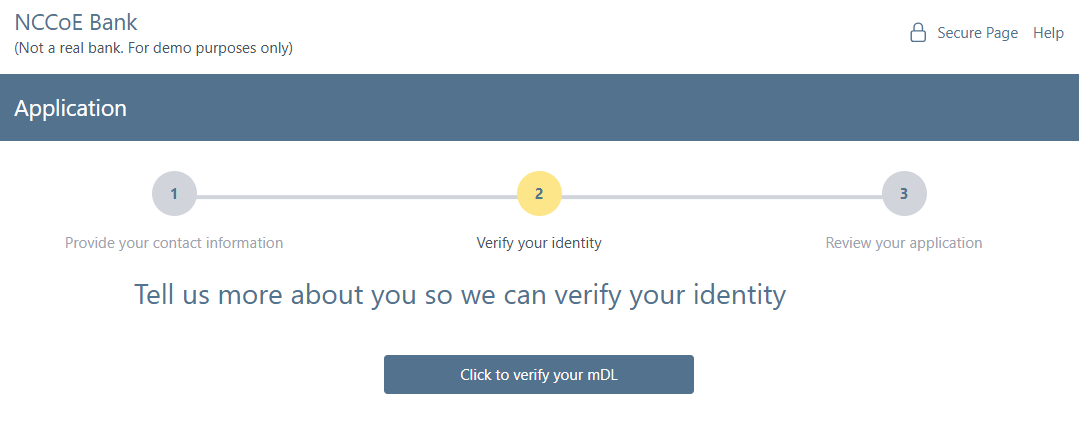
<button id="mdlverifybutton" type="submit" onclick="verifyMDL()">Click to verify your mDL</button>
Select how verification results are returned (front-end browser flow vs. backend integration). Each option carries different integration and data-handling implications that should be assessed based on system architecture and regulatory requirements.
In our implementation, we made the architectural decision to retrieve validation results through our backend as a decision point to issue an access token to the client. Refer to MATTR’s detailed flow that describes general guidance of the backend flow. First, our supporting javascript implements a callback that is invoked once the mDoc payload object has been collected and submitted to MATTR. MATTR returns a session identifier
sessionIdas shown in the code below.function processResponse(response, isDcApi) { console.info( '<<< MATTRVerifierSDK.requestCredentials crossDeviceCallback.onComplete', response ); const sessionId = isDcApi ? response.value.sessionId : response.result.sessionId; document.querySelector("#sessionId").value = sessionId; document.getElementById("continue").click(); }The B2C orchestration next retrieves an access token from our bank API then uses the
sessionIdto retrieve the presented attributes using Technical Profiles. Note that in the Account Application journey the attributes are not stored in Azure AD B2C, they are displayed to the applicant to confirm their information.MATTR Journey Configuration
<TechnicalProfile Id="REST-getMattrTokenAnnexD">
      <DisplayName>GET mattr Token</DisplayName>
      <Protocol Name="Proprietary" Handler="Web.TPEngine.Providers.RestfulProvider, Web.TPEngine, Version=1.0.0.0, Culture=neutral, PublicKeyToken=null" />
      <Metadata>
        <Item Key="ServiceUrl">https://mattr-api.azure-api.net/mattrAPIs-python/token</Item>
        <Item Key="AuthenticationType">Basic</Item>
        <Item Key="SendClaimsIn">Body</Item>
        <Item Key="IncludeClaimResolvingInClaimsHandling">true</Item>
      </Metadata>
      <CryptographicKeys>
        <Key Id="BasicAuthenticationUsername" StorageReferenceId="B2C_1A_APIUsername" />
        <Key Id="BasicAuthenticationPassword" StorageReferenceId="B2C_1A_APIPassword" />
      </CryptographicKeys>
      <InputClaims>
        <InputClaim ClaimTypeReferenceId="mattr_grant_type" PartnerClaimType="grant_type" DefaultValue="client_credentials" />
        <InputClaim ClaimTypeReferenceId="correlationId" DefaultValue="{Context:CorrelationId}" AlwaysUseDefaultValue="true" />
        <InputClaim ClaimTypeReferenceId="dcApiProtocol" PartnerClaimType="type" DefaultValue="uri" />
        <InputClaim ClaimTypeReferenceId="mDL-Dataset" PartnerClaimType="dataset" DefaultValue="crossdevice" />
      </InputClaims>
      <OutputClaims>
        <OutputClaim ClaimTypeReferenceId="access_token" />
      </OutputClaims>
      <UseTechnicalProfileForSessionManagement ReferenceId="SM-Noop" />
    </TechnicalProfile>
<TechnicalProfile Id="REST-VerifyMdlSessionAnnexD"> <DisplayName>Verify mattr session</DisplayName> <Protocol Name="Proprietary" Handler="Web.TPEngine.Providers.RestfulProvider, Web.TPEngine, Version=1.0.0.0, Culture=neutral, PublicKeyToken=null" /> <Metadata> <Item Key="ServiceUrl">https://mattr-api.azure-api.net/mattrAPIs-python/result</Item> <Item Key="AuthenticationType">Basic</Item> <Item Key="SendClaimsIn">Body</Item> <Item Key="IncludeClaimResolvingInClaimsHandling">true</Item> <Item Key="ResolveJsonPathsInJsonTokens">true</Item> </Metadata> <CryptographicKeys> <Key Id="BasicAuthenticationUsername" StorageReferenceId="B2C_1A_APIUsername" /> <Key Id="BasicAuthenticationPassword" StorageReferenceId="B2C_1A_APIPassword" /> </CryptographicKeys> <InputClaims> <InputClaim ClaimTypeReferenceId="access_token" PartnerClaimType="token" /> <InputClaim ClaimTypeReferenceId="sessionId" /> <InputClaim ClaimTypeReferenceId="correlationId" DefaultValue="{Context:CorrelationId}" AlwaysUseDefaultValue="true" /> <InputClaim ClaimTypeReferenceId="dcApiProtocol" PartnerClaimType="type" /> <InputClaim ClaimTypeReferenceId="mDL-Dataset" PartnerClaimType="dataset" DefaultValue="crossdevice" /> </InputClaims> <OutputClaims> <OutputClaim ClaimTypeReferenceId="mattr_challenge" PartnerClaimType="challenge" /> <OutputClaim ClaimTypeReferenceId="family_name" PartnerClaimType="family_name.value" /> <OutputClaim ClaimTypeReferenceId="given_name" PartnerClaimType="given_name.value" /> <OutputClaim ClaimTypeReferenceId="birth_date" PartnerClaimType="birth_date.value" /> <OutputClaim ClaimTypeReferenceId="issue_date" PartnerClaimType="issue_date.value" /> <OutputClaim ClaimTypeReferenceId="expiry_date" PartnerClaimType="expiry_date.value" /> <OutputClaim ClaimTypeReferenceId="issuing_country" PartnerClaimType="issuing_country.value" /> <OutputClaim ClaimTypeReferenceId="issuing_authority" PartnerClaimType="issuing_authority.value" /> <OutputClaim ClaimTypeReferenceId="document_number" PartnerClaimType="document_number.value" /> <OutputClaim ClaimTypeReferenceId="resident_address" PartnerClaimType="resident_address.value" /> <OutputClaim ClaimTypeReferenceId="resident_city" PartnerClaimType="resident_city.value" /> <OutputClaim ClaimTypeReferenceId="resident_state" PartnerClaimType="resident_state.value" /> <OutputClaim ClaimTypeReferenceId="resident_postal_code" PartnerClaimType="resident_postal_code.value" /> <OutputClaim ClaimTypeReferenceId="encrypted_cip_token" PartnerClaimType="encrypted_cip_token" /> </OutputClaims> <UseTechnicalProfileForSessionManagement ReferenceId="SM-Noop" /> </TechnicalProfile>
3. Design effective user journeys in an IDMS
User journeys should be structured as clear orchestration sequences that support identity verification, enrollment, and subsequent authentication:
Use explicit orchestration steps to guide users through data collection, out-of-band verification, credential presentation, and final approval.
We recommend implementers review the documentation from your IDMS provider to learn how to translate your business proceseses to web based user journeys. Our configuration for the account application registration journey is reproduced below as configured in Azure AD B2C orchestration documentation. The journey implements a comprehensive identity verification flow to support a bank account application process that combines traditional methods (email, phone, SSN) with modern mDL verification technology, ultimately creating a verified digital identity stored in Azure AD B2C.
Orchestration Steps
<OrchestrationSteps>

    <OrchestrationStep Order="1" Type="ClaimsExchange">
    <ClaimsExchanges>
        <ClaimsExchange Id="SelfAsserted-CollectEmail" TechnicalProfileReferenceId="SelfAsserted-CollectEmail" />
    </ClaimsExchanges>
    </OrchestrationStep>
    <OrchestrationStep Order="2" Type="ClaimsExchange">
    <ClaimsExchanges>
        <ClaimsExchange Id="SelfAsserted-VerifyEmail" TechnicalProfileReferenceId="VerifyEmail" />
    </ClaimsExchanges>
    </OrchestrationStep>
    <OrchestrationStep Order="3" Type="ClaimsExchange">
    <ClaimsExchanges>
        <ClaimsExchange Id="SelfAsserted-CollectPhone" TechnicalProfileReferenceId="SelfAsserted-CollectPhone" />
    </ClaimsExchanges>
    </OrchestrationStep>
    <OrchestrationStep Order="4" Type="ClaimsExchange">
    <ClaimsExchanges>
        <ClaimsExchange Id="SelfAsserted-VerifyPhone" TechnicalProfileReferenceId="VerifyPhone" />
    </ClaimsExchanges>
    </OrchestrationStep>
    <OrchestrationStep Order="5" Type="ClaimsExchange">
    <ClaimsExchanges>
        <ClaimsExchange Id="SelfAsserted-CollectSSN" TechnicalProfileReferenceId="SelfAsserted-CollectSSN" />
    </ClaimsExchanges>
    </OrchestrationStep>

    <OrchestrationStep Order="6" Type="ClaimsExchange">
    <ClaimsExchanges>
        <ClaimsExchange Id="SelfAsserted-verificationSelection" TechnicalProfileReferenceId="SelfAsserted-verificationSelection" />
    </ClaimsExchanges>
    </OrchestrationStep>

    <OrchestrationStep Order="7" Type="ClaimsExchange">
    <ClaimsExchanges>
        <ClaimsExchange Id="SelfAsserted-mDLVerificationAnnexD" TechnicalProfileReferenceId="SelfAsserted-mDLVerificationAnnexD" />
    </ClaimsExchanges>
    </OrchestrationStep>
        <OrchestrationStep Order="8" Type="ClaimsExchange">
    <ClaimsExchanges>
        <ClaimsExchange Id="SelfAsserted-ReviewMdlClaims" TechnicalProfileReferenceId="SelfAsserted-ReviewMdlClaims" />
    </ClaimsExchanges>
    </OrchestrationStep>

        <OrchestrationStep Order="9" Type="ClaimsExchange">
    <ClaimsExchanges>
        <ClaimsExchange Id="SelfAsserted-ApprovalStatus" TechnicalProfileReferenceId="SelfAsserted-ApprovalStatus" />
    </ClaimsExchanges>
    </OrchestrationStep>

    <OrchestrationStep Order="10" Type="SendClaims" CpimIssuerTechnicalProfileReferenceId="JwtIssuer" />

</OrchestrationSteps>
Orchestration Steps Description
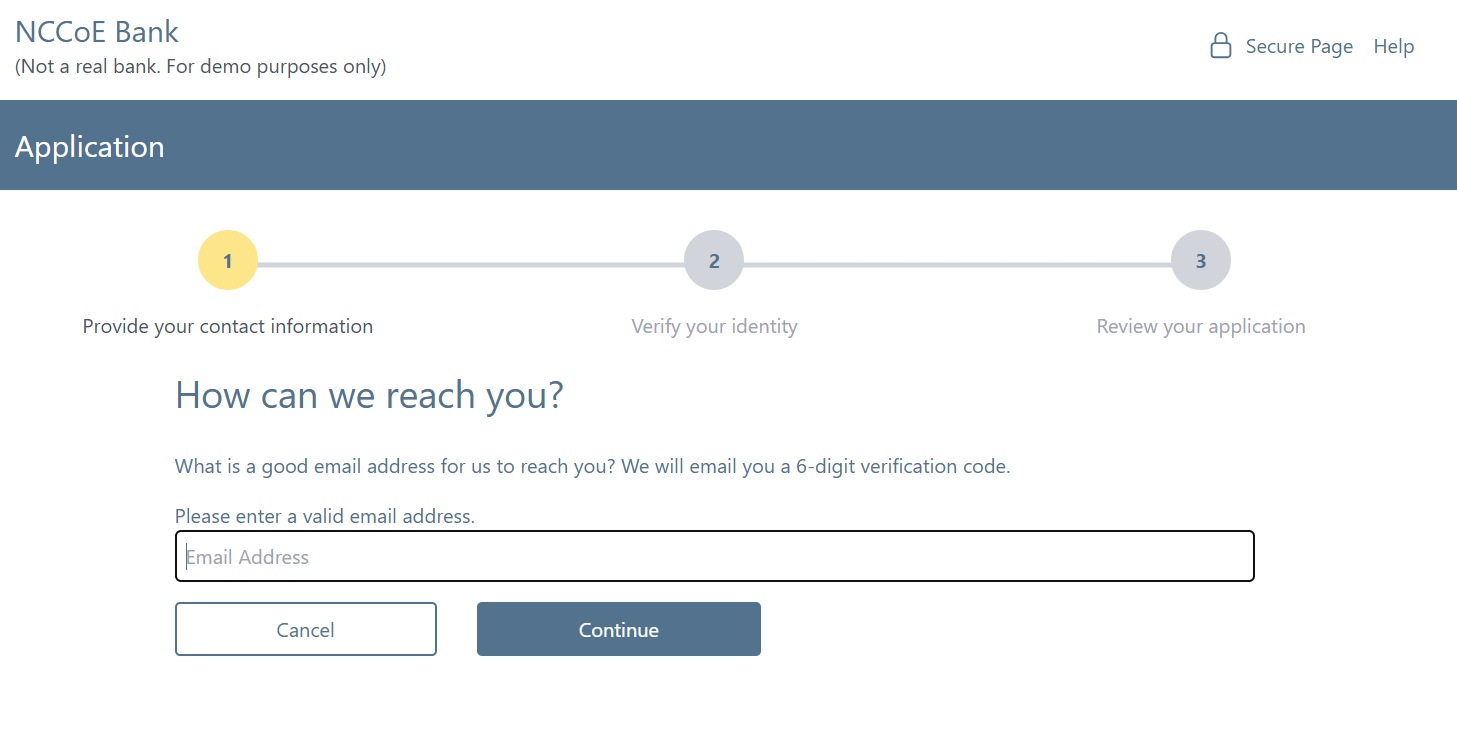
Step 1: Email Collection
Purpose
Collects the applicant’s email address as the primary identifier.
User Interface
Renders email collection template in the web browser.
Technical Details
Uses a built-in Azure B2C web template that collects the applicant’s email address and displays a message explaining collection purpose. The submitted email address is saved as a claim for the next step in the flow.
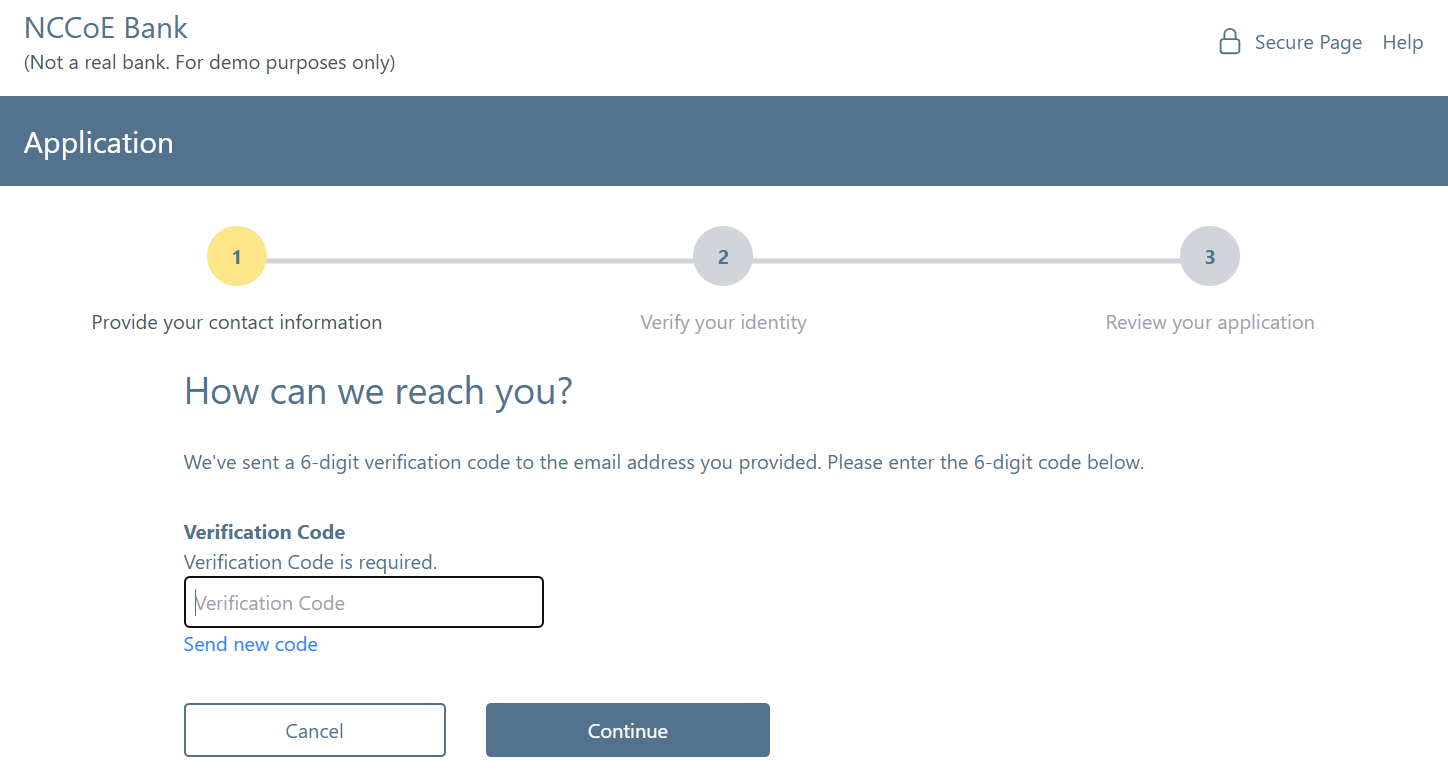
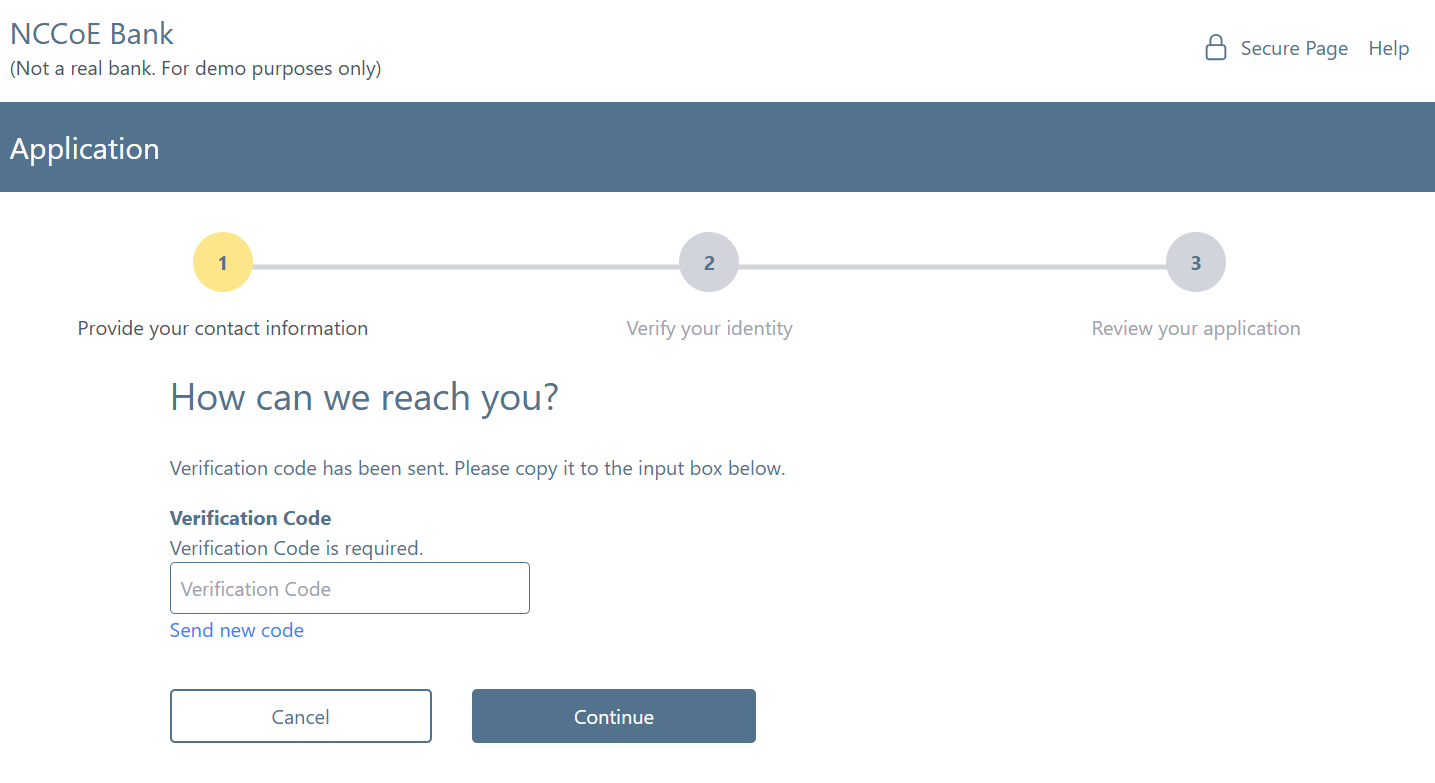
Step 2: Email Verification
Purpose
Verifies the collected email address through One Time Password/Code verification.
User Interface
Renders self-asserted-verifyEmail.cshtml template
Technical Details
Uses a built-in Azure B2C OTP verification logic to ensure the applicant has access to a valid email account. Note that this is not related to identity vetting of the individual. On successful validation, Azure B2C saves the state in the current session.
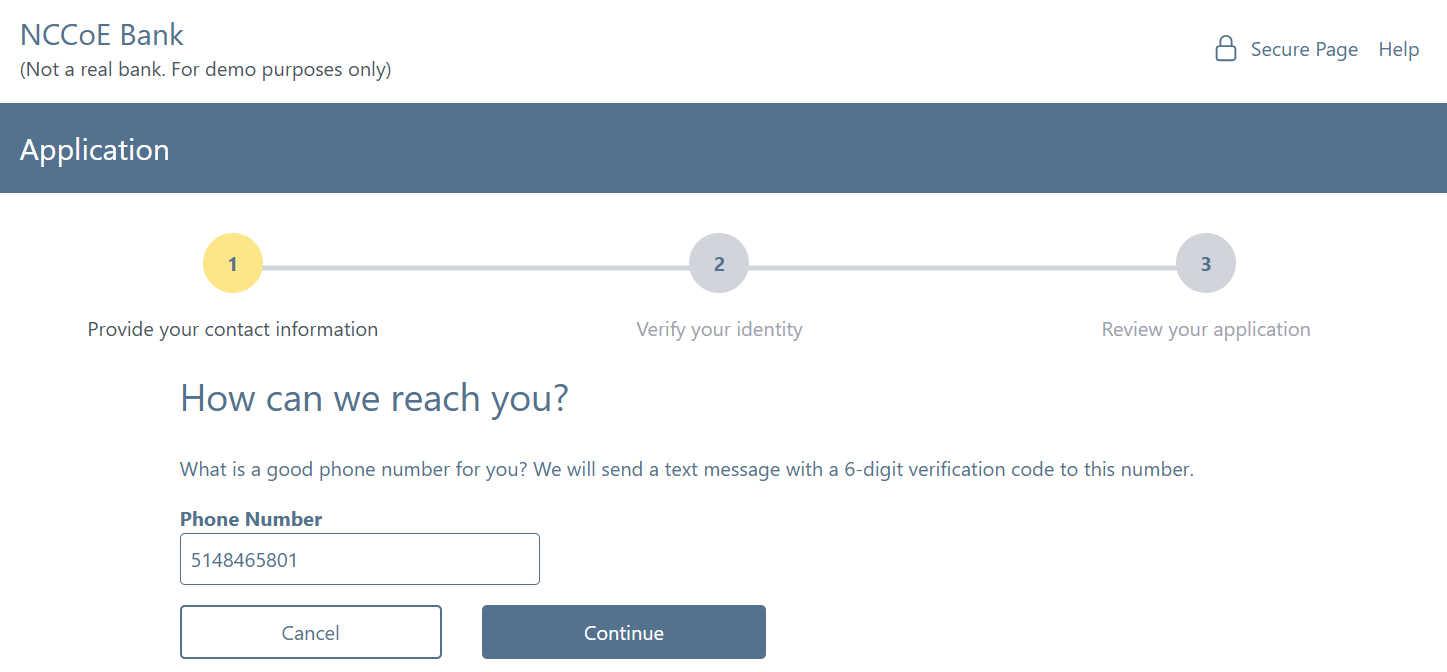
Step 3: Phone Collection
Purpose
Collects the user’s phone number for additional verification
User Interface
Renders self-asserted-collectPhone.cshtml template
Technical Details
Uses a built-in Azure B2C web template that collects the applicant’s phone number and displays a message explaining collection purpose. The submitted phone number is saved as a claim for the next step in the flow.
Step 4: Phone Verification
Purpose
Verifies the phone number through Short Messaging Service OTP
User Interface
Renders self-asserted-verifyPhone.cshtml template
Technical Details
Uses a built-in Azure B2C OTP verification logic to ensure the applicant has access to a valid phone number. Note that this is not related to identity vetting of the individual. On successful validation, Azure B2C saves the state in the current session.
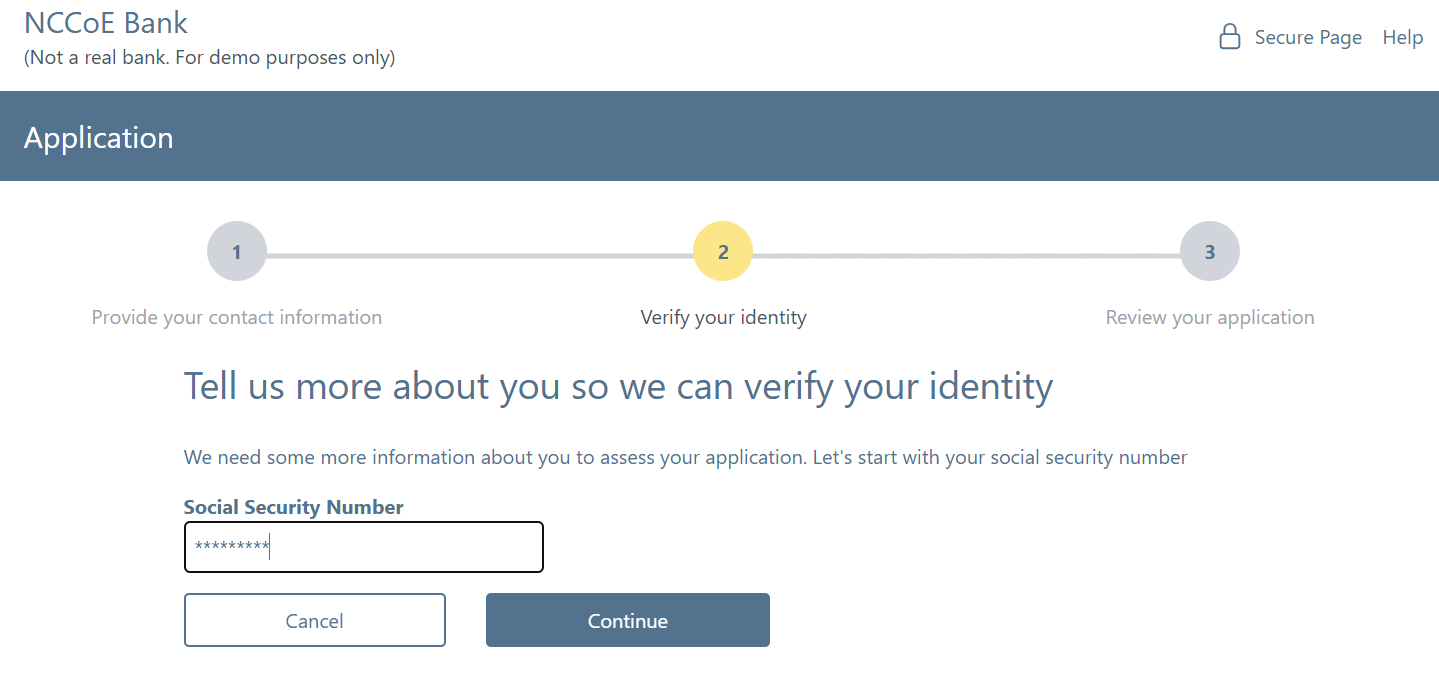
Step 5: SSN Collection
Purpose
Collects Social Security Number for identity verification
User Interface
Renders self-asserted-collectSsn.cshtml template
Technical Details
Uses a generic input template to collect SSN and display an instructional message. The SSN is stored as a claim and persisted to the Azure B2C directory for later validation by the banking system.
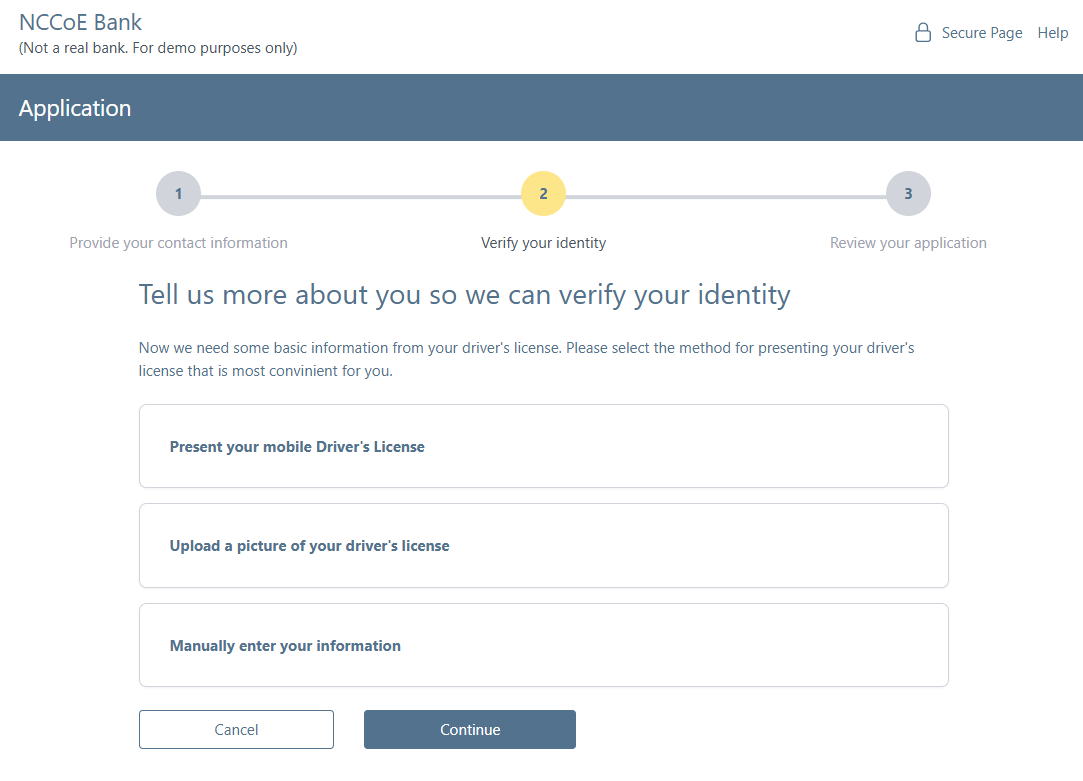
Step 6: Verification Method Selection
Purpose
Allows user to choose their preferred identity verification method
User Interface
Renders self-asserted-verificationMethod.cshtml template
Technical Details
Provides an interface for the applicant to choose a preferred verification method. Only mDL verification option is supported within this demonstration. The applicant’s selection is stored as a claim for subsequent steps in the flow.
Step 7: mDL Verification
Purpose
Performs mobile Driver’s License (mDL) verification using MATTR SDK
User Interface
Renders self-asserted-mdlUri.cshtml template
Technical Details
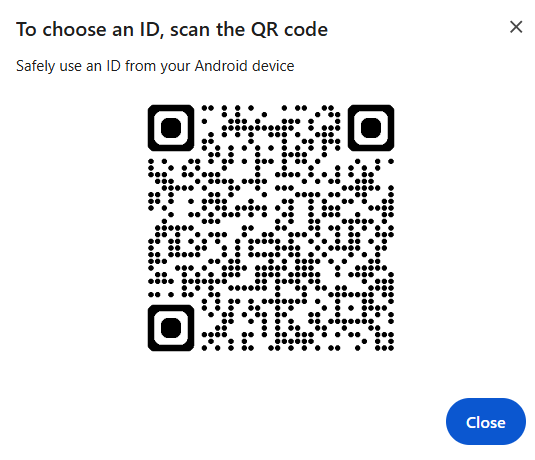
Provides the logic that implements the mDL verification via the MATTR SDK. First, B2C invokes two bank system endpoints which receive a MATTR OAuth token and retrieves a session identifier using the MATTR Verifier API. Next, the MATTR SDK is initiated with the retrieved session identifier which invokes the Digital Credential API. After the applicant completes the Digital Credential API flow, control is returned to the MATTR SDK where the presented attributes are queried by B2C. The extracted attributes are stored as claims for further processing.
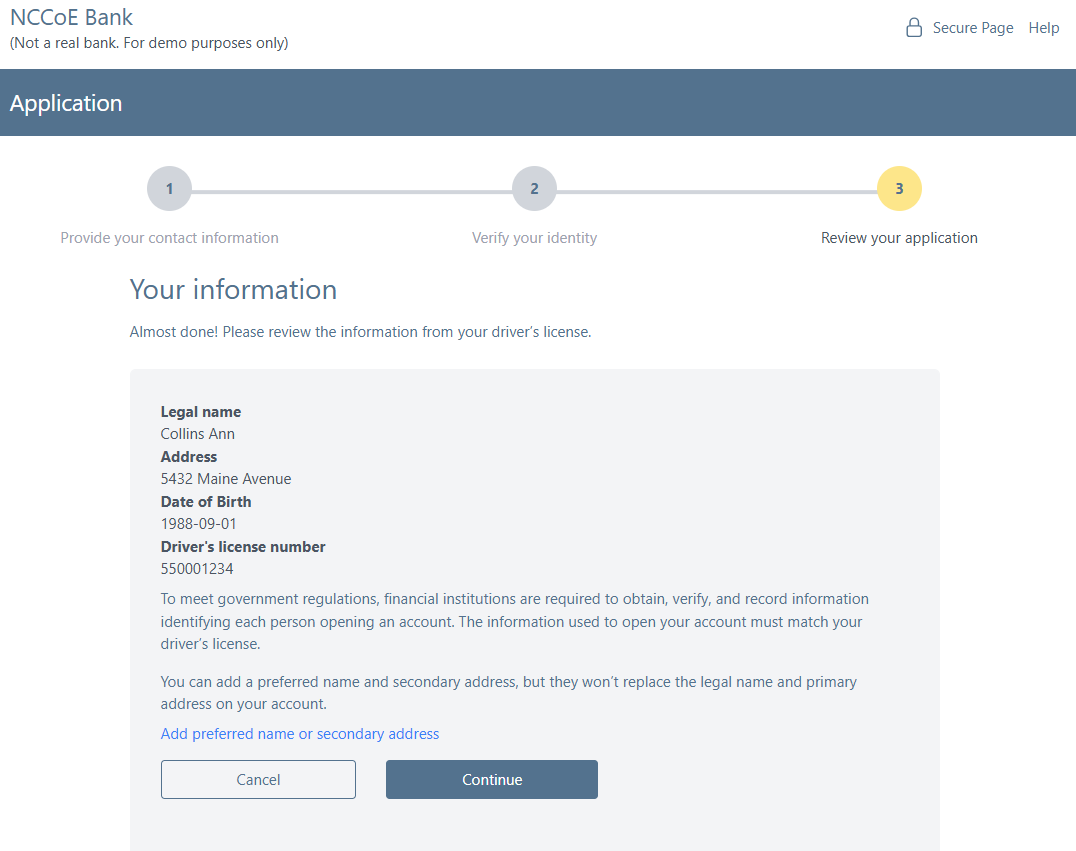
Step 8: Review mDL Claims
Purpose
Displays extracted mDL data for user review and confirmation
User Interface
Renders self-asserted-reviewMdlClaims.cshtml template
Technical Details
Provides display interface for the attributes presented by the applicant and updates the user account in the Azure AD B2C directory with a preferred address (if provided). The applicant’s mDL license number and issuing authority are concatenated along with salt to produce a unreversible unique identifier. The unique identifier is persisted in the B2C directory for the second phase (digital enrollment).
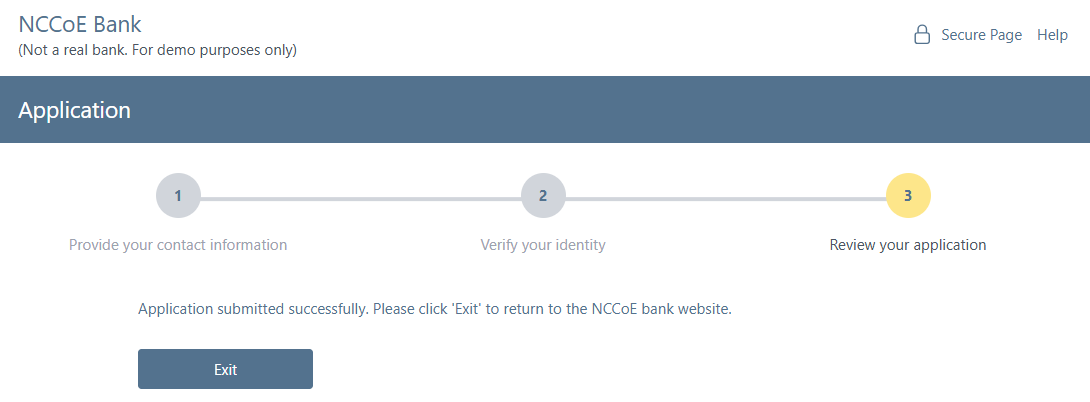
Step 9: Approval Status
Purpose
Shows final registration status and approval message
User Interface
Renders approval status template
Technical Details
Displays interface that provides “Exit” button and informs the applicant that this phase of the application process has been completed. The exit button invokes the final step in the account application process.
Step 10: Token Issuance
Purpose
Issues the final JWT token containing all verified claims
User Interface
Technical Details
Completes the frontend OpenID Connect interactions with an Authorization Response that redirects the applicant back to the banking system website. The calculated mDL unique identifier and B2C identifier are returned in the access token as a claim for processing by the banking system.
Store collected attributes as claims at each step to ensure continuity across the journey and to support downstream validation steps.
Storing collected attributes allows them to be stored alongside user information in the B2C directory. User attributes collected during identity verification such as email, phone number, SSN, and mDL information should be stored as claims alongside the user in the identity management system. This allows the claims to support future use cases. For example, in our build, we stored a hash of the driver’s license number and the issuing entity as a claim that is later used to link an mDL to the user when presented as a step-up during high-risk transactions.
Create User With Persisted Claims
<TechnicalProfile Id="Custom-UserWriteUsingLogonEmail">
<Metadata>
    <Item Key="Operation">Write</Item>
    <!-- Allows creating account with same email again -->
    <Item Key="RaiseErrorIfClaimsPrincipalAlreadyExists">false</Item>
    <Item Key="api-version">1.6</Item>
</Metadata>
<IncludeInSso>false</IncludeInSso>
<InputClaims>
    <InputClaim ClaimTypeReferenceId="email" PartnerClaimType="signInNames.emailAddress" Required="true" />
</InputClaims>
<PersistedClaims>
    <!-- Required claims -->
    <PersistedClaim ClaimTypeReferenceId="email" PartnerClaimType="signInNames.emailAddress" />
    <PersistedClaim ClaimTypeReferenceId="hashedDocumentNumberAndIssuingAuthority" PartnerClaimType="signInNames.hashedDocNumIssAuth" />
    <!-- require a password, should be generated randomly -->
    <PersistedClaim ClaimTypeReferenceId="newPassword" PartnerClaimType="password" DefaultValue="fnpDD!casc2242" />
    <PersistedClaim ClaimTypeReferenceId="given_name" PartnerClaimType="displayName" DefaultValue="unknown" />
    <PersistedClaim ClaimTypeReferenceId="passwordPolicies" DefaultValue="DisablePasswordExpiration" />
    <PersistedClaim ClaimTypeReferenceId="extension_socialSecurityNumber" DefaultValue="" />
    <PersistedClaim ClaimTypeReferenceId="resident_address" PartnerClaimType="streetAddress" />
    <PersistedClaim ClaimTypeReferenceId="resident_postal_code" PartnerClaimType="postalCode" />
    <PersistedClaim ClaimTypeReferenceId="given_name" PartnerClaimType="givenName" />
    <PersistedClaim ClaimTypeReferenceId="resident_city" PartnerClaimType="city" />
    <PersistedClaim ClaimTypeReferenceId="resident_state" PartnerClaimType="state" />
    <PersistedClaim ClaimTypeReferenceId="family_name" PartnerClaimType="surname" />
    <PersistedClaim ClaimTypeReferenceId="phoneNumber" PartnerClaimType="telephoneNumber" />
    <PersistedClaim ClaimTypeReferenceId="extension_first_name_preferred" DefaultValue="" />
    <PersistedClaim ClaimTypeReferenceId="extension_middle_name_preferred" DefaultValue="" />
    <PersistedClaim ClaimTypeReferenceId="extension_last_name_preferred" DefaultValue="" />
    <PersistedClaim ClaimTypeReferenceId="extension_address_line_1_preferred" DefaultValue="" />
    <PersistedClaim ClaimTypeReferenceId="extension_address_line_2_preferred" DefaultValue="" />
    <PersistedClaim ClaimTypeReferenceId="extension_city_preferred" DefaultValue="" />
    <PersistedClaim ClaimTypeReferenceId="extension_state_preferred" DefaultValue="" />
    <PersistedClaim ClaimTypeReferenceId="extension_zip_code_preferred" DefaultValue="" />
</PersistedClaims>
<OutputClaims>
    <OutputClaim ClaimTypeReferenceId="objectId" />
    <OutputClaim ClaimTypeReferenceId="hashedDocumentNumberAndIssuingAuthority" PartnerClaimType="signInNames.hashedDocNumIssAuth" />
    <OutputClaim ClaimTypeReferenceId="newUser" PartnerClaimType="newClaimsPrincipalCreated" />
    <OutputClaim ClaimTypeReferenceId="authenticationSource" DefaultValue="localAccountAuthentication" />
    <OutputClaim ClaimTypeReferenceId="userPrincipalName" />
    <OutputClaim ClaimTypeReferenceId="signInNames.emailAddress" />
</OutputClaims>
<IncludeTechnicalProfile ReferenceId="AAD-Common" />
<UseTechnicalProfileForSessionManagement ReferenceId="SM-AAD" />
</TechnicalProfile>
Support multiple verification methods where appropriate, while still allowing organizations to enforce the preferred choice (e.g., mDL verification) for the demonstration or production environment.
Because not all users will have an mDL, financial institutions should support multiple identity verification methods, such as mDL presentation, uploading photos of a physical drivers license, or manually entering the drivers license information, etc. However, FIs can encourage mDLs verification as the preferred choice by listing it as the first option and by including helping prompts such as directing user to the AAMVA website to see if their state supports mDLs and by providing simple instructions for mDL presentment. Note that for this demonstration, only mDL presentation is supported.
4. Implement digital mDL credential verification
When integrating mobile driver’s license (mDL) or similar credential verification:
Invoke verifier endpoints that return the necessary session or authorization data before initiating wallet-based credential presentation.
Prior to invoking a wallet, session and/or authorization data must be retrieved from the verifier. In the case of MATTR, prior to requesting session information, a dedicated verifier application must be created, as described in Step 1 of this document. The verifier application provides the required client ID and secret, and contains information specific to that application, such as the redirect URI or package signature (in the case of an Android application). Once the application is configured, requests can be made to the API. In this implementation, the MATTR JavaScript API does not require the client ID and secret to create the presentation session, but the client ID and secret are required to retrieve the attributes via back-channel.
To illustrate this flow, the Python function below show how our demonstration retrieved presentation results using a bearer token.
Python Azure Function
def handle_result_request(request_data: dict, telemetry: dict) -> func.HttpResponse:

token = request_data.get("token")
session_id = request_data.get("sessionId")

if not token:
    return bad_request("Missing token")
if not session_id:
    return bad_request("Missing sessionId")

telemetry["sessionId"] = session_id

result_url = f"{os.getenv('MATTR_TENANT_URL')}/v2/presentations/sessions/{session_id}/result"
headers = {"Authorization": f"Bearer {token}"}

result_response = session.get(result_url, headers=headers)
logging.info(f"[Result] Response: {result_response.status_code}")

fetch_event_logs(token, session_id)

if not result_response.ok:
    return error_response("Failed to retrieve session result", result_response)

try:
    return process_session_result(result_response.json(), telemetry)
except Exception as ex:
    logging.exception("Failed to process session result")
    return server_error("Error processing session result", str(ex))
Implementers should also be prepared to catch and gracefully handle error considerations that may occur in the validation process. The snippet below gives one such example of a validation error in which the user might have presented a credential whose issuer was not preconfigured in the verifier.
"verificationResult": }
"verified": "False",
"reason": {
  "type": "MobileCredentialInvalid",
  "message": "X5Chain was not valid"
  }
}
Comprehensive guidance describing how verification results can be consumed by your application can be found on the MATTR website.
Use platform APIs exposed by browsers for credential requests, supporting both same-device and cross-device flows and ensuring alignment with emerging web standards.
The MATTR Verifier SDK for mDL presentation supports both same-device and cross-device flows, and is frequently updated to reflect new mDL changes and standards. In this implementation, the cross-device flow was used, and the attributes were not available in the front-channel. Additionally, the Digital Credential (DC) API is in MATTR technical preview, requiring additional configuration to enable it. In the example application configuration in Step 1, the following JSON code is required in order to enable the DC API for that application:
{
  // ... your existing configuration
  "dcApiConfiguration": {
    "supportedBrowserPlatforms": {
      "mobile": true,
      "desktop": true
    }
  }
}
Query returned attributes after credential presentation and store them as claims for subsequent steps, such as user confirmation or account creation.
By storing returned attributes in the B2C claims bag, subsequent orchestration steps in the user journey can access and use the attributes. This allows B2C to easily return the attributes back to the relying party.
5. Support phishinng resistant authentication (e.g., passkeys)
FIs should offer customer at customers at least one phishing resistant authentication option. To support this:
Provide a mechanism to generate a cryptographically secure challenge during both enrollment and authentication ceremonies to prevent replay attacks.
In this implementation, a separate, JavaScript-based FIDO service was used to generate cryptographically secure challenges. The FIDO service is invoked by the B2C user journies via a REST API as shown in the Azure B2C technical profile below.
B2C Secure Challenge
<TechnicalProfile Id="REST-FIDOGetChallenge">
      <DisplayName>GET a FIDO Challenge</DisplayName>
      <Protocol Name="Proprietary" Handler="Web.TPEngine.Providers.RestfulProvider, Web.TPEngine, Version=1.0.0.0, Culture=neutral, PublicKeyToken=null" />
      <Metadata>
        <Item Key="ServiceUrl">https://[Azure-Function-Hostname]/challenge</Item>
        <Item Key="AuthenticationType">None</Item>
        <Item Key="SendClaimsIn">QueryString</Item>
        <Item Key="AllowInsecureAuthInProduction">true</Item>
      </Metadata>
      <OutputClaims>
        <OutputClaim ClaimTypeReferenceId="challenge" PartnerClaimType="result" />
        <!--Sample: Set the identity provider name to FIDO-->
        <OutputClaim ClaimTypeReferenceId="identityProvider" DefaultValue="fido" AlwaysUseDefaultValue="true" />
      </OutputClaims>
      <UseTechnicalProfileForSessionManagement ReferenceId="SM-Noop" />
  </TechnicalProfile>
Trigger authenticator creation and authentication flows via browser APIs (e.g., WebAuthn) using policy-driven orchestration.
W3C’s Credential Management API enables the secure creation of credentials used for authentication. By invoking the API, the user is prompted where to store the credential. The storage location includes options such as a separate device or in the currently signed in Google account (when using the Chrome browser). By selecting the latter, the credential can be used in any Google Chrome browser or Android device signed into the account. We chose this approach to facilitate Passkey authentications across desktop and mobile contexts. The Azure B2C technical profile below illustrates how are implementation invoked the FIDO service, which in turn uses the create () Credential Management API method.
B2C Credential Create
<TechnicalProfile Id="REST-FIDOMakeCredential">
    <DisplayName>GET a FIDO Challenge</DisplayName>
    <Protocol Name="Proprietary" Handler="Web.TPEngine.Providers.RestfulProvider, Web.TPEngine, Version=1.0.0.0, Culture=neutral, PublicKeyToken=null" />
    <Metadata>
      <Item Key="ServiceUrl">https://[Azure-Function-Hostname]/credentials</Item>
      <Item Key="AuthenticationType">None</Item>
      <Item Key="SendClaimsIn">Body</Item>
      <Item Key="AllowInsecureAuthInProduction">true</Item>
    </Metadata>
    <InputClaims>
      <InputClaim ClaimTypeReferenceId="extension_fido_rawId" PartnerClaimType="id" />
      <InputClaim ClaimTypeReferenceId="clientDataJSON" PartnerClaimType="clientDataJSON" />
      <InputClaim ClaimTypeReferenceId="attestationObject" PartnerClaimType="attestationObject" />
    </InputClaims>
    <OutputClaims>
      <OutputClaim ClaimTypeReferenceId="fido_publicKeyJwk" PartnerClaimType="publicKeyJwk" />
      <OutputClaim ClaimTypeReferenceId="extension_fido_publicKeyJwk1" PartnerClaimType="publicKeyJwk1" />
      <OutputClaim ClaimTypeReferenceId="extension_fido_publicKeyJwk2" PartnerClaimType="publicKeyJwk2" />
    </OutputClaims>
    <UseTechnicalProfileForSessionManagement ReferenceId="SM-Noop" />
  </TechnicalProfile>
Validate the returned public credentials server-side and store them in the user directory for future authentication events.
Credentials should always be validated server-side to avoid the user interfering with the validation process. By storing the FIDO claims alongside the user during the digital enrollment B2C journey, the claims will be stored in the directory entry and allow the user to authenticate in the future. Below is a snippet from the B2C policy that stores the passkey’s public component to the directory.
B2C Write FIDO Credentials
<TechnicalProfile Id="AAD-UserWriteFidoUsingObjectId">
  <Metadata>
    <Item Key="Operation">Write</Item>
    <Item Key="RaiseErrorIfClaimsPrincipalAlreadyExists">false</Item>
    <Item Key="RaiseErrorIfClaimsPrincipalDoesNotExist">true</Item>
    <Item Key="ApplicationObjectId">b8fd7628-15cf-4211-816f-6fc3b52227d0</Item>
    <Item Key="ClientId">c7d93118-32ef-4ce8-8393-a74324557e34</Item>
  </Metadata>
  <IncludeInSso>false</IncludeInSso>
  <InputClaims>
    <InputClaim ClaimTypeReferenceId="objectId" Required="true" />
  </InputClaims>
  <PersistedClaims>
    <!-- Required claims -->
    <PersistedClaim ClaimTypeReferenceId="objectId" />
    <!-- Sample: Writ FIDO claims to the user account -->
    <PersistedClaim ClaimTypeReferenceId="extension_fido_publicKeyJwk1" DefaultValue="" />
    <PersistedClaim ClaimTypeReferenceId="extension_fido_publicKeyJwk2" DefaultValue="" />
    <PersistedClaim ClaimTypeReferenceId="extension_fido_rawId" DefaultValue="" />
  </PersistedClaims>
  <IncludeTechnicalProfile ReferenceId="AAD-Common" />
</TechnicalProfile>
Support synced and device-bound credentials, evaluating tradeoffs according to organizational guidance from digital identity standards such as NIST SP 800-63-4.
Built-in browser APIs provide the abitility to provide custom configurations to specify credential options, such as username-less flows, second factors such as a PIN or biometric lock, or bound vs detachable authenticators. Below is a snippet of our configuration which used by the WebAuthn API to interact with the passkey backend.
hints: ['client-device'],
authenticatorSelection: {
    //Select authenticators that support username-less flows
    requireResidentKey: true,
    //Select authenticators that have a second factor (e.g. PIN, Bio)
    userVerification: "required",
    //Selects between bound or detachable authenticators

},
6. Implementing Re-verification workflows
To gain additional confidence in the user identity during a high-risk transaction, FIs may:
Ask customers to step-up to mDL re-verification ensuring the presented credential matches to user identity established in during identity verification.
As previously mentioned, our build stored a hash of driver’s license number and issuing authority as a claim in our IDMS. Because of this, B2C is automatically able to verify that the mDL presented during a high-risk transaction matches the credential that was used for initial registration by calculating the hash of the credential presented for re-verification and verifying it against the hash stored alongside the user in B2C. The B2C policy snippet below shows this user journey in which two steps are executed—we validate the mDL and locate the existing customer using a ClaimsExchange technical profile then issue OIDC tokens to the banking system.
Note
The verifier component plays an active role in re-presenting and validating the credential during high-risk or step-up scenarios. The credential is re-presented and verified through the verifier component (MATTR VII), and the hash comparison in Azure AD B2C is used as a binding mechanism to link the newly verified credential to the previously established identity. Refer to 2. Integrate verification capabilities into an identity management system section for a detailed description of the verifier interactions that are also implemented in this section’s flow.
<UserJourney Id="NCCoEReverification">
      <OrchestrationSteps>
          <!--mDL verification-->
        <OrchestrationStep Order="1" Type="ClaimsExchange">
          <ClaimsExchanges>
            <ClaimsExchange Id="SelfAsserted-mDLVerificationAnnexD" TechnicalProfileReferenceId="SelfAsserted-mDLVerificationAnnexD" />
          </ClaimsExchanges>
        </OrchestrationStep>

          <OrchestrationStep Order="2" Type="SendClaims" CpimIssuerTechnicalProfileReferenceId="JwtIssuer" />

      </OrchestrationSteps>
      <ClientDefinition ReferenceId="DefaultWeb" />
    </UserJourney>
Below is an example access token issued by B2C. Note the
hashedDocumentNumberAndIssuingAuthorityvalue. This is the unique, one-way hash used to verify the presented credential matches the existing one.{ "exp": 1757099740, "nbf": 1757096140, "ver": "1.0", "iss": "https://[AZURE-IDP-HOSTNAME]/aaa2bd66-63f9-49cc-a488-3cb2fe8c2785/v2.0/", "sub": "b060ab18-9265-457d-a3b5-91a011430d9b", "aud": "f3b13cbc-a9ae-4ca6-b0fc-a8b3a022b772", "acr": "b2c_1a_nccoe_registration", "iat": 1757096140, "auth_time": 1757096139, "email": "[email protected]", "verificationMethodCheckbox": "mdl", "given_name": "Name", "encrypted_cip_token": "encrypted_cip_token", "hashedDocumentNumberAndIssuingAuthority": "IQfQyeBRp+G81xWAGZW/O2kobyff7nqMW41TRlvAITc=" }
Recalculate unique identifier values using presented credential attributes and match them against existing directory records before issuing tokens.
When the mDL is presented during reverification, the one-way document number and issuing authority hash is calculated and compared to the hash stored alongside the user in B2C. If the hashes match, the reverification is a success and a token can be issued.
Review the following B2C policies in which we calculate the hash using a built-in function called a claims transformation then use the calculated value to fetch the user details.
B2C Claims Transformation
<ClaimsTransformation Id="HashDocumentNumberAndIssuingAuthority" TransformationMethod="Hash">
  <InputClaims>
    <InputClaim ClaimTypeReferenceId="documentNumberAndIssuingAuthority" TransformationClaimType="plaintext" />
    <InputClaim ClaimTypeReferenceId="mySalt" TransformationClaimType="salt" />
  </InputClaims>
  <InputParameters>
    <InputParameter Id="randomizerSecret" DataType="string" Value="B2C_1A_IdTransformSecret" />
  </InputParameters>
  <OutputClaims>
    <OutputClaim ClaimTypeReferenceId="hashedDocumentNumberAndIssuingAuthority" TransformationClaimType="hash" />
  </OutputClaims>
</ClaimsTransformation>
B2C Directory Read Operation
<TechnicalProfile Id="AAD-UserReadUsingDocumentNumber">
  <Metadata>
    <Item Key="Operation">Read</Item>
    <Item Key="RaiseErrorIfClaimsPrincipalDoesNotExist">true</Item>
  </Metadata>
  <IncludeInSso>false</IncludeInSso>
  <InputClaimsTransformations>
    <InputClaimsTransformation ReferenceId="JoinDocumentNumberAndIssuingAuthority" />
    <InputClaimsTransformation ReferenceId="HashDocumentNumberAndIssuingAuthority" />
  </InputClaimsTransformations>
  <InputClaims>
    <InputClaim ClaimTypeReferenceId="hashedDocumentNumberAndIssuingAuthority" PartnerClaimType="signInNames.hashedDocNumIssAuth" Required="true" />
  </InputClaims>
  <OutputClaims>
    <OutputClaim ClaimTypeReferenceId="objectId" />
    <OutputClaim ClaimTypeReferenceId="userPrincipalName" />
    <OutputClaim ClaimTypeReferenceId="signInNames.emailAddress" />
    <OutputClaim ClaimTypeReferenceId="hashedDocumentNumberAndIssuingAuthority" PartnerClaimType="signInNames.hashedDocNumIssAuth" />
  </OutputClaims>
  <IncludeTechnicalProfile ReferenceId="AAD-Common" />
  <UseTechnicalProfileForSessionManagement ReferenceId="SM-AAD" />
</TechnicalProfile>
7. Implement user experience considerations
To ensure a consistent and trustworthy experience:
Harmonize theming and interface styles across all application flows—verification, enrollment, authentication—so users perceive a single, coherent system.
By utilizing common CSS, similar designs can be applied to both B2C custom templates and the banking website itself to provide a coherent UI experience for the end user. In this demonstration we used Vue, a JavaScript framework for building user interfaces that builds on top of standard HTML, CSS, and JavaScript.
Use custom templates when necessary to support browser-based interactions, data entry, and credential presentation steps.
Through the use of B2C custom policies, HTML templates can be specified for use throughout the journies. This allows a high degree of flexibility when applying theming and other specific UI elements.
8. Integrate verification and authentication capabilities into a relying party application
A web-based relying party must support standards-based integration patterns provided by the IDMS. Implementers should:
Establish a common lexicon with the IDMS that conveys the user’s persistent identifier and the authentication/verification method.
The most common way to convey the user’s persistent identifier is through JSON Web Tokens (JWTs). These are commonly issued in the form of identity and access tokens, and are utilized to authenticate and authorize users. The tokens issued by B2C can be customized to fit specific use cases.
Use an extensible, widely deployed OpenID Connect software library to mediate the authentication and verification interactions between the relying party and the IDMS.
In this implementation, the banking website was developed using Laravel, and all OpenID Connect IDMS (B2C) interactions were handled using the Azure AD B2C Socialite Provider. This extensible and highly configurable authentication library transparently handled user authentication, as well as all other operations within B2C (registration, digital enrollment, and re-verification). Refer to Microsoft’s documentation to learn how to integrate your specific OpenID Connect software library.
9. Consider Wallet interoperability and configuration
The mDL project demonstrated interoperability with Android-based wallet apps from our technology partners. However, for testing purposes, we leveraged an open-source wallet to test specific scenarios. This section contains general guidelines for wallet-based testing:
Register wallet applications with platform-level credential management APIs enabling them to appear as selectable options during credential requests.
For example, on Android, the Credential Manager Holder API enables a wallet app to manage and present digital credentials to verifiers. For wallets that are invoked by custom URI schemes, applications must register with the system which URI schemes they are able to handle in the application’s manifest. This enables the wallet to appear as an option when that specific URI scheme is invoked by the system, a website, or another application. Registering for URI schemes is only doable by the application developer, not the end user, as it is part of the application’s source code.
Ensure wallets can render native, local authentication prompts to complete credential presentations securely.
We recommend selecting wallets that integrate with platform-level biometric APIs to force user biometric re-authentication prior to presenting the credential. Ideally, the credential holder is authenticated through a biometric match to either a biometric encoded in the credential or a unique template created at the time of issuance. However, this approach was not implemented in our demonstration due to technology limitations.
Configure test credentials that match expected issuer profiles and attribute formats to ensure compatibility with verification policies.
Digital credential test applications, such as CMWallet, allow high a high degree of customization of test credentials to test presentation prior to deployment. We created custom credentials by editing the existing configuration files and recompiling the app. More information can be found in the project’s repository.