Tutorial 3: Processing Data from an RGBD Camera
This tutorial shows how to use OpenCV to parse the RGB image from a camera to classify part type and color for parts in a bin.
Starting the environment for Tutorial 3
To start the enviornment, use this command:
ros2 launch ariac_gazebo ariac.launch.py competitor_pkg:=ariac_tutorials trial_name:=tutorial dev_mode:=True
Running tutorial 3
To start tutorial 3, open a new terminal and use this command:
ros2 launch ariac_tutorials tutorial.launch.py tutorial:=3
Expected output of tutorial 3
Output Visualization
When interface.display_bounding_boxes is set to True the
part detection results can be visualized with bounding boxes overlayed on the
initial image of the selected bin.
The processed images are published on /ariac/sensors/display_bounding_boxes
Use rqt to bring up an image viewer.
ros2 run rqt_image_view rqt_image_view
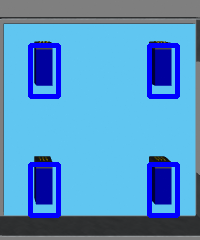
Fig. 15 Fig: Part Detection Results
Code explanation for Tutorial 3
This is the node used for tutorial 3. The functions from competition_interface.py which are used are highlighted.
#!/usr/bin/env python3
import rclpy
import threading
from rclpy.executors import MultiThreadedExecutor
from ariac_tutorials.competition_interface import CompetitionInterface
from time import sleep

def main(args=None):
    rclpy.init(args=args)
    interface = CompetitionInterface(enable_moveit=False)
    executor = MultiThreadedExecutor()
    executor.add_node(interface)

    spin_thread = threading.Thread(target=executor.spin)
    spin_thread.start()
    interface.start_competition()

    # Turns on a debug topic to visualize bounding boxes and slots
    # /ariac/sensors/display_bounding_boxes
    interface.display_bounding_boxes = True

    bin_number = 6

    interface.get_logger().info(f"Getting parts from bin {bin_number}")
    bin_parts = None

    while rclpy.ok():
        try:
            bin_parts = interface.get_bin_parts(bin_number)

            # bin_parts will be None until image processing starts
            if bin_parts is None:
                interface.get_logger().info(f"Waiting for camera images ...")
                sleep(1)
            else:
                for _slot_number, _part in bin_parts.items():
                    if _part.type is None:
                        interface.get_logger().info(f"Slot {_slot_number}: Empty")
                    else:
                        interface.get_logger().info(f"Slot {_slot_number}: {_part.color} {_part.type}")

            interface.get_logger().info(f"---")

        except KeyboardInterrupt:
            break

        sleep(0.3)

    interface.end_competition()
    interface.destroy_node()
    rclpy.shutdown()


if __name__ == '__main__':
    main()
This tutorial demonstrates how part characteristics can be extracted from image data published by the RGB cameras in ARIAC. Once the trivial steps to collect data are taken, the image processing steps can be replaced with an approach of the competitors’ choosing to extract more information from the image. Tutorial 3 contains two configurable settings: the bin number that will be checked for parts and a flag to turn on a visualization of the printed result. The output lists the type and colour of the part in each slot or states ‘Empty’ if unoccupied.
Collecting and Handling Image Data
The RBG and RGBD cameras - through the use of plugins - publish data to
multiple topics. The topic with the image matrix is
/ariac/sensors/<SENSOR_NAME>/rgb_image. Notice the QoS profile
setting. The value of this arguement is an import starting point for
troubleshooting when your subscriber appears to not receive data.
self.right_bins_RGB_camera_sub = self.create_subscription(ImageMsg,
                                                            "/ariac/sensors/right_bins_RGB_camera/rgb_image",
                                                            self._right_bins_RGB_camera_cb,
                                                            qos_profile_sensor_data,
                                                            )
self.left_bins_RGB_camera_sub = self.create_subscription(ImageMsg,
                                                            "/ariac/sensors/left_bins_RGB_camera/rgb_image",
                                                            self._left_bins_RGB_camera_cb,
                                                            qos_profile_sensor_data,
                                                            )
Camera images from sensor topics are in a ROS message format and are not
compatible with OpenCV Matrix types. The ROS2 cv_bridge package
allows for efficient conversion between image messages and OpenCV matrices.
self._bridge = CvBridge()
The most recent image from each of the subscribed sensors is stored in an
instance variable. This is done with the imgmsg_to_cv2 function.
bgr8 is the canonical OpenCV format. It is important to specify the
image encoding because the default format used by the RGB cameras is
rgb8.
def _left_bins_RGB_camera_cb(self, msg: ImageMsg):
    try:
        self._left_bins_camera_image = self._bridge.imgmsg_to_cv2(msg, "bgr8")
    except CvBridgeError as e:
        print(e)
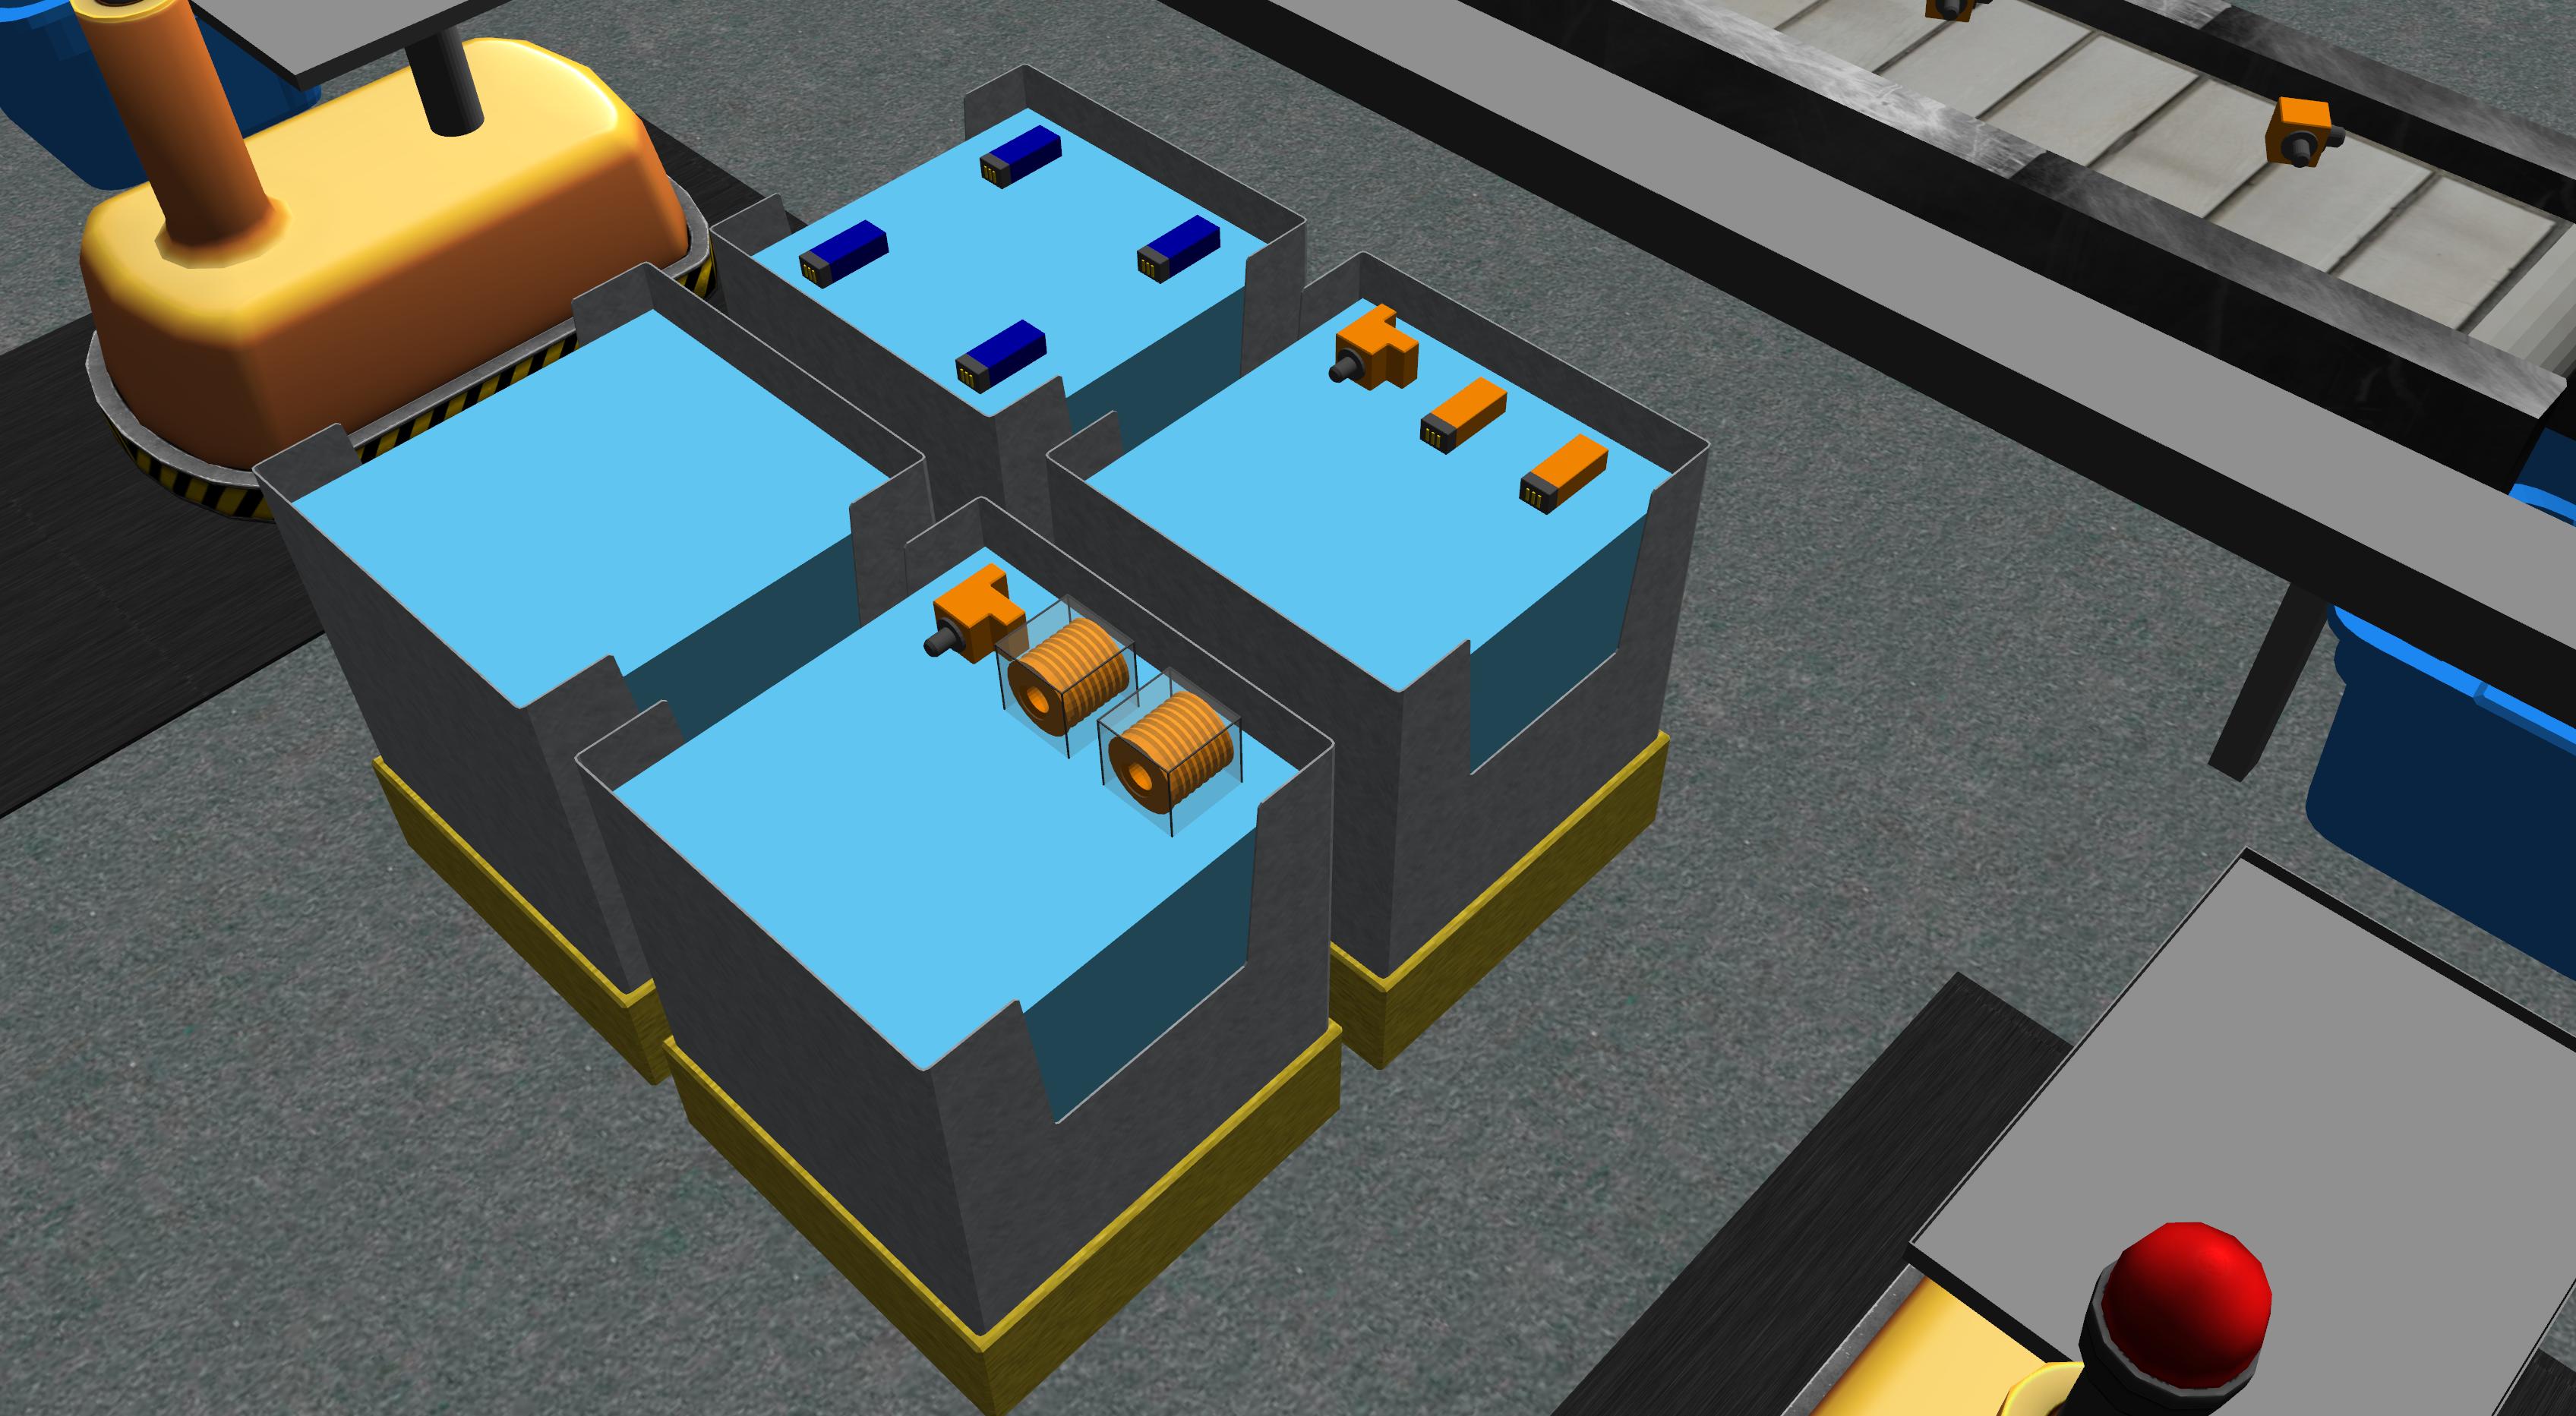
Fig. 16 Fig: Gazebo View
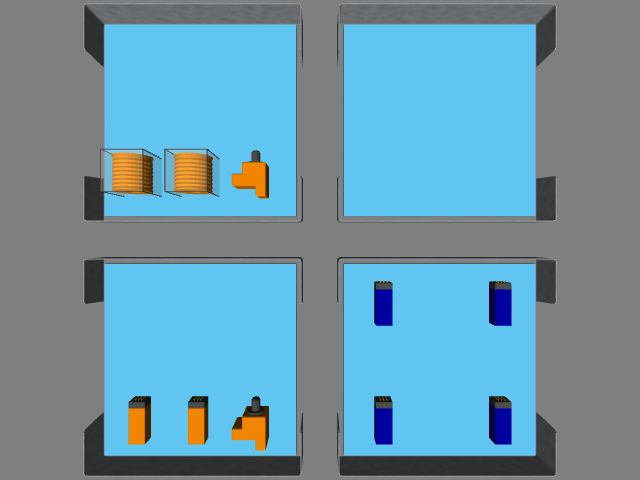
Fig. 17 Fig: Camera View
Image Processing
The goal of this stage is to take in an RGB camera image and
return a list of parts in the image. The parts should be identified by colour and
type. get_bin_parts when called, picks one of the stored images based
on the bin number argument and searches it for parts. The image is cropped for
efficiency down to the bin that is needed.
def get_bin_parts(self, bin_number: int):
    '''
    return slot occupancy list
    '''
    if type(self._left_bins_camera_image) == type(np.ndarray([])) and \
        type(self._right_bins_camera_image) == type(np.ndarray([])):
        if bin_number > 4:
            cv_img = self._left_bins_camera_image
        else:
            cv_img = self._right_bins_camera_image

        imgH, imgW = cv_img.shape[:2]

        # roi based on bin number
        if bin_number == 1 or bin_number == 6:
            # bottom left
            cv_img = cv_img[imgH//2:, (imgW//2)+20:imgW-100]
        if bin_number == 2 or bin_number == 5:
            # bottom right
            cv_img = cv_img[imgH//2:, 100:(imgW//2)-20]
        if bin_number == 3 or bin_number == 8:
            # top left
            cv_img = cv_img[:imgH//2, 100:(imgW//2)-20]
        if bin_number == 4 or bin_number == 7:
            # top right
            cv_img = cv_img[:imgH//2, (imgW//2)+20:imgW-100]
The search for parts, implemented in find_parts, does the following:
HSV Colour Masking
Template Matching (Cross Correlation)
Non-Maximum Suppression
There are 5 possible part colours and 4 possible part types. Parts are found
by inspecting the image, once for each colour-type combination. First, the
image is changed from the BGR to HSV colour space to gain some degree of lighting
invariance. To pick out parts of a chosen colour, predetermined upper and
lower bounds of the HSV values for the colour are specified to
the cv2.inRange function which masks out everything but the parts of
that colour. The colour bounds are chosen such that only the tops of the parts
are unmasked which is necessary for next step.
def find_parts(self, img):
    '''
    image processing
    '''
    # hsv masking
    imgHSV = cv2.cvtColor(img, cv2.COLOR_BGR2HSV)

    for color in self.part_poses.keys():
        for type in self.part_poses[color].keys():

            # colour filtering
            imgMask = cv2.inRange(imgHSV,
                                self.colorBound(color, "lower"),
                                self.colorBound(color, "upper"))
These values can be emperically determined. This online tool can help with tuning HSV values: Online HSV Mask Tool.
HSVcolors = {
"red"    : {"hmin":   0, "smin":  10, "vmin": 115, "hmax":   4, "smax": 255, "vmax": 255},
"green"  : {"hmin":  57, "smin":   0, "vmin":   0, "hmax":  80, "smax": 255, "vmax": 255},
"blue"   : {"hmin": 116, "smin":   0, "vmin": 134, "hmax": 121, "smax": 255, "vmax": 255},
"orange" : {"hmin":  14, "smin":   0, "vmin": 200, "hmax":  21, "smax": 255, "vmax": 255},
"purple" : {"hmin": 130, "smin": 180, "vmin": 160, "hmax": 150, "smax": 255, "vmax": 255}
}
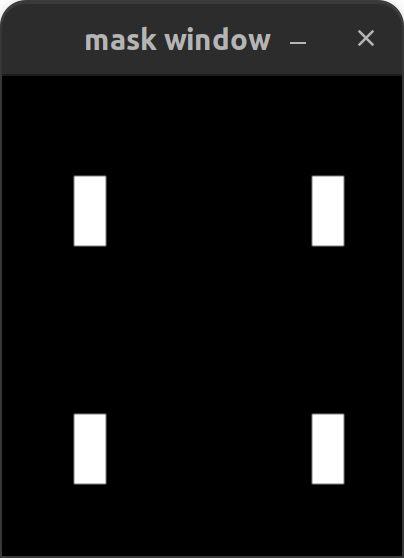
Fig. 18 Fig: Image Masking (Blue Parts)
The second step is to find the types of parts in the masked image. This is done by taking an image of a known part as template and searching the masked image for places that match the template. Since the image is an 8-bit single channel masked image, the template of the part needs to be in the same format. These images can be created and stored off-line since part appearences are not subject to change. This code snipped shows how the images are loaded when the node is initialized. Missing templates will stop normal operation.
def load_part_templates(self):
  self.sensor_template = cv2.imread(
      "install/part_detector/share/part_detector/part_detector_assets/partTemplateMasks/sensor.png", cv2.IMREAD_GRAYSCALE)
  self.regulator_template = cv2.imread(
      "install/part_detector/share/part_detector/part_detector_assets/partTemplateMasks/regulator.png", cv2.IMREAD_GRAYSCALE)
  self.battery_template = cv2.imread(
      "install/part_detector/share/part_detector/part_detector_assets/partTemplateMasks/battery.png", cv2.IMREAD_GRAYSCALE)
  self.pump_template = cv2.imread(
      "install/part_detector/share/part_detector/part_detector_assets/partTemplateMasks/pump.png", cv2.IMREAD_GRAYSCALE)

  if (not self.sensor_template.shape[0] > 0) or \
    (not self.regulator_template.shape[0] > 0) or \
    (not self.battery_template.shape[0] > 0) or \
    (not self.pump_template.shape[0] > 0):
    return False
  return True
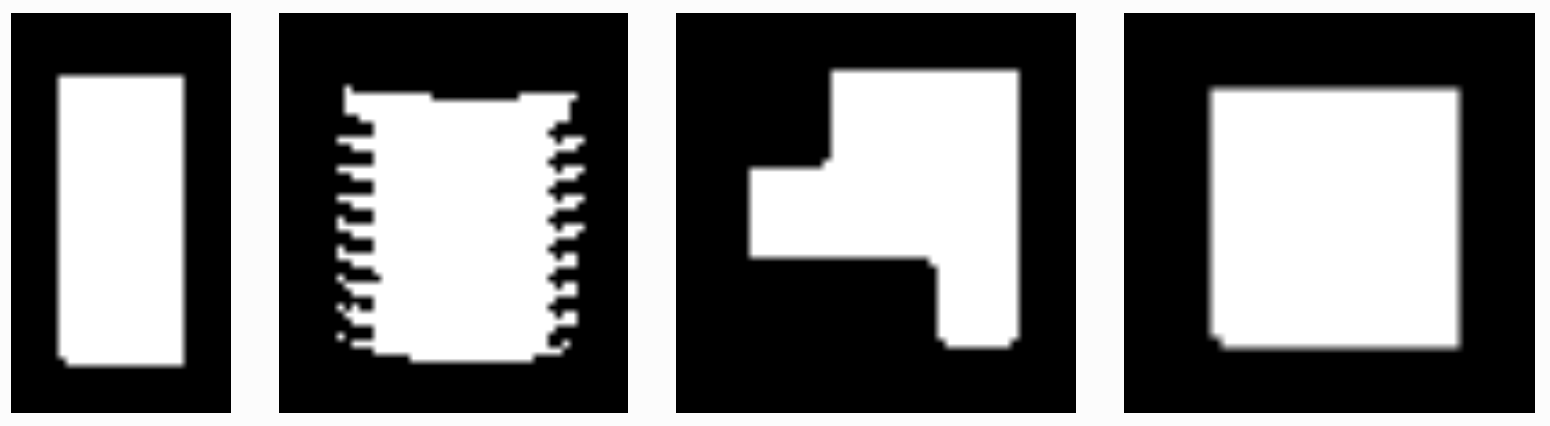
Fig. 19 Fig: Part Templates
The matchTemplate function searches the masked image
for the template. The function takes in the masked image, the queried type and
colour. The colour of the parts in the image is known at this stage but is
included to write out results. cv2.matchTemplate performs
cross-correlation of the template over the masked image and returns a
confidence map. The highest confidence values are the likely locations of parts
in the image. If the threshold is too high it causes some parts to be missed. A
low threshold results in duplicate results for the location of the same part.
Duplication is mostly solved with non maximum suppression which picks out the highest
confidence points when there are overlapping detections. The coordinates in the result
correspond to the top-left of the template at the position where the template
best matches the underlying image, in line with OpenCV’s image frame
conventions. Since it is more convenient to know the center of the part
location, the final coordinates are translated by half the template’s height
and width.
def matchTemplate(self, imgMask, color, type):
    # template matching
    if type == "pump":
        tH, tW = self.pump_template.shape#[:2]
        matchField = cv2.matchTemplate(imgMask, self.pump_template, cv2.TM_CCOEFF_NORMED)
    elif type == "battery":
        tH, tW = self.battery_template.shape#[:2]
        matchField = cv2.matchTemplate(imgMask, self.battery_template, cv2.TM_CCOEFF_NORMED)
    elif type == "sensor":
        tH, tW = self.sensor_template.shape#[:2]
        matchField = cv2.matchTemplate(imgMask, self.sensor_template, cv2.TM_CCOEFF_NORMED)
    elif type == "regulator":
        tH, tW = self.regulator_template.shape#[:2]
        matchField = cv2.matchTemplate(imgMask, self.regulator_template, cv2.TM_CCOEFF_NORMED)

    # match many
    (yy, xx) = np.where(matchField >= 0.80)

    raw_matches = []
    for (x, y) in zip(xx, yy):
        raw_matches.append((x, y, x+tW, y+tH))

    # non-max suppression
    refined_matches = []
    refined_matches = non_max_suppression(np.array(raw_matches))

    # do this once to save divisions
    htH, htW = tH//2, tW//2
    centered_refined_matches = []
    for sx, sy, _, _ in refined_matches:
        centered_refined_matches.append((sx + htW, sy + htH))

    # store results
    self.part_poses[color][type] = refined_matches
    self.centered_part_poses[color][type] = centered_refined_matches
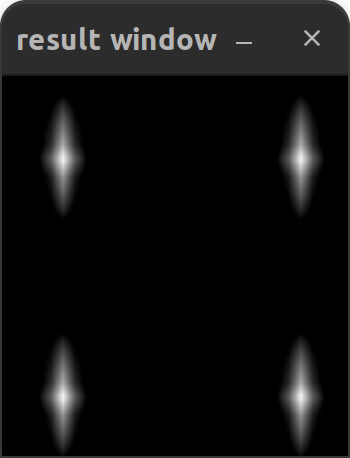
Fig. 20 Fig: Template Matching Result(Blue Parts)
The list of results of part locations are written into a dictionary that stores part locations by colour and type that is allocated when the node is initialized.
part_poses = {
    "red"    : {"battery": [], "pump": [], "sensor": [], "regulator": []},
    "green"  : {"battery": [], "pump": [], "sensor": [], "regulator": []},
    "blue"   : {"battery": [], "pump": [], "sensor": [], "regulator": []},
    "orange" : {"battery": [], "pump": [], "sensor": [], "regulator": []},
    "purple" : {"battery": [], "pump": [], "sensor": [], "regulator": []}
}
At this stage, the pose of the parts can be computed if needed. The sensor position is clearly known. The position of all the parts in the image are known, the bounds of the image’s field of view can be emperically determined and used to map the image coordinates to world coordinates.
Reporting Results
the pixels of the bin are mapped to slot numbers and each slot is assigned a part if one is present.
def output_by_slot(self):
    bin = dict([(i, PartMsg(color=None, type=None)) for i in range(1, 10)])

    for color in self.centered_part_poses.keys():
        for type in self.centered_part_poses[color].keys():
           for (csx, csy) in self.centered_part_poses[color][type]:
                row = 0
                # slot 1, 2, 3
                if csy <= 88:
                    row = 1
                # slot 7, 8, 9
                elif csy >= 151:
                    row = 3
                # slot 4, 5, 6
                else: #csy > 88 and csy < 151:
                    row = 2
                col = 0
                if csx <= 68:
                    col = 1
                elif csx >= 131:
                    col = 3
                else: # csx > 68 and csx < 131:
                    col = 2

                bin[self.slot_mapping[(row, col)]] = PartMsg(color=color, type=type)
    return bin
Warning
The image processing pipeline used for this tutorial only works for parts that are not rotated.
Warning
Pumps might not always be detected.