Configuration Files
Configuration files are described in the YAML format. YAML is a human-readable data serialization format. It is commonly used for configuration files and in applications where data is being stored or transmitted. For more information on YAML, see the YAML website.
Sensor Configuration
The sensor configuration file is defined by the competitor and describes the location of sensors added to the competition environment.
Listing 11 shows an example of a sensor configuration file with one of each of the different possible sensors.
The first field in the yaml file is robot_cameras. This is an optional field in the sensor configuration file. If this field is not present in the file, cameras will not be activated. Alternatively the active field can be used to enable or disable a camera for either robot. Last the type field should be either rgb or rgbd.
The second field in the configuration file is static_sensors. This field should contain all the static sensors that the competitor wants to add. Static sensors each have four fields:
A name (e.g.
right_bins_camera). This name has to be unique among all sensors in the same configuration file.A type (e.g.
rgb_camera). This type has to be one of the following types described in the section Static sensors.A pose defined in the world frame:
A position
xyz. This should be a list with three elements representing the x, y, and z coordinates for the sensor origin.An orientation
rpy. This should be a three element list containing the roll, pitch and yaw of the sensor using this convention . The orientation should be defined in radians using either floating-point values or with thepiconstant (pi,pi/2,pi/4, etc).
A toggle for visualizing the sensor field of view
visualize_fov. This field is optional and if not present the default isfalse.
robot_cameras:
  floor_robot_camera:
    active: true
    type: rgb

  ceiling_robot_camera:
    active: true
    type: rgbd

static_sensors:
  breakbeam_0:
    type: break_beam
    visualize_fov: true
    pose:
      xyz: [-0.35, 3, 0.95]
      rpy: [0, 0, pi]

  proximity_sensor_0:
    type: proximity
    visualize_fov: true
    pose:
      xyz: [-0.573, 2.84, 1]
      rpy: [pi/2, pi/6, pi/2]

  laser_profiler_0:
    type: laser_profiler
    visualize_fov: true
    pose:
      xyz: [-0.573, 1.486, 1.526]
      rpy: [pi/2, pi/2, 0]

  lidar_0:
    type: lidar
    visualize_fov: false
    pose:
      xyz: [-2.286, -2.96, 1.8]
      rpy: [pi, pi/2, 0]

  rgb_camera_0:
    type: rgb_camera
    visualize_fov: false
    pose:
      xyz: [-2.286, 2.96, 1.8]
      rpy: [pi, pi/2, 0]

  rgbd_camera_0:
    type: rgbd_camera
    visualize_fov: false
    pose:
      xyz: [-2.286, 4.96, 1.8]
      rpy: [pi, pi/2, 0]

  basic_logical_camera_0:
    visualize_fov: false
    type: basic_logical_camera
    pose:
      xyz: [-2.286, 2.96, 1.8]
      rpy: [pi, pi/2, 0]
Trial Configuration
The trial configuration file contains all the information that the AM uses to run a given trial. This includes part and kit tray information, orders, and challenges. Listing 12 shows an example of a trial configuration file with all of the possible fields.
Fields
time_limit, Float
The time limit is a positive floating point number that represents the number of seconds that the competitor has to complete the trial. At the end of the time limit the competition will end automatically.
kitting_trays, Dictionary
This section defines the kit trays that will be spawned onto the kit tray stations at the start of simulation.
tray_ids,List: The IDs of the all the trays to be spawned (0-9). Several trays can have the same ID.
slots,List: The slots on the kitting tray station where the trays will be spawned (kts1: 0-3, kts2: 4-6). Slots must be unique.Note
The
tray_idsandslotslists should be the same length.
assembly_inserts, Dictionary
This section defines the rotation for each of the assembly station inserts.
as{n},FloatorString: Rotation in radians of assembly insert n (1-4). Pi strings can be used.
parts, Dictionary
This section defines all the parts that will be spawned into the environment.
agvs,Dictionary: Parts that will placed directly onto the AGV at the start of the simulation. These parts are directly related to the assembly order and will be filled out automatically based on the assembly order if using the trial_generator.
agv{n},Dictionary: The AGV that will have parts (n: 1-4). Multiple agvs may have parts.
tray_id,Integer: The ID of the kitting tray (0-9) that will be placed on the AGV. Parts on AGVs should always be placed onto a kit tray.
parts,List: Parts that will be spawned on the tray.
type,String: The type of the part ('sensor','regulator','pump', or'battery').
color,String: The color of the part ('red','blue','green','orange', or'purple').
quadrant,Integer: The quadrant of the kit tray the part will be spawned onto (1-4).
rotation,FloatorString: The rotation of the part in radians. Pi strings can be used.
bins,Dictionary: Parts that will be placed into the bins at the start of the simulation.
bin{n},Dictionary: The bin that will have parts (n: 1-8). Multiple bins may have parts.
type,String: The type of the part ('sensor','regulator','pump', or'battery').
color,String: The color of the part ('red','blue','green','orange', or'purple').
rotation,FloatorString: The rotation of the part in radians. Pi strings can be used.
flipped,Boolean: Whether the part will be flipped. Iftruethe z-axis of the part will face down instead of up.
slots,List: The slots of the bin that this part can be found (1-9). Each slot should be unique for a given bin.
conveyor_belt,Dictionary: Parts that will be spawned onto the conveyor when the competition is started. The cycle of parts will be repeated after all parts are spawned, up until the competition ends.
active,Boolean: Whether the conveyor is active. This toggle is mostly used for testing to enable or disable the conveyor without removing all the parts.
spawn_rate,Integer: The time in seconds between parts spawned on the conveyor.
order,String: Either'sequential'where all parts of the same type will appear before the next type, or'random'where the parts will come out in a random order.
parts_to_spawn,Dictionary: This is a list of part lots that will be found on the conveyor.
type,String: The type of the part ('sensor','regulator','pump', or'battery').
color,String: The color of the part ('red','blue','green','orange', or'purple').
number,Integer: The number of parts spawned with the selectedtype,color,offset,flipped, androtation.
offset,Float: The position on the conveyor belt. Positive offset is further from the bins and negative offset is closer to the bins. This value should be between -1.0 and 1.0.
flipped,Boolean: Whether the part will be flipped. Iftruethe z-axis of the part will face down instead of up.
rotation,FloatorString: The rotation of the part in radians. Pi strings can be used.
orders
id,String: Unique identifier for each order. String with a length of 8 characters.
type,String: Determines the type of order. Possible values are'kitting','assembly', and'combined'.
announcement,Dictionary: Determines under what condition the order will be announced.
priority,Boolean: Determines whether the order is a regular order,false, or a high priority order,true.
task_info: The information for the task based on the ordertype. Eitherkitting_task,assembly_task, orcombined_task
kitting_task,Dictionary: This is only used iftypeis set to'kitting'.
agv_number,Integer: The agv number for the agv used in the kitting order.
tray_id,Integer: The tray ID which will be placed on the agv for the kitting order.
destination,String: The destination for the agv after all parts are placed on it. Destination should always be set towarehouse.
products,List: The list of parts to be placed on the agv for the kitting order. Maximum of four.
type,String: The type of the part ('sensor','regulator','pump', or'battery').
color,String: The color of the part ('red','blue','green','orange', or'purple').
quadrant,Integer: The quadrant of the kitting tray which the part should be placed on.
assembly_task,Dictionary: This is only used iftypeis set to'assembly'.
agv_number,List: List of agvs which will be used for the assembly order.
station,String: The assembly station where the assembly of the breifcase will take place.
products,List: The list of parts to be assembled in the breifcase. Maximum of four.
type,String: The type of the part ('sensor','regulator','pump', or'battery').
color,String: The color of the part ('red','blue','green','orange', or'purple').
assembled_pose,Dictionary: The position and orientation of the part relative to the breifcase frame.
xyz,List: A list of position coordinates of the part assembly pose relative to the breifcase frame.
rpy,List: A list of orientation values of the part assembly pose relative to the breifcase frame.
assembly_direction,List: A unit vector in the breifcase frame.
combined_task,Dictionary: This is only used iftypeis set to'combined'.
station,String: The assembly station where the assembly of the breifcase will take place.
products,List: The list of parts to be assembled in the breifcase. Maximum of four.
type,String: The type of the part ('sensor','regulator','pump', or'battery').
color,String: The color of the part ('red','blue','green','orange', or'purple').
assembled_pose,Dictionary: The position and orientation of the part relative to the breifcase frame.
xyz,List: A list of position coordinates of the part assembly pose relative to the breifcase frame.
rpy,List: A list of orientation values of the part assembly pose relative to the breifcase frame.
assembly_direction,List: A unit vector in the breifcase frame.
challenges
dropped_part,Dictionary: Adds a dropped part challenge to the environment.
robot,String: Determines which robot will drop the part. Options are'floor_robot'or'ceiling_robot'.
type,String: Determines the type of part that will be dropped ('sensor','regulator','pump', or'battery').
color,String: Determines the color of part that will be dropped ('red','blue','green','orange', or'purple').
drop_after,Integer: Determines the index of the part to drop after. For example, ifdrop_afteris set to 2, the 3rd part the robot successfully picks will be dropped.
delay,Float: Drops the part after the specified delay.
robot_malfunction,Dictionary: Adds a robot malfunction challenge to the environment.
duration,Float: Determines how long the robot malfunction will last.
robots_to_disable,List: List of robots that can be disabled. Options are'floor_robot'or'ceiling_robot'.
announcement: One of the three announcement conditions
time_condition,Float: After this amount of time has passed, the specified robot(s) will malfunction.
part_place_condition,Dictionary: The robot malfunction starts after a part of a specific type and color is placed on a specified agv.
type,String: The type of the part ('sensor','regulator','pump', or'battery').
color,String: The color of the part ('red','blue','green','orange', or'purple').
agv,Integer: The agv number for the part place condition.
submission_condition: The robot malfunction will begin after the specified order has been submitted.
order_id,String: ID of the order for the submission_condition. The robot malfunction will begin once the order associated with this order ID is submitted.
sensor_blackout,Dictionary: Adds a sensor blackout challenge to the environment.
duration,Float: Determines how long the sensor blackout will last.
sensors_to_disable,List: List of sensors which will be disabled. Options are'break_beam','proximity','laser_profiler','lidar','camera', and'logical_camera'
announcement: One of the three announcement conditions. See above.
faulty_part,Dictionary: Adds a faulty part challenge to the environment.
order_id,String: Specifies the order where the selected quadrants will have faulty parts at first. If faulty parts are removed and replaced with new parts, the new parts will be non-faulty.
quadrant{n},Bool: Specifies if quadrantnhas a faulty part or not. For example, ifquadrant1is set to true, any first part placed in quadrant 1 is faulty.
  1# Trial name: example.yaml
  2# ARIAC2024
  3# Author: Justin Albrecht
  4# 2024-01-03 14:23:37
  5
  6# ENVIRONMENT SETUP
  7
  8time_limit: 500
  9
 10# KITTING TRAYS
 11
 12kitting_trays:
 13  tray_ids:
 14  - 2
 15  - 2
 16  - 2
 17  - 4
 18  - 4
 19  - 4
 20  slots:
 21  - 1
 22  - 2
 23  - 3
 24  - 4
 25  - 5
 26  - 6
 27
 28# INSERT ROTATION
 29
 30assembly_inserts:
 31  as1: pi/3
 32  as2: -pi/4
 33  as3: 0.0
 34  as4: pi/2
 35
 36# PARTS INFORMATION
 37
 38parts:
 39  agvs:
 40    agv2:
 41      tray_id: 0
 42      parts:
 43      - type: sensor
 44        color: blue
 45        quadrant: 1
 46        rotation: 0.0
 47      - type: pump
 48        color: blue
 49        quadrant: 2
 50        rotation: 0.0
 51      - type: regulator
 52        color: blue
 53        quadrant: 3
 54        rotation: 0.0
 55      - type: battery
 56        color: blue
 57        quadrant: 4
 58        rotation: 0.0
 59  bins:
 60    bin1:
 61    - type: sensor
 62      color: green
 63      rotation: pi/4
 64      flipped: false
 65      slots:
 66      - 1
 67      - 3
 68      - 7
 69      - 9
 70    bin2:
 71    - type: pump
 72      color: purple
 73      rotation: 0.0
 74      flipped: false
 75      slots:
 76      - 1
 77      - 3
 78      - 7
 79      - 9
 80    bin5:
 81    - type: battery
 82      color: orange
 83      rotation: 0.0
 84      flipped: true
 85      slots:
 86      - 2
 87      - 4
 88      - 6
 89      - 8
 90    bin6:
 91    - type: regulator
 92      color: blue
 93      rotation: -pi
 94      flipped: false
 95      slots:
 96      - 2
 97      - 4
 98      - 6
 99      - 8
100  conveyor_belt:
101    active: true
102    spawn_rate: 3.0
103    order: random
104    parts_to_spawn:
105    - type: sensor
106      color: orange
107      number: 3
108      offset: 0.2
109      flipped: false
110      rotation: pi/3
111    - type: battery
112      color: red
113      number: 5
114      offset: 0.0
115      flipped: true
116      rotation: 0.0
117
118# ORDERS INFORMATION
119
120orders:
121- id: E414303S
122  type: kitting
123  announcement:
124    time_condition: 0.0
125  priority: false
126  kitting_task:
127    agv_number: 1
128    tray_id: 2
129    destination: warehouse
130    products:
131    - type: sensor
132      color: green
133      quadrant: 1
134    - type: battery
135      color: red
136      quadrant: 2
137    - type: pump
138      color: purple
139      quadrant: 4
140- id: YTDIGV7W
141  type: assembly
142  announcement:
143    submission_condition:
144      order_id: E414303S
145  priority: false
146  assembly_task:
147    agv_number:
148    - 2
149    station: as1
150    products:
151    - type: sensor
152      color: blue
153      assembled_pose:
154        xyz:
155        - -0.1
156        - 0.395
157        - 0.045
158        rpy:
159        - 0
160        - 0
161        - -pi/2
162      assembly_direction:
163      - 0
164      - -1
165      - 0
166    - type: pump
167      color: blue
168      assembled_pose:
169        xyz:
170        - 0.14
171        - 0.0
172        - 0.02
173        rpy:
174        - 0
175        - 0
176        - -pi/2
177      assembly_direction:
178      - 0
179      - 0
180      - -1
181    - type: regulator
182      color: blue
183      assembled_pose:
184        xyz:
185        - 0.175
186        - -0.223
187        - 0.215
188        rpy:
189        - pi/2
190        - 0
191        - -pi/2
192      assembly_direction:
193      - 0
194      - 0
195      - -1
196    - type: battery
197      color: blue
198      assembled_pose:
199        xyz:
200        - -0.15
201        - 0.035
202        - 0.043
203        rpy:
204        - 0
205        - 0
206        - pi/2
207      assembly_direction:
208      - 0
209      - 1
210      - 0
211- id: 7JADKH4U
212  type: combined
213  announcement:
214    part_place_condition:
215      color: purple
216      type: pump
217      agv: 1
218  priority: true
219  combined_task:
220    station: as3
221    products:
222    - type: regulator
223      color: blue
224      assembled_pose:
225        xyz:
226        - 0.175
227        - -0.223
228        - 0.215
229        rpy:
230        - pi/2
231        - 0
232        - -pi/2
233      assembly_direction:
234      - 0
235      - 0
236      - -1
237    - type: sensor
238      color: orange
239      assembled_pose:
240        xyz:
241        - -0.1
242        - 0.395
243        - 0.045
244        rpy:
245        - 0
246        - 0
247        - -pi/2
248      assembly_direction:
249      - 0
250      - -1
251      - 0
252
253# CHALLENGES INFORMATION
254
255challenges:
256- dropped_part:
257    robot: floor_robot
258    type: regulator
259    color: blue
260    drop_after: 0
261    delay: 0.5
262- robot_malfunction:
263    duration: 20.0
264    robots_to_disable:
265    - floor_robot
266    submission_condition:
267      order_id: 7JADKH4U
268- sensor_blackout:
269    duration: 20.0
270    sensors_to_disable:
271    - logical_camera
272    - camera
273    time_condition: 100.0
274- faulty_part:
275    order_id: E414303S
276    quadrant1: true
Trial Generator GUI
Instructions to Start the Trial Generator
To run the ARIAC configuration GUI, first, install the dependencies with
cd ~/ariac_ws && pip install -r src/ARIAC/ariac_gui/requirements.txt
After the dependencies are installed, run the GUI with
ros2 run ariac_gui trial_generator
Start-Up Menu
The first menu of the GUI gives two options. A new file can be created or an existing file can be loaded in and edited. When a file is loaded in, the GUI will be opened as usual, but all of the options will be loaded with those from the configuration file selected.

Fig. 2 File Creation Menu
Setup Tab
The first tab of the GUI lets you edit the header of the configuration file. This includes the time limit, the trial name, and the name of the author.
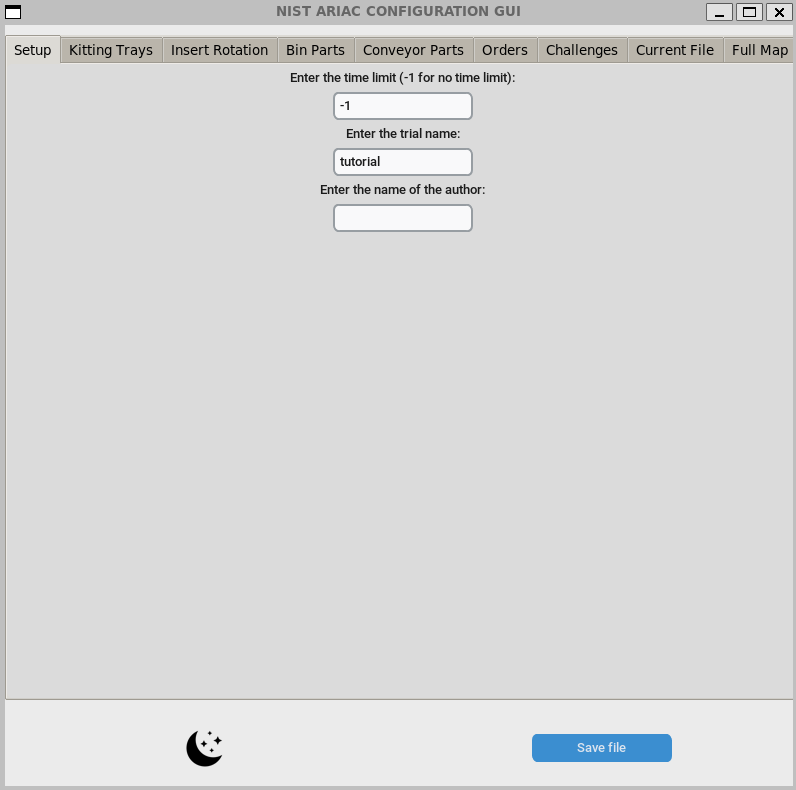
Fig. 3 Setup Menu
Kitting Trays Tab
The second tab is the kitting trays menu. This menu lets you choose the kitting tray in each of the slots. When a kitting tray is selected, the kitting tray with the correct fiducial tag appears on the tables in the GUI.
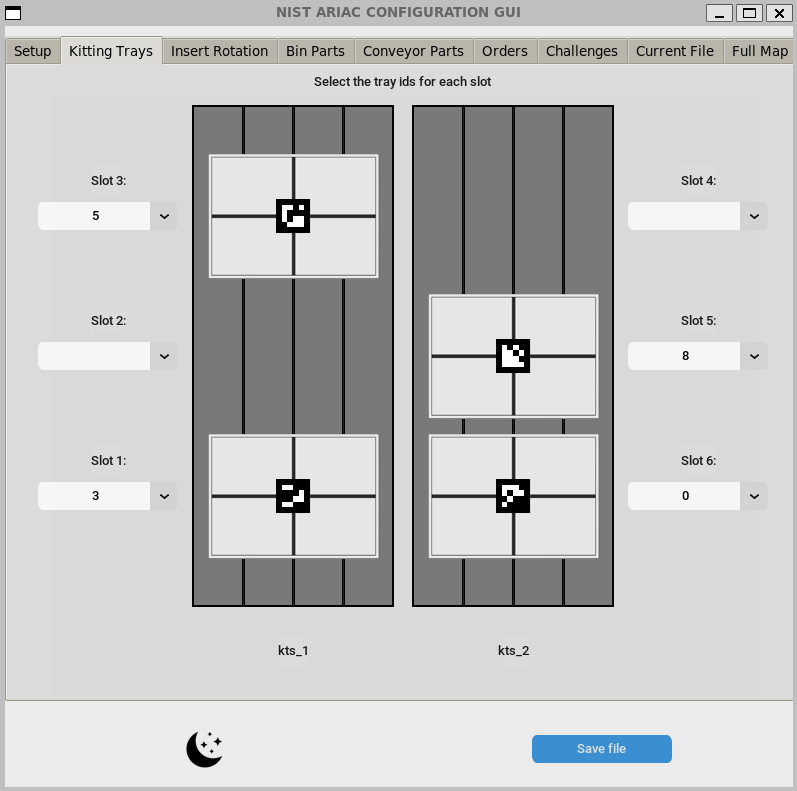
Fig. 4 Kitting Trays Menu
Assembly Insert Rotation Tab
The third tab is the assembly insert rotation menu. At first, as long as a file with non-zero assembly insert rotations is not loaded in, this menu will be a button which states that all the inserts are currently set to 0.0.
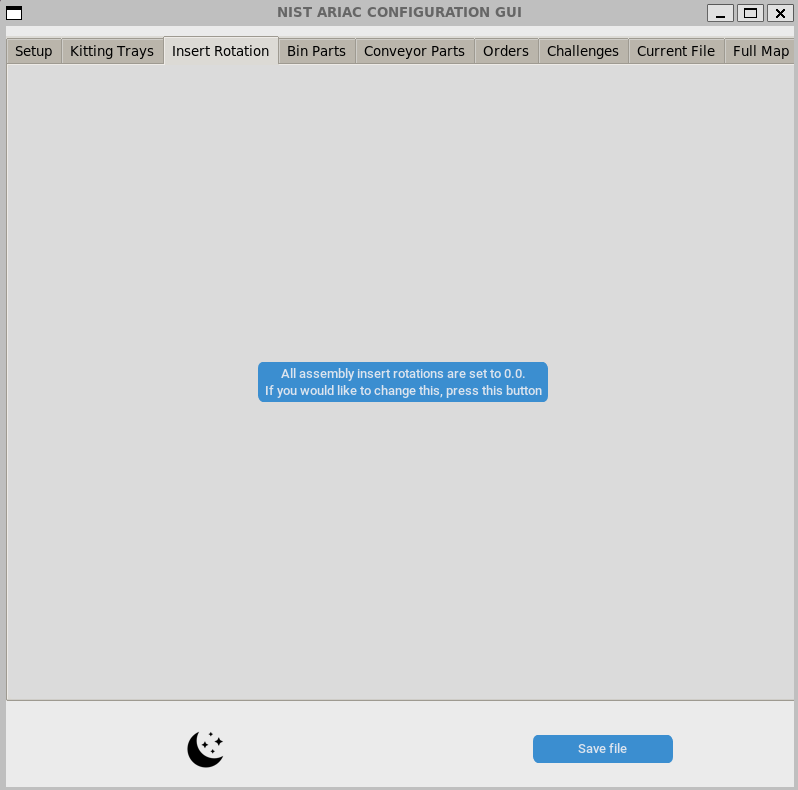
Fig. 5 Assembly Inserts Initial Menu
If this needs to be changed, press the button and four sliders appear, which allow you to change the rotation of each of the inserts.

Fig. 6 Assembly Inserts Slider Menu
Bin Parts Tab
The fourth tab is the bin parts menu. At the top of this menu, there is a dropdown menu which changes the bin being edited. On the left half of this menu, a diagram of the bin shows up with each slot acting as a button. If there is a part there, the button will be an figure of the part with the correct rotation. Clicking on a part allows it to be edited. If there is no part there, the button will be a plus sign. If this button is clicked, the add part menu will appear.
On the right half of the menu, is a minimap which shows each of the bins. The one currently being edited will show up in blue and the others will be white. This minimap also shows the parts currently on each bin. Under the diagram and the minimap, there are two buttons. The top button allows for multiple parts to be added at the same time. The second button clears the selected bin.
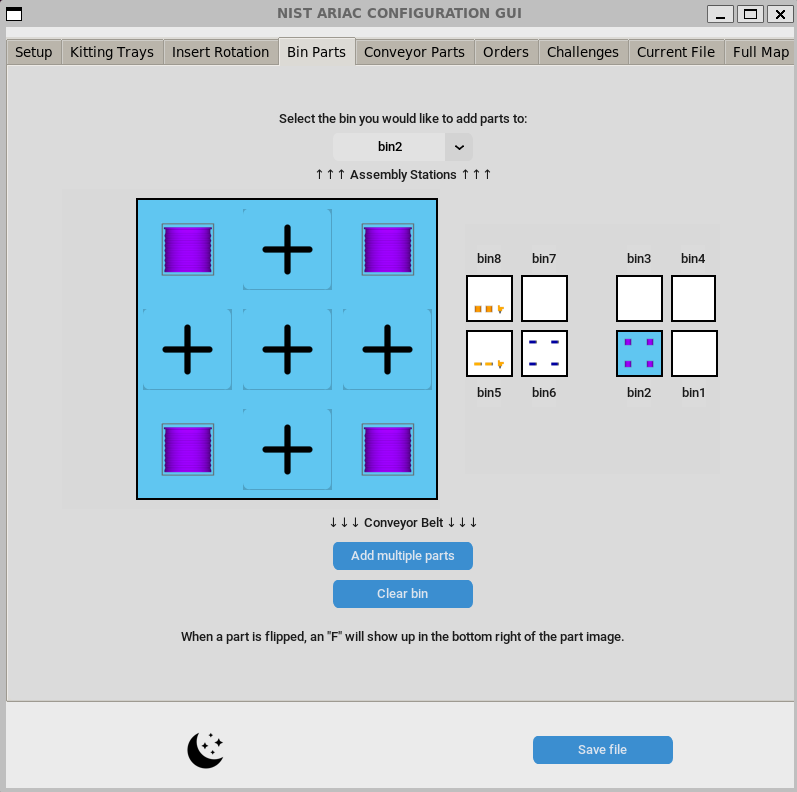
Fig. 7 Bins Menu
Conveyor Parts Tab
The fifth tab is the conveyor parts menu. The top half of this menu has the basic conveyor settings, like spawn rate and whether the order is random or sequential. Under these options, there is an add part lot button, which adds parts to the conveyor belt. Under these settings, there is a scrollable sub-window with a list of the part lots currently on the conveyor belt. This list has buttons where the part lots can be edited or deleted.
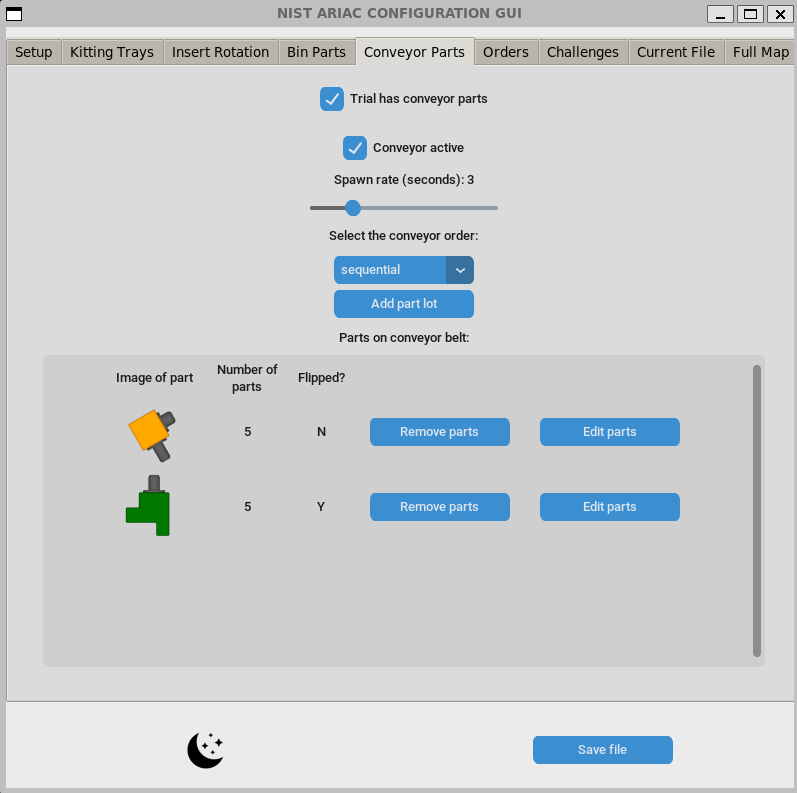
Fig. 8 Conveyor Parts Menu
Orders Tab
The sixth tab is the orders menu. There are three main buttons in this menu, the “Add kitting order”, “Add assembly order”, and “Add combined order”. If any orders have already been created, a menu will show up under these buttons with edit and delete buttons. If no kitting trays have been selected, the GUI will not be able to create a kitting order.
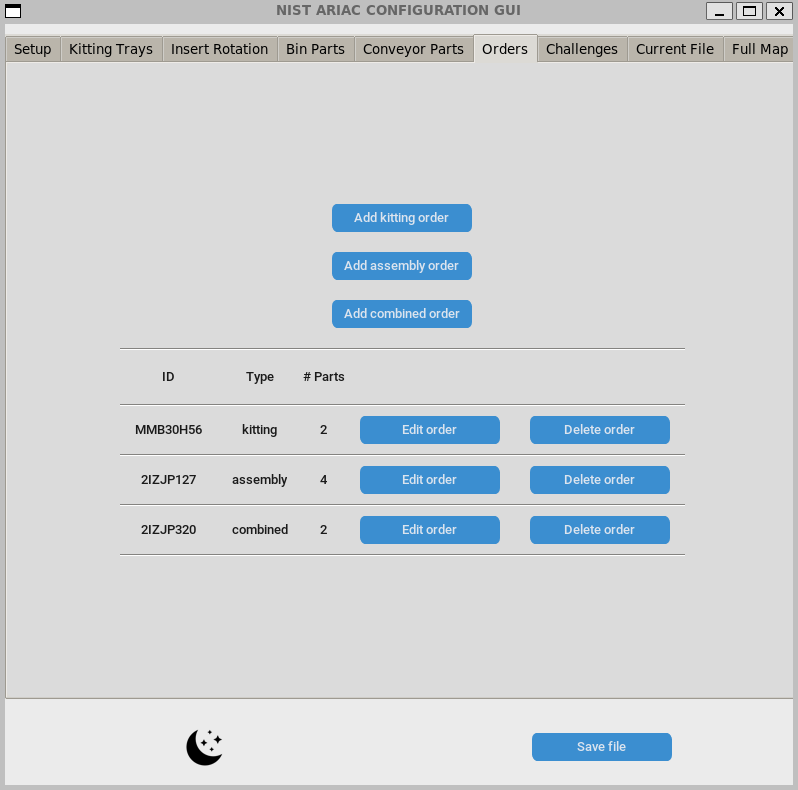
Fig. 9 Orders Menu
Challenges Tab
The seventh tab is the challenges menu. This menu can add any of the challenges available in the configuration file. Once challenges are made, they appear in a scrollable sub-window with edit and delete buttons for each of the challenges.
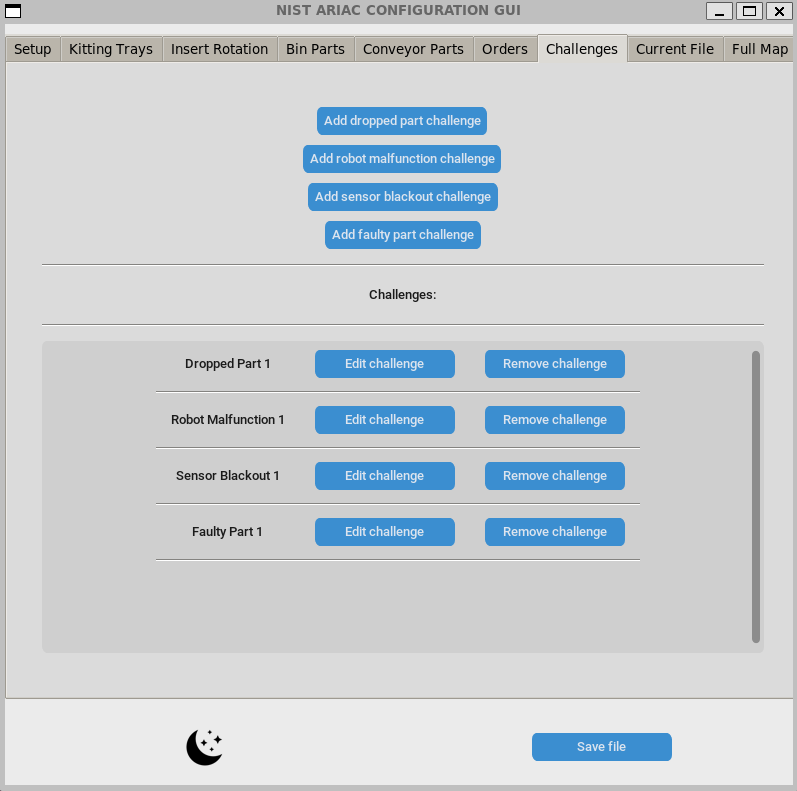
Fig. 10 Challenges Menu
Current File Tab
The eighth tab shows the current file in yaml format. This is updated live any time a change is made.

Fig. 11 Current File Tab
Map Tab
The final tab is a map of the environment which shows each every part present on the AGVs, bins, and conveyor belt. It also shows the rotation of the assembly stations. To show the conveyor belt parts, set the “Show conveyor_parts” checkbox to true. The parts will move across the conveyor belt. Any time a part is added, edited, or deleted on the conveyor belt, the checkbox will automatically turn off.
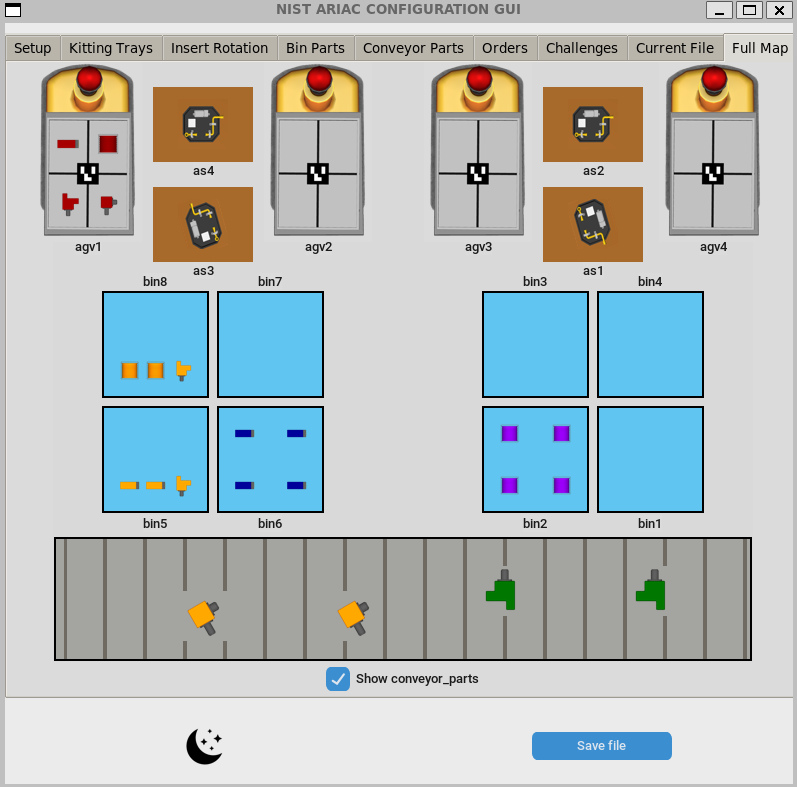
Fig. 12 Full Map
Save Menu
To save the file, press the “Save file” button in the bottom left. If you loaded in a file at the beginning, you will be asked if you want to overwrite that file.

Fig. 13 Overwrite Menu
Otherwise, a file saving menu will appear.

Fig. 14 Save File Menu